Ricoh Aficio SP 5210SR Copy Reference - Page 160
Specifying a user name
 |
View all Ricoh Aficio SP 5210SR manuals
Add to My Manuals
Save this manual to your list of manuals |
Page 160 highlights
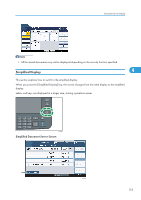
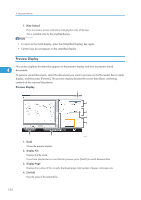
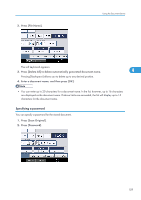
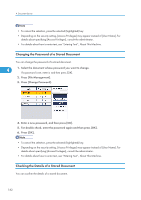
4. Document Server • After scanning, a list of stored documents will be displayed. If the list does not appear, press [Finish Scanning]. • Data stored in the Document Server is set to be deleted after three days (72 hours) by the factory default. You can specify the period after which the stored data is deleted automatically under Auto Delete File in Document Server in User Tools. See "System Settings", Network and System Settings Reference. • If you do not want stored documents to be automatically deleted, select [Off] in Auto Delete File in Document Server before storing a document. If you select [On] later, data stored after will be automatically deleted. • When storing another document in the Document Server after storing a document from the copy feature, be sure that its copy is completed. 4 • Depending on the security setting, [Access Privileges] may appear instead of [User Name]. For details about specifying [Access Privileges], consult the administrator. • For details about how to enter text, see "Entering Text", About This Machine. Specifying a user name You can specify a user name for the stored file. 1. Press [Scan Original]. 2. Press [User Name]. A list of user names appears. 3. Select a user name, and then press [OK]. The user names shown are names that were registered in the Address Book. To specify a name not shown in the display, press [Manual Entry], and then enter a user name. Specifying a file name You can change the name of a stored document. 1. Press [Scan Original]. 158
-
 1
1 -
2
-
3
-
4
-
5
-
6
-
7
-
8
-
9
-
10
-
11
-
12
-
13
-
14
-
15
-
16
-
17
-
18
-
19
-
20
-
21
-
22
-
23
-
24
-
25
-
26
-
27
-
28
-
29
-
30
-
31
-
32
-
33
-
34
-
35
-
36
-
37
-
38
-
39
-
40
-
41
-
42
-
43
-
44
-
45
-
46
-
47
-
48
-
49
-
50
-
51
-
52
-
53
-
54
-
55
-
56
-
57
-
58
-
59
-
60
-
61
-
62
-
63
-
64
-
65
-
66
-
67
-
68
-
69
-
70
-
71
-
72
-
73
-
74
-
75
-
76
-
77
-
78
-
79
-
80
-
81
-
82
-
83
-
84
-
85
-
86
-
87
-
88
-
89
-
90
-
91
-
92
-
93
-
94
-
95
-
96
-
97
-
98
-
99
-
100
-
101
-
102
-
103
-
104
-
105
-
106
-
107
-
108
-
109
-
110
-
111
-
112
-
113
-
114
-
115
-
116
-
117
-
118
-
119
-
120
-
121
-
122
-
123
-
124
-
125
-
126
-
127
-
128
-
129
-
130
-
131
-
132
-
133
-
134
-
135
-
136
-
137
-
138
-
139
-
140
-
141
-
142
-
143
-
144
-
145
-
146
-
147
-
148
-
149
-
150
-
151
-
152
-
153
-
154
-
 155
155 -
 156
156 -
 157
157 -
 158
158 -
 159
159 -
 160
160 -
 161
161 -
 162
162 -
 163
163 -
 164
164 -
 165
165 -
166
-
167
-
168
-
169
-
170
-
171
-
172
-
173
-
174
-
175
-
176
-
177
-
178
-
179
-
180
-
181
-
182
-
183
-
184
-
185
-
186
-
187
-
188
-
189
-
190
-
191
-
192
-
193
-
194
-
195
-
196
-
197
-
198
-
199
-
200
-
201
-
202
-
203
-
204
-
205
-
206
-
207
-
208
 |
 |
