Ricoh Aficio SP 5210SR Copy Reference - Page 60
Specifications for the Main Unit, About This Machine., Sided] or [2 Sided
 |
View all Ricoh Aficio SP 5210SR manuals
Add to My Manuals
Save this manual to your list of manuals |
Page 60 highlights
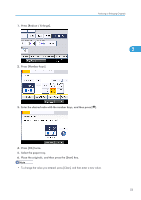
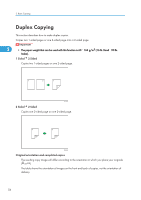
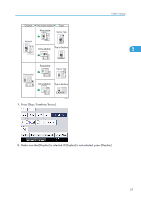
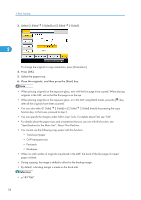
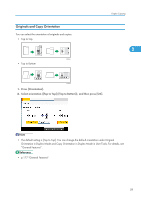
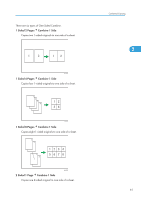
2. Basic Copying 3. Select [1 Sided 2 Sided] or [2 Sided 2 Sided]. 2 To change the original or copy orientation, press [Orientation]. 4. Press [OK]. 5. Select the paper tray. 6. Place the originals, and then press the [Start] key. • When placing originals on the exposure glass, start with the first page to be copied. When placing originals in the ADF, set so that the first page is on the top. • When placing originals on the exposure glass, or in the ADF using Batch mode, press the [ ] key after all the originals have been scanned. • You can also select [1 Sided 2 Sided] or [2 Sided 2 Sided] directly by pressing the copy function key. In that case, proceed to step 5. • You can specify the margins under Edit in User Tools. For details about Edit, see "Edit". • For details about the paper sizes and orientations that you can use with this function, see "Specifications for the Main Unit", About This Machine. • You cannot use the following copy paper with this function: • Translucent paper • OHP transparencies • Postcards • Envelopes • When an odd number of originals are placed in the ADF, the back of the last page of copied paper is blank. • During copying, the image is shifted to allow for the binding margin. • By default, a binding margin is made on the back side. • p.183 "Edit" 58
-
 1
1 -
2
-
3
-
4
-
5
-
6
-
7
-
8
-
9
-
10
-
11
-
12
-
13
-
14
-
15
-
16
-
17
-
18
-
19
-
20
-
21
-
22
-
23
-
24
-
25
-
26
-
27
-
28
-
29
-
30
-
31
-
32
-
33
-
34
-
35
-
36
-
37
-
38
-
39
-
40
-
41
-
42
-
43
-
44
-
45
-
46
-
47
-
48
-
49
-
50
-
51
-
52
-
53
-
54
-
 55
55 -
 56
56 -
 57
57 -
 58
58 -
 59
59 -
 60
60 -
 61
61 -
 62
62 -
 63
63 -
 64
64 -
 65
65 -
66
-
67
-
68
-
69
-
70
-
71
-
72
-
73
-
74
-
75
-
76
-
77
-
78
-
79
-
80
-
81
-
82
-
83
-
84
-
85
-
86
-
87
-
88
-
89
-
90
-
91
-
92
-
93
-
94
-
95
-
96
-
97
-
98
-
99
-
100
-
101
-
102
-
103
-
104
-
105
-
106
-
107
-
108
-
109
-
110
-
111
-
112
-
113
-
114
-
115
-
116
-
117
-
118
-
119
-
120
-
121
-
122
-
123
-
124
-
125
-
126
-
127
-
128
-
129
-
130
-
131
-
132
-
133
-
134
-
135
-
136
-
137
-
138
-
139
-
140
-
141
-
142
-
143
-
144
-
145
-
146
-
147
-
148
-
149
-
150
-
151
-
152
-
153
-
154
-
155
-
156
-
157
-
158
-
159
-
160
-
161
-
162
-
163
-
164
-
165
-
166
-
167
-
168
-
169
-
170
-
171
-
172
-
173
-
174
-
175
-
176
-
177
-
178
-
179
-
180
-
181
-
182
-
183
-
184
-
185
-
186
-
187
-
188
-
189
-
190
-
191
-
192
-
193
-
194
-
195
-
196
-
197
-
198
-
199
-
200
-
201
-
202
-
203
-
204
-
205
-
206
-
207
-
208
 |
 |
