Ricoh Aficio SP 5210SR Copy Reference - Page 37
Copying onto Envelopes from Trays 1 - 4, p.78 Managing Jobs
 |
View all Ricoh Aficio SP 5210SR manuals
Add to My Manuals
Save this manual to your list of manuals |
Page 37 highlights
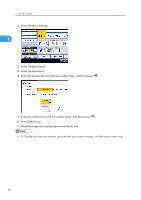
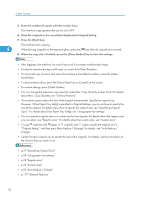
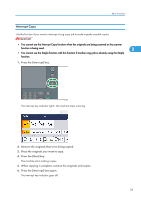
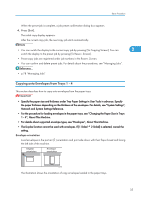
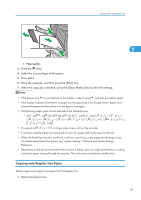
Basic Procedure When the preset job is complete, a job preset confirmation dialog box appears. 4. Press [Exit]. The initial copy display appears. After the current copy job, the next copy job starts automatically. • You can switch the display to the current copy job by pressing [To Copying Screen]. You can 2 switch the display to the preset job by pressing [To Reserv. Screen]. • Preset copy jobs are registered under job numbers in the Reserv. Screen. • You can confirm and delete preset jobs. For details about the procedures, see "Managing Jobs". • p.78 "Managing Jobs" Copying onto Envelopes from Trays 1 - 4 This section describes how to copy onto envelopes from the paper trays. • Specify the paper size and thickness under Tray Paper Settings in User Tools in advance. Specify the paper thickness depending on the thickness of the envelopes. For details, see "System Settings", Network and System Settings Reference. • For the procedure for loading envelopes in the paper trays, see "Changing the Paper Size in Trays 1 - 4", About This Machine. • For details about supported envelope types, see "Envelopes", About This Machine. • The Duplex function cannot be used with envelopes. If [1 Sided 2 Sided] is selected, cancel the setting. Envelope orientation Load envelopes in the portrait ( ) orientation and print side down with their flaps closed and facing the left side of the machine. Original orientation Envelope orientation CFG018 The illustration shows the orientation of copy envelopes loaded in the paper trays. 35
-
 1
1 -
2
-
3
-
4
-
5
-
6
-
7
-
8
-
9
-
10
-
11
-
12
-
13
-
14
-
15
-
16
-
17
-
18
-
19
-
20
-
21
-
22
-
23
-
24
-
25
-
26
-
27
-
28
-
29
-
30
-
31
-
 32
32 -
 33
33 -
 34
34 -
 35
35 -
 36
36 -
 37
37 -
 38
38 -
 39
39 -
 40
40 -
 41
41 -
 42
42 -
43
-
44
-
45
-
46
-
47
-
48
-
49
-
50
-
51
-
52
-
53
-
54
-
55
-
56
-
57
-
58
-
59
-
60
-
61
-
62
-
63
-
64
-
65
-
66
-
67
-
68
-
69
-
70
-
71
-
72
-
73
-
74
-
75
-
76
-
77
-
78
-
79
-
80
-
81
-
82
-
83
-
84
-
85
-
86
-
87
-
88
-
89
-
90
-
91
-
92
-
93
-
94
-
95
-
96
-
97
-
98
-
99
-
100
-
101
-
102
-
103
-
104
-
105
-
106
-
107
-
108
-
109
-
110
-
111
-
112
-
113
-
114
-
115
-
116
-
117
-
118
-
119
-
120
-
121
-
122
-
123
-
124
-
125
-
126
-
127
-
128
-
129
-
130
-
131
-
132
-
133
-
134
-
135
-
136
-
137
-
138
-
139
-
140
-
141
-
142
-
143
-
144
-
145
-
146
-
147
-
148
-
149
-
150
-
151
-
152
-
153
-
154
-
155
-
156
-
157
-
158
-
159
-
160
-
161
-
162
-
163
-
164
-
165
-
166
-
167
-
168
-
169
-
170
-
171
-
172
-
173
-
174
-
175
-
176
-
177
-
178
-
179
-
180
-
181
-
182
-
183
-
184
-
185
-
186
-
187
-
188
-
189
-
190
-
191
-
192
-
193
-
194
-
195
-
196
-
197
-
198
-
199
-
200
-
201
-
202
-
203
-
204
-
205
-
206
-
207
-
208
 |
 |
