Ricoh SP C250DN Operating Instructions - Page 133
Take the new print cartridge out of the box, and then take it out of the plastic bag.
 |
View all Ricoh SP C250DN manuals
Add to My Manuals
Save this manual to your list of manuals |
Page 133 highlights
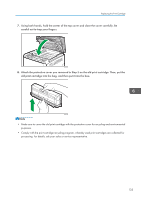
Replacing the Print Cartridge 1. Pull up the lever on the top cover, and then carefully raise the top cover. DAC477 2. Carefully lift out the print cartridge vertically, holding its center. From the rear, the print cartridges are installed in the order of cyan (C), magenta (M), yellow (Y), and black (K). DAC040 • Do not shake the removed print cartridge. Doing so can cause remaining toner to leak. • Place the old print cartridge on paper or similar material to avoid dirtying your workspace. • The toner color is indicated by the label on each print cartridge. 3. Take the new print cartridge out of the box, and then take it out of the plastic bag. DAC036 131
-
 1
1 -
2
-
3
-
4
-
5
-
6
-
7
-
8
-
9
-
10
-
11
-
12
-
13
-
14
-
15
-
16
-
17
-
18
-
19
-
20
-
21
-
22
-
23
-
24
-
25
-
26
-
27
-
28
-
29
-
30
-
31
-
32
-
33
-
34
-
35
-
36
-
37
-
38
-
39
-
40
-
41
-
42
-
43
-
44
-
45
-
46
-
47
-
48
-
49
-
50
-
51
-
52
-
53
-
54
-
55
-
56
-
57
-
58
-
59
-
60
-
61
-
62
-
63
-
64
-
65
-
66
-
67
-
68
-
69
-
70
-
71
-
72
-
73
-
74
-
75
-
76
-
77
-
78
-
79
-
80
-
81
-
82
-
83
-
84
-
85
-
86
-
87
-
88
-
89
-
90
-
91
-
92
-
93
-
94
-
95
-
96
-
97
-
98
-
99
-
100
-
101
-
102
-
103
-
104
-
105
-
106
-
107
-
108
-
109
-
110
-
111
-
112
-
113
-
114
-
115
-
116
-
117
-
118
-
119
-
120
-
121
-
122
-
123
-
124
-
125
-
126
-
127
-
 128
128 -
 129
129 -
 130
130 -
 131
131 -
 132
132 -
 133
133 -
 134
134 -
 135
135 -
 136
136 -
 137
137 -
 138
138 -
139
-
140
-
141
-
142
-
143
-
144
-
145
-
146
-
147
-
148
-
149
-
150
-
151
-
152
-
153
-
154
-
155
-
156
-
157
-
158
-
159
-
160
-
161
-
162
-
163
-
164
-
165
-
166
-
167
-
168
-
169
-
170
-
171
-
172
-
173
-
174
-
175
-
176
-
177
-
178
-
179
-
180
-
181
-
182
-
183
-
184
-
185
-
186
-
187
-
188
-
189
-
190
-
191
-
192
-
193
-
194
-
195
-
196
-
197
-
198
-
199
-
200
-
201
-
202
-
203
-
204
-
205
-
206
-
207
-
208
 |
 |
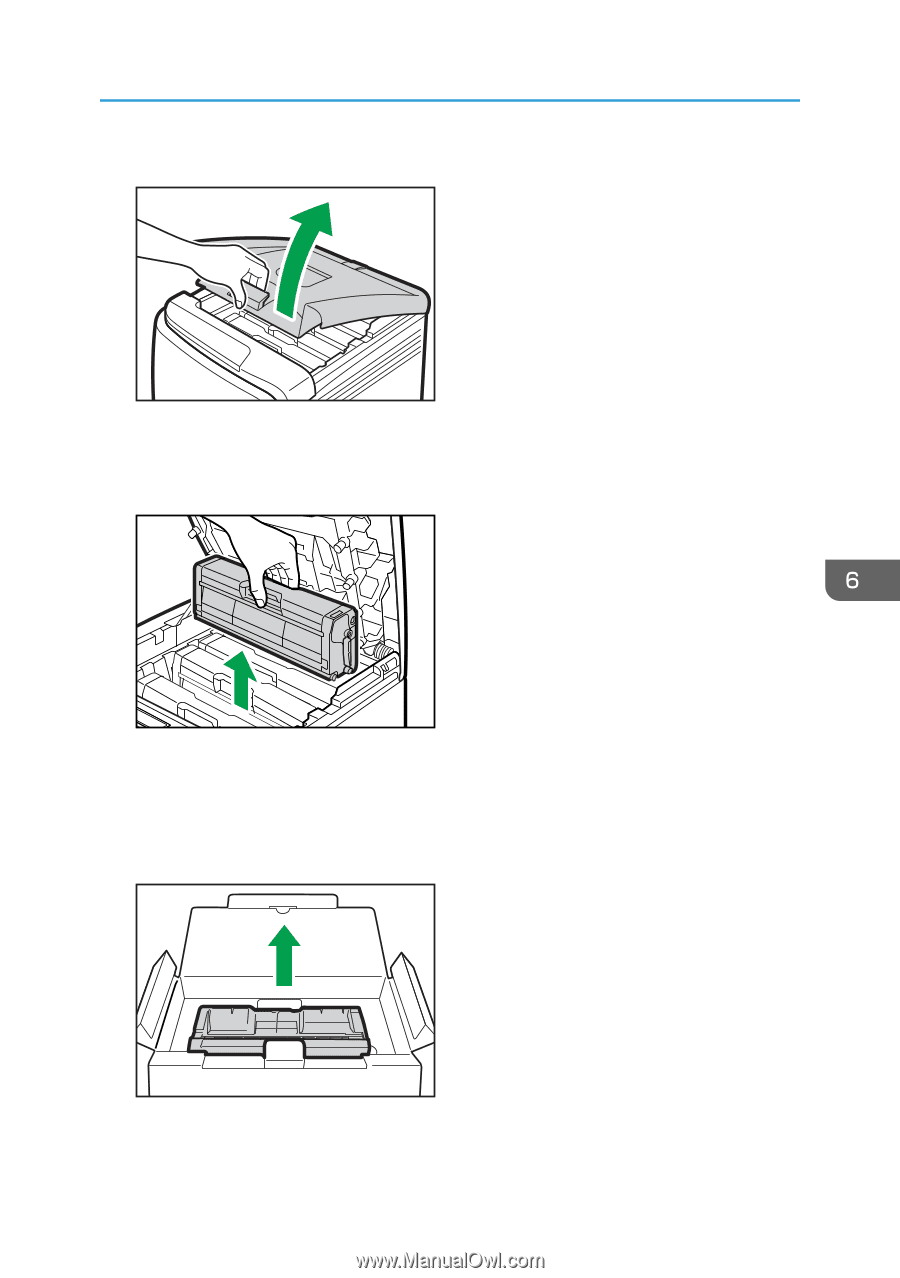
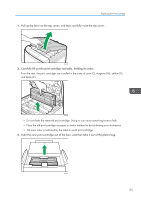
1.
Pull up the lever on the top cover, and then carefully raise the top cover.
DAC477
2.
Carefully lift out the print cartridge vertically, holding its center.
From the rear, the print cartridges are installed in the order of cyan (C), magenta (M), yellow (Y),
and black (K).
DAC040
•
Do not shake the removed print cartridge. Doing so can cause remaining toner to leak.
•
Place the old print cartridge on paper or similar material to avoid dirtying your workspace.
•
The toner color is indicated by the label on each print cartridge.
3.
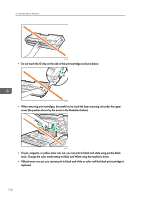
Take the new print cartridge out of the box, and then take it out of the plastic bag.
DAC036
Replacing the Print Cartridge
131