Ricoh SP C250DN Operating Instructions - Page 33
Specifying settings to receive an IPv6 address automatically
 |
View all Ricoh SP C250DN manuals
Add to My Manuals
Save this manual to your list of manuals |
Page 33 highlights
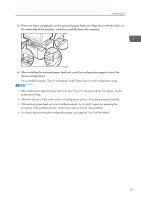
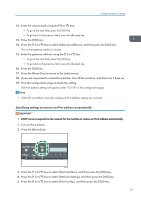
Configuring Network Settings 12. Enter the subnet mask using the [ ] or [ ] key. • To go to the next field, press the [OK] key. • To go back to the previous field, press the [Escape] key. 13. Press the [OK] key. 14. Press the [ ] or [ ] key to select [Gateway Address], and then press the [OK] key. The current gateway address is shown. 15. Enter the gateway address using the [ ] or [ ] key. • To go to the next field, press the [OK] key. • To go back to the previous field, press the [Escape] key. 16. Press the [OK] key. 17. Press the [Menu] key to return to the initial screen. 18. If you are requested to restart the machine, turn off the machine, and then turn it back on. 19. Print the configuration page to check the setting. The IPv4 address setting will appear under "TCP/IP" on the configuration page. • If [DHCP] is enabled, manually configured IPv4 address settings are not used. Specifying settings to receive an IPv6 address automatically • DHCP server is required on the network for the machine to receive an IPv6 address automatically. 1. Turn on the machine. 2. Press the [Menu] key. CER408 3. Press the [ ] or [ ] key to select [Host Interface], and then press the [OK] key. 4. Press the [ ] or [ ] key to select [Network Setting], and then press the [OK] key. 5. Press the [ ] or [ ] key to select [IPv6 Config.], and then press the [OK] key. 31
-
 1
1 -
2
-
3
-
4
-
5
-
6
-
7
-
8
-
9
-
10
-
11
-
12
-
13
-
14
-
15
-
16
-
17
-
18
-
19
-
20
-
21
-
22
-
23
-
24
-
25
-
26
-
27
-
 28
28 -
 29
29 -
 30
30 -
 31
31 -
 32
32 -
 33
33 -
 34
34 -
 35
35 -
 36
36 -
 37
37 -
 38
38 -
39
-
40
-
41
-
42
-
43
-
44
-
45
-
46
-
47
-
48
-
49
-
50
-
51
-
52
-
53
-
54
-
55
-
56
-
57
-
58
-
59
-
60
-
61
-
62
-
63
-
64
-
65
-
66
-
67
-
68
-
69
-
70
-
71
-
72
-
73
-
74
-
75
-
76
-
77
-
78
-
79
-
80
-
81
-
82
-
83
-
84
-
85
-
86
-
87
-
88
-
89
-
90
-
91
-
92
-
93
-
94
-
95
-
96
-
97
-
98
-
99
-
100
-
101
-
102
-
103
-
104
-
105
-
106
-
107
-
108
-
109
-
110
-
111
-
112
-
113
-
114
-
115
-
116
-
117
-
118
-
119
-
120
-
121
-
122
-
123
-
124
-
125
-
126
-
127
-
128
-
129
-
130
-
131
-
132
-
133
-
134
-
135
-
136
-
137
-
138
-
139
-
140
-
141
-
142
-
143
-
144
-
145
-
146
-
147
-
148
-
149
-
150
-
151
-
152
-
153
-
154
-
155
-
156
-
157
-
158
-
159
-
160
-
161
-
162
-
163
-
164
-
165
-
166
-
167
-
168
-
169
-
170
-
171
-
172
-
173
-
174
-
175
-
176
-
177
-
178
-
179
-
180
-
181
-
182
-
183
-
184
-
185
-
186
-
187
-
188
-
189
-
190
-
191
-
192
-
193
-
194
-
195
-
196
-
197
-
198
-
199
-
200
-
201
-
202
-
203
-
204
-
205
-
206
-
207
-
208
 |
 |