Ricoh SP C250DN Operating Instructions - Page 21
Exterior: Rear View, Front Cover Open Lever, Cable Cover, Ethernet Port, USB Host Interface, USB Port
 |
View all Ricoh SP C250DN manuals
Add to My Manuals
Save this manual to your list of manuals |
Page 21 highlights
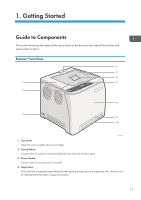
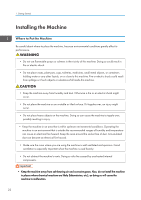
Exterior: Rear View Guide to Components 3 4 5 1 2 6 7 DAC024 1. Front Cover Open Lever To open the front cover, pull this lever on the right side of the machine. 2. Cable Cover Remove this cover when connecting cables to the machine. 3. Ethernet Port For connecting the machine to the network using a network interface cable. 4. USB Host Interface Use a USB cable to connect the digital camera to the machine. You can print images directly from a digital camera, without having to connect to a computer. 5. USB Port For connecting the machine to a computer using a USB cable. 6. Power Socket For connecting the power cord to the machine. 7. Rear Cover Remove this cover when loading paper longer than A4 in Tray 1. 19
-
 1
1 -
2
-
3
-
4
-
5
-
6
-
7
-
8
-
9
-
10
-
11
-
12
-
13
-
14
-
15
-
 16
16 -
 17
17 -
 18
18 -
 19
19 -
 20
20 -
 21
21 -
 22
22 -
 23
23 -
 24
24 -
 25
25 -
 26
26 -
27
-
28
-
29
-
30
-
31
-
32
-
33
-
34
-
35
-
36
-
37
-
38
-
39
-
40
-
41
-
42
-
43
-
44
-
45
-
46
-
47
-
48
-
49
-
50
-
51
-
52
-
53
-
54
-
55
-
56
-
57
-
58
-
59
-
60
-
61
-
62
-
63
-
64
-
65
-
66
-
67
-
68
-
69
-
70
-
71
-
72
-
73
-
74
-
75
-
76
-
77
-
78
-
79
-
80
-
81
-
82
-
83
-
84
-
85
-
86
-
87
-
88
-
89
-
90
-
91
-
92
-
93
-
94
-
95
-
96
-
97
-
98
-
99
-
100
-
101
-
102
-
103
-
104
-
105
-
106
-
107
-
108
-
109
-
110
-
111
-
112
-
113
-
114
-
115
-
116
-
117
-
118
-
119
-
120
-
121
-
122
-
123
-
124
-
125
-
126
-
127
-
128
-
129
-
130
-
131
-
132
-
133
-
134
-
135
-
136
-
137
-
138
-
139
-
140
-
141
-
142
-
143
-
144
-
145
-
146
-
147
-
148
-
149
-
150
-
151
-
152
-
153
-
154
-
155
-
156
-
157
-
158
-
159
-
160
-
161
-
162
-
163
-
164
-
165
-
166
-
167
-
168
-
169
-
170
-
171
-
172
-
173
-
174
-
175
-
176
-
177
-
178
-
179
-
180
-
181
-
182
-
183
-
184
-
185
-
186
-
187
-
188
-
189
-
190
-
191
-
192
-
193
-
194
-
195
-
196
-
197
-
198
-
199
-
200
-
201
-
202
-
203
-
204
-
205
-
206
-
207
-
208
 |
 |
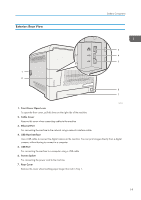
Exterior: Rear View
1
2
6
7
3
4
5
DAC024
1.
Front Cover Open Lever
To open the front cover, pull this lever on the right side of the machine.
2.
Cable Cover
Remove this cover when connecting cables to the machine.
3.
Ethernet Port
For connecting the machine to the network using a network interface cable.
4.
USB Host Interface
Use a USB cable to connect the digital camera to the machine. You can print images directly from a digital
camera, without having to connect to a computer.
5.
USB Port
For connecting the machine to a computer using a USB cable.
6.
Power Socket
For connecting the power cord to the machine.
7.
Rear Cover
Remove this cover when loading paper longer than A4 in Tray 1.
Guide to Components
19