Samsung SCD6040 User Manual (user Manual) (English, French) - Page 139

Customizing Print Options

Page 139 highlights

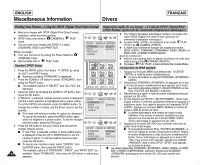
ENGLISH Miscellaneous Information Divers FRANÇAIS Customizing Print Options ✤ To customize your print options such as PAPER SIZE, LAYOUT, PAPER TYPE, PRINT QUALITY, DATE PRINT, and FILE NAME imprint options, select the PRINTER SETUP menu. 1. In the PictBridge settings menu, press the DOWN button to select "PRINTER SETUP". I The available options are listed: DEFAULT and CUSTOMIZE. I To change options, select CUSTOMIZE. To reset your settings back to default, select DEFAULT. 2. Press the RIGHT button and select CUSTOMIZE by using DOWN button or UP button, then press the OK button. I CUSTOMIZE menu is displayed. 3. In the CUSTOMIZE menu, you can set following options: PAPER SIZE LAYOUT PAPER TYPE PRINT QUALITY DATE PRINT FILE NAME POSTCARD, 4X6, 8X10, A6, A4, B5 FULL, INDEX, 1, 2, 4, 6, 8 PLAIN, PHOTO, FASTPHOTO DRAFT, NORMAL, FINE OFF, ON OFF, ON You can select a paper size that is available from the printer. The option "1" has borders around. Others will not. Set the type according to the paper type you are using. Finer setting will take more time to print. Date and Time imprint option. Filename imprint option. 4. After setting options, press the MENU button to exit the CUSTOMIZE menu screen. I It will return to the PictBridge settings screen. Notes ✤ The "INDEX" option of LAYOUT will print thumbnail images of all the selected pictures. ✤ Unsupported menu items are displayed on the LCD monitor as deactivated. ✤ INDEX printing over many files (exceeding 10) using PictBridge may take long period of time. For faster INDEX printing, use the DPOF INDEX printing (refer to page 143) or thumbnail printing on a PC. Personnalisation des options d'impression ✤ Pour personnaliser vos options d'impression telles que PAPER SIZE , LAYOUT , PAPER TYPE , PRINT QUALITY et FILE NAME , sélectionnez le menu PRINTER SETUP . 1. Dans le menu de paramétrage de Pictbridge, appuyez sur le bas du bouton pour sélectionner PRINTER SETUP

  • 1
  • 2
  • 3
  • 4
  • 5
  • 6
  • 7
  • 8
  • 9
  • 10
  • 11
  • 12
  • 13
  • 14
  • 15
  • 16
  • 17
  • 18
  • 19
  • 20
  • 21
  • 22
  • 23
  • 24
  • 25
  • 26
  • 27
  • 28
  • 29
  • 30
  • 31
  • 32
  • 33
  • 34
  • 35
  • 36
  • 37
  • 38
  • 39
  • 40
  • 41
  • 42
  • 43
  • 44
  • 45
  • 46
  • 47
  • 48
  • 49
  • 50
  • 51
  • 52
  • 53
  • 54
  • 55
  • 56
  • 57
  • 58
  • 59
  • 60
  • 61
  • 62
  • 63
  • 64
  • 65
  • 66
  • 67
  • 68
  • 69
  • 70
  • 71
  • 72
  • 73
  • 74
  • 75
  • 76
  • 77
  • 78
  • 79
  • 80
  • 81
  • 82
  • 83
  • 84
  • 85
  • 86
  • 87
  • 88
  • 89
  • 90
  • 91
  • 92
  • 93
  • 94
  • 95
  • 96
  • 97
  • 98
  • 99
  • 100
  • 101
  • 102
  • 103
  • 104
  • 105
  • 106
  • 107
  • 108
  • 109
  • 110
  • 111
  • 112
  • 113
  • 114
  • 115
  • 116
  • 117
  • 118
  • 119
  • 120
  • 121
  • 122
  • 123
  • 124
  • 125
  • 126
  • 127
  • 128
  • 129
  • 130
  • 131
  • 132
  • 133
  • 134
  • 135
  • 136
  • 137
  • 138
  • 139
  • 140
  • 141
  • 142
  • 143
  • 144
  • 145
  • 146
  • 147
  • 148
  • 149
  • 150
  • 151
  • 152
  • 153
  • 154
  • 155
  • 156
  • 157
  • 158
  • 159
  • 160
  • 161
  • 162
  • 163
  • 164
  • 165
  • 166
  • 167

Personnalisation des options d’impression
Pour personnaliser vos options d
impression telles que
PAPER SIZE <FORMAT DU PAPIER>, LAYOUT <MISE EN
PAGE>, PAPER TYPE <TYPE DE PAPIER>, PRINT
QUALITY <QUALITE D
IMPRESSION>,DATE PRINT
<DATE D
IMPRESSION> et FILE NAME <NOM DE
FICHIER>, s
é
lectionnez le menu PRINTER SETUP
<CONFIGURATION IMPRIMANTE>.
1.
Dans le menu de param
é
trage de Pictbridge, appuyez sur le
bas du bouton pour s
é
lectionner PRINTER SETUP
<CONFIGURATION DE L
IMPRIMANTE>.
La liste des options disponibles s
affiche
: DEFAULT
<PAR DEFAUT> et CUSTOMIZE <PERSONNALISE>.
S
é
lectionnez CUSTOMIZE <PERSONNALISE> pour
modifier les options. S
é
lectionnez DEFAULT <PAR
DEFAUT> pour r
é
tablir les r
é
glages par d
é
faut.
2.
Appuyez sur la droite du bouton et s
é
lectionnez
CUSTOMIZE <PERSONNALISE> en appuyant sur le haut
ou sur le bas du bouton multidirectionnel, puis appuyez sur
OK <OK>.
Le menu CUSTOMIZE <PERSONNALISE> s'affiche.
3.
Le menu CUSTOMIZE <PERSONNALISE> vous permet de r
é
gler les options
suivantes:
4.
Appuyez sur le bouton MENU pour quitter l
’é
cran du menu CUSTOMIZE
<PERSONNALISE>.
Vous revenez alors
à
l
’é
cran de param
é
trage PictBridge.
Remarques
L
option INDEX <INDEX> du menu LAYOUT <MISE EN PAGE> permet
d
imprimer toutes les images s
é
lectionn
é
es au format de vignette.
Les
é
l
é
ments du menu non pris en charge s
affichent sur l'
é
cran
LCD comme
é
tant d
é
sactiv
é
s.
L
impression INDEX <INDEX> sur plusieurs fichiers (plus de 10)
à
l
aide de
PictBridge peut prendre beaucoup de temps. Pour une impression INDEX
<INDEX> plus rapide, utilisez l
impression DPOF INDEX <INDEX DPOF>
(reportez-vous
à
la page 143) ou l'impression de vignettes sur un ordinateur.
PAPIERFORMAAT
<PAPER SIZE>
LAY-OUT <LAYOUT>
PAPIERTYPE
<PAPER TYPE>
AFDRUKKWALITEIT
<PRINT QUALITY>
DATUM AFDRUKKEN
<DATE PRINT>
BESTANDSNAAM
<FILE NAME>
ANSICHTKAART <POSTCARD>, 4X6,
8X10, A6, A4, B5
VOLLEDIG <FULL>,
INDEX, 1, 2, 4, 6, 8
NORMAAL <PLAIN>, FOTO <PHOTO>,
SNELFOTO <FASTPHOTO>
CONCEPT <DRAFT>, NORMAAL
<NORMAL>, FIJN <FINE>
UIT <OFF>, AAN <ON>
UIT <OFF>, AAN <ON>
U kunt een papierformaat selecteren
dat op uw printer beschikbaar is.
Optie 1 heeft een omkadering.
De andere opties niet.
Stel het type in dat past bij het
papiertype dat u gebruikt.
Bij een fijnere instelling duurt het
afdrukken langer.
Optie voor het afdrukken van datum
en tijd.
Optie voor het afdrukken van de
bestandsnaam.
Divers
ENGLISH
FRANÇAIS
139
139
Miscellaneous Information
To customize your print options such as PAPER SIZE,
LAYOUT, PAPER TYPE, PRINTQUALITY, DATE PRINT,
and FILE NAME imprint options, select the PRINTER
SETUP menu.
1.
In the PictBridge settings menu, press the DOWN button
to select
PRINTER SETUP
.
The available options are listed: DEFAULT and
CUSTOMIZE.
To change options, select CUSTOMIZE. To reset your
settings back to default, select DEFAULT.
2.
Press the RIGHT button and select CUSTOMIZE by using
DOWN button or UP button, then press the OK button.
CUSTOMIZE menu is displayed.
3.
In the CUSTOMIZE menu, you can set following options:
4.
After setting options, press the MENU button to exit the CUSTOMIZE
menu screen.
It will return to the PictBridge settings screen.
The
INDEX
option of LAYOUT will print thumbnail images of all the
selected pictures.
Unsupported menu items are displayed on the LCD monitor as
deactivated.
INDEX printing over many files (exceeding 10) using PictBridge may
take long period of time. For faster INDEX printing, use the DPOF
INDEX printing (refer to page 143) or thumbnail printing on a PC.
Customizing Print Options
PAPER SIZE
LAYOUT
PAPER TYPE
PRINT QUALITY
DATE PRINT
FILE NAME
POSTCARD, 4X6, 8X10, A6, A4,
B5
FULL, INDEX, 1, 2, 4, 6, 8
PLAIN, PHOTO, FASTPHOTO
DRAFT, NORMAL, FINE
OFF, ON
OFF, ON
You can select a paper size that is available
from the printer.
The option
1
has borders around. Others will not.
Set the type according to the paper type you
are using.
Finer setting will take more time to print.
Date and Time imprint option.
Filename imprint option.
Notes