Samsung SCD6040 User Manual (user Manual) (English, French) - Page 142
Printing Your Pictures - Using the DPOF Digital Print Order Format
 |
View all Samsung SCD6040 manuals
Add to My Manuals
Save this manual to your list of manuals |
Page 142 highlights
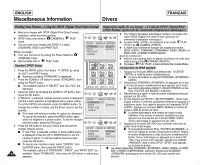
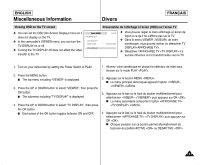
ENGLISH Miscellaneous Information Divers FRANÇAIS Printing Your Pictures - Using the DPOF (Digital Print Order Format) ✤ Mark your images with DPOF (Digital Print Order Format) marking to utilize automatic printing. ✤ DPOF menu only works in (CAMERA)'s PLAY mode. ✤ You can mark your images with DPOF in 3 ways: STANDARD, INDEX and PRINT SIZE. Before you begin! ✤ Turn your camera on by setting the Power Switch to (CAMERA) mode. ✤ Set the Mode Dial to PLAY mode. Standard DPOF Setup 1. 2. 3. 4. 5. 142 Press the MENU button, then select (DPOF) by using the LEFT and RIGHT button. I Submenu including "STANDARD" is displayed. Press the DOWN or UP button to select "STANDARD", then press the RIGHT button. I The available options of "SELECT" and "ALL PICs" are displayed. Select an option by pressing the DOWN or UP button, then press the OK button. If "SELECT" is selected, multiple pictures screen is displayed and the current selection is highlighted with a yellow outline. To set the DPOF print selection, press the MENU button. To change the number of copies, use the Zoom Lever to set the quantity. I Print mark and selected number of copies are displayed. To cancel the selection, press the MENU button again while it is hilighted in a yellow outline. To exit the multiple pictures screen, press the OK button. Press the OK button to set your choice and and exit the multiple pictures screen. I If "ALL PICs" is selected, number of prints setting menu is displayed. Press the UP or DOWN button to set the number of prints. To exit the multiple pictures screen, press the OK button. I To cancel your selection made, select "CANCEL" from the DPOF menu, then press the RIGHT button. The available options of "STANDARD", "INDEX", and "PRINT SIZE" are available. Select "STANDARD", then press the OK button to cancel your selection. Impression rapide de vos images - A l'aide de DPOF (Digital Print Order Format ). ✤ Le menu DPOF ne fonctionne qu'en mode PLAY de (CAMERA . Avant de commencer! ✤ Allumez votre appareil photo en plaçant le sélecteur de mise sous tension sur le mode (CAMERA ). ✤ Choisissez PLAY à l'aide de Mode Dial. Configuration de DPOF standard 1. Appuyez sur le bouton MENU puis sélectionnez (DPOF) () à l'aide du bouton multidirectionnel. I Le menu secondaire où apparaît STANDARD s'affiche. 2. Sélectionnez STANDARD en appuyant sur le bas ou le haut du bouton multidirectionnel puis appuyez sur la droite. I Les options disponibles SELECT et ALL PICs s'affichent. 3. Sélectionnez une option à l'aide du bouton multidirectionnel puis appuyez sur OK . 4. Si vous sélectionnez SELECT , l'écran multiimages s'affiche et l'élément actuellement sélectionné apparaît en surbrillance jaune. Pour régler la sélection de l'impression DPOF , appuyez sur le bouton MENU. Modifiez le nombre de copies à l'aide du bouton du zoom. I Le repère d'impression et le nombre de copies choisis s'affichent. Pour annuler la sélection (surbrillance jaune), appuyez une nouvelle fois sur le bouton MENU. Quittez l'écran multi-images en appuyant sur OK . 5. Appuyez sur le bouton OK pour confirmer votre choix et quitter l'écran multi-images. I Si vous sélectionnez ALL PICs , le menu de réglage du nombre d'impressions s'affiche. Réglez le nombre d'impressions à l'aide du bouton multidirectionnel. Quittez l'écran multi-images en appuyant sur le bouton OK . Pour annuler votre sélection, sélectionnez CANCEL dans le menu DPOF puis appuyez sur la droite du bouton. I Les options disponibles STANDARD , INDEX et PRINT SIZE
-
 1
1 -
2
-
3
-
4
-
5
-
6
-
7
-
8
-
9
-
10
-
11
-
12
-
13
-
14
-
15
-
16
-
17
-
18
-
19
-
20
-
21
-
22
-
23
-
24
-
25
-
26
-
27
-
28
-
29
-
30
-
31
-
32
-
33
-
34
-
35
-
36
-
37
-
38
-
39
-
40
-
41
-
42
-
43
-
44
-
45
-
46
-
47
-
48
-
49
-
50
-
51
-
52
-
53
-
54
-
55
-
56
-
57
-
58
-
59
-
60
-
61
-
62
-
63
-
64
-
65
-
66
-
67
-
68
-
69
-
70
-
71
-
72
-
73
-
74
-
75
-
76
-
77
-
78
-
79
-
80
-
81
-
82
-
83
-
84
-
85
-
86
-
87
-
88
-
89
-
90
-
91
-
92
-
93
-
94
-
95
-
96
-
97
-
98
-
99
-
100
-
101
-
102
-
103
-
104
-
105
-
106
-
107
-
108
-
109
-
110
-
111
-
112
-
113
-
114
-
115
-
116
-
117
-
118
-
119
-
120
-
121
-
122
-
123
-
124
-
125
-
126
-
127
-
128
-
129
-
130
-
131
-
132
-
133
-
134
-
135
-
136
-
 137
137 -
 138
138 -
 139
139 -
 140
140 -
 141
141 -
 142
142 -
 143
143 -
 144
144 -
 145
145 -
 146
146 -
 147
147 -
148
-
149
-
150
-
151
-
152
-
153
-
154
-
155
-
156
-
157
-
158
-
159
-
160
-
161
-
162
-
163
-
164
-
165
-
166
-
167
 |
 |
