Samsung SCD6040 User Manual (user Manual) (English, French) - Page 99
Prise et visualisation de votre première photo, Taking and Viewing Your First Photo
 |
View all Samsung SCD6040 manuals
Add to My Manuals
Save this manual to your list of manuals |
Page 99 highlights
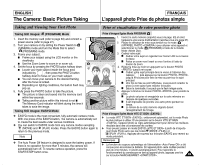
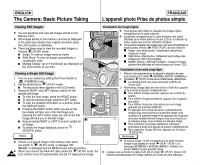
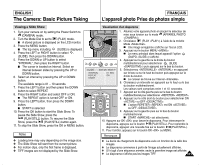
ENGLISH The Camera: Basic Picture Taking FRANÇAIS L'appareil photo Prise de photos simple Taking and Viewing Your First Photo Prise et visualisation de votre première photo Taking Still Images: (PROGRAM) Mode 1. Insert the memory card (refer to page 83) and connect a power source (refer to page 27). 2. Turn your camera on by setting the Power Switch to (CAMERA) mode and turn the Mode Dial to select (PROGRAM) mode. 3. Frame your subject. I Frame your subject using the LCD monitor or the viewfinder. I Use the Zoom Lever to zoom in or zoom out. 4. Set the focus by pressing the PHOTO button halfway down. I Locate your main subject inside the focus area indicated by , then press the PHOTO button halfway down to focus on your main subject. I You can move your camera to the desired framing after the focus is locked. I Depending on lighting conditions, the built-in flash may pop up. 5. Fully press the PHOTO button to take the picture. I The picture is taken and saved into the memory card within few seconds. I Taking another picture within this interval is not I The Memory Card indicator will blink during the time it takes to save the image. Taking Still Images: EASYQ Mode ✤ EASYQ mode is the most convenient, fully automatic camera mode. With one press of the EASYQ button, the camera is automatically set to create the best results under various conditions. ✤ You can switch to EASYQ mode from any camera modes excepting (MOVIE) and (PLAY) modes. Press the EASYQ button again to return to the previous mode. Note ✤ The Auto Power Off feature is designed to save the battery power. If there is no operation for more than 5 minutes, the camera will automatically turn off. To resume camera operation, press the START/STOP button once. Prise d'images figées Mode PROGRAM 1. Insérez la carte mémoire (reportez-vous à la page 83) et reliez l'appareil à une source d'alimentation (reportez-vous à la page 27). 2. Placez le sélecteur de mise sous tension sur le mode (APPAREIL PHOTO ) pour allumer votre appareil et sélectionnez le mode (PROGRAM) à l'aide de la molette Mode . 3. Cadrez votre sujet I Cadrez votre sujet en regardant sur l'écran LCD ou à travers le viseur. I Faites un zoom vers l'avant ou vers l'arrière à l'aide du 2 bouton du zoom. 4. Réglez la mise au moint en appuyant sur le bouton PHOTO jusqu'à mi-course. I Cadrez votre sujet principal dans le viseur à l'intérieur des repères puis appuyez sur le bouton PHOTO jusqu'à mi-course pour faire la mise au point sur le sujet principal. I Une fois la mise au point effectuée, vous pouvez recadrer la photo à votre guise sans relâcher le bouton. I Selon la luminosité, il se peut que le flash intégré sorte. 5. Appuyez à fond sur le bouton PHOTO pour prendre la photo. I La photo est prise et enregistrée sur la carte mémoire en l'espace de quelques secondes. I Il est impossible de prendre une autre photo pendant ce temps. I Le témoin de la carte mémoire clignote durant l'enregistrement de l'image. Prise d'images figées Mode VITE ET BIEN ✤ Le mode VITE ET BIEN , entièrement automatisé, est le mode Photo le plus pratique à utiliser. D'une pression sur le bouton VITE ET BIEN , l'appareil photo se règle automatiquement pour donner les meilleurs résultats dans des circonstances très variées. ✤ Vous pouvez passer en mode EASYQ à partir de n'importe quel mode Photo autre que les modes (MOVIE ) et (PLAY ). Appuyez de nouveau sur le bouton EASYQ pour revenir au mode précédent. Remarques ✤ La fonction de coupure automatique de l'alimentation a été conçue pour économiser la batterie. Si l'appareil photo reste inutilisé pendant plus de cinq minutes, il s'éteint automatiquement. Pour reprendre le fonctionnement du caméscope en tant qu'appareil photo, appuyez une fois sur le bouton MARCHE/ARRET . 99
-
 1
1 -
2
-
3
-
4
-
5
-
6
-
7
-
8
-
9
-
10
-
11
-
12
-
13
-
14
-
15
-
16
-
17
-
18
-
19
-
20
-
21
-
22
-
23
-
24
-
25
-
26
-
27
-
28
-
29
-
30
-
31
-
32
-
33
-
34
-
35
-
36
-
37
-
38
-
39
-
40
-
41
-
42
-
43
-
44
-
45
-
46
-
47
-
48
-
49
-
50
-
51
-
52
-
53
-
54
-
55
-
56
-
57
-
58
-
59
-
60
-
61
-
62
-
63
-
64
-
65
-
66
-
67
-
68
-
69
-
70
-
71
-
72
-
73
-
74
-
75
-
76
-
77
-
78
-
79
-
80
-
81
-
82
-
83
-
84
-
85
-
86
-
87
-
88
-
89
-
90
-
91
-
92
-
93
-
 94
94 -
 95
95 -
 96
96 -
 97
97 -
 98
98 -
 99
99 -
 100
100 -
 101
101 -
 102
102 -
 103
103 -
 104
104 -
105
-
106
-
107
-
108
-
109
-
110
-
111
-
112
-
113
-
114
-
115
-
116
-
117
-
118
-
119
-
120
-
121
-
122
-
123
-
124
-
125
-
126
-
127
-
128
-
129
-
130
-
131
-
132
-
133
-
134
-
135
-
136
-
137
-
138
-
139
-
140
-
141
-
142
-
143
-
144
-
145
-
146
-
147
-
148
-
149
-
150
-
151
-
152
-
153
-
154
-
155
-
156
-
157
-
158
-
159
-
160
-
161
-
162
-
163
-
164
-
165
-
166
-
167
 |
 |
