Samsung SCD6040 User Manual (user Manual) (English, French) - Page 144
Impression des images marquées d'un repère, Printing DPOF Marked Images
 |
View all Samsung SCD6040 manuals
Add to My Manuals
Save this manual to your list of manuals |
Page 144 highlights
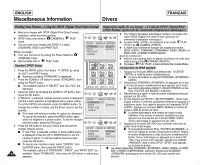
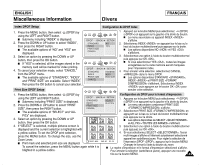
ENGLISH Miscellaneous Information Divers FRANÇAIS 5. Press the OK button to set your choice and exit the multiple pictures screen. I If "ALL PICs" is selected, print size setting menu is displayed. Press the UP or DOWN button to set the print size. To exit the multiple pictures screen, press the OK button. I To cancel your selection made, select "CANCEL" from the DPOF menu, then press the RIGHT button. The available options of "STANDARD", "INDEX", and "PRINT SIZE" are available. Select "PRINT SIZE", then press the OK button to cancel your selection. Printing DPOF Marked Images ✤ You can print out DPOF marked images using PictBridge menu if the printer supports PictBridge (refer to page 141). ✤ You can print out DPOF marked images by inserting your memory card directly to a DPOF supporting printer that has memory card interface. Or, you can connect your camera using USB cable to a printer that supports DPOF printing. Refer to printer's documentation for further details. Notes ✤ DPOF supporting printers are commercially available. ✤ Use the USB cable provided with the camera. 144 5. Appuyez sur le bouton OK pour confirmer votre choix et quitter l'écran multi-images. I Si vous sélectionnez ALL PICs , le menu de réglage du format d'impression s'affiche. Réglez le format d'impression à l'aide du bouton multidirectionnel. Quittez l'écran multi-images en appuyant sur le bouton OK . I Pour annuler votre sélection, sélectionnez CANCEL dans le menu DPOF puis appuyez sur la droite du bouton. Les options disponibles STANDARD , INDEX et PRINT SIZE
-
 1
1 -
2
-
3
-
4
-
5
-
6
-
7
-
8
-
9
-
10
-
11
-
12
-
13
-
14
-
15
-
16
-
17
-
18
-
19
-
20
-
21
-
22
-
23
-
24
-
25
-
26
-
27
-
28
-
29
-
30
-
31
-
32
-
33
-
34
-
35
-
36
-
37
-
38
-
39
-
40
-
41
-
42
-
43
-
44
-
45
-
46
-
47
-
48
-
49
-
50
-
51
-
52
-
53
-
54
-
55
-
56
-
57
-
58
-
59
-
60
-
61
-
62
-
63
-
64
-
65
-
66
-
67
-
68
-
69
-
70
-
71
-
72
-
73
-
74
-
75
-
76
-
77
-
78
-
79
-
80
-
81
-
82
-
83
-
84
-
85
-
86
-
87
-
88
-
89
-
90
-
91
-
92
-
93
-
94
-
95
-
96
-
97
-
98
-
99
-
100
-
101
-
102
-
103
-
104
-
105
-
106
-
107
-
108
-
109
-
110
-
111
-
112
-
113
-
114
-
115
-
116
-
117
-
118
-
119
-
120
-
121
-
122
-
123
-
124
-
125
-
126
-
127
-
128
-
129
-
130
-
131
-
132
-
133
-
134
-
135
-
136
-
137
-
138
-
 139
139 -
 140
140 -
 141
141 -
 142
142 -
 143
143 -
 144
144 -
 145
145 -
 146
146 -
 147
147 -
 148
148 -
 149
149 -
150
-
151
-
152
-
153
-
154
-
155
-
156
-
157
-
158
-
159
-
160
-
161
-
162
-
163
-
164
-
165
-
166
-
167
 |
 |
