Samsung SCD6040 User Manual (user Manual) (English, French) - Page 93
Activation de la télécommande TELECOMMANDE <WL.REMOTE>
 |
View all Samsung SCD6040 manuals
Add to My Manuals
Save this manual to your list of manuals |
Page 93 highlights
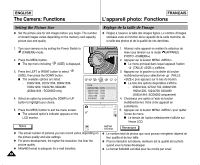
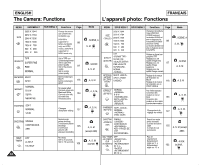
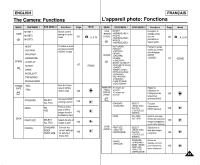
ENGLISH The Camera: Functions FRANÇAIS L'appareil photo: Fonctions Setting the Wireless Remote Control Acceptance (WL.REMOTE) Activation de la télécommande (TELECOMMANDE ) ✤ You can enable or disable the Wireless Remote Control for use in Camera mode. ✤ Using the Wireless Remote Control, you can easily and remotely manipulate your camera. Refer to page 40 for setting the Wireless Remote Control for Camcorder use. ✤ Using the Wireless Remote Control provided, you can take a delayed picture using the SELF TIMER button (refer to page 105). ✤ Vous pouvez activer ou désactiver la télécommande en mode Photo. ✤ La télécommande vous permet de manipuler facilement votre appareil photo à distance. Pour paramétrer la télécommande en mode Caméscope , reportez-vous à la page 40. ✤ Vous pouvez programmer une photo en utilisant le bouton RETARDATEUR AUTOMATIQUE de la télécommande (reportez-vous à la page 105). 1. Turn your camera on by setting the Power Switch to 1. Allumez votre appareil photo en plaçant le sélecteur de mise sous tension sur le mode (APPAREIL PHOTO (CAMERA) mode. ). 2. Press the MENU button. 2. Appuyez sur le bouton MENU . I The top menu including (SET) is displayed. I Le menu principal dans lequel apparaît l'option 3. Press the LEFT or RIGHT button to select (SET), (PARAMETRAGE ) s'affiche. then press the DOWN button. 3. Appuyez sur la gauche ou la droite du bouton I The submenu including "WL.REMOTE" is displayed. 4. Press the DOWN button to select "WL.REMOTE", then press RIGHT button. I The available options of "OFF" and "ON" are displayed. 5. Select an option by pressing the UP or DOWN button. I The selected option is applied. 6. Press the OK button to return to the SETUP menu. 7. Press the MENU button to exit the menu screen. BACK: SET:OK multidirectionnel pour sélectionner «PARAMETRAGE» puis appuyez sur le bas du bouton. I Le menu secondaire comportant l'option «TELECOMMANDE » apparaît à l'écran. 4. Appuyez sur le bas du bouton multidirectionnel pour sélectionner «TELECOMMANDE » puis appuyez sur le côté droit du bouton. I Les options disponibles pour «OFF» et «ON» s'affichent. 5. Choisissez une option à l'aide du bouton multidirectionnel. Notes I L'option sélectionnée prend effet. 6. Appuyez sur OK pour valider votre choix. 7. Appuyez sur le bouton MENU pour quitter l'écran du menu. ✤ Available Remote Control buttons in each mode: I (MOVIE) Recording: START/STOP, DISPLAY, W / T (before Remarques recording), SELF TIMER ✤ Boutons de la télécommande disponibles pour chaque mode : I (PLAY) for MOVIE: PLAY, PAUSE, STOP, FF, REW I (PROGRAM), A, S, M, SCENE, MYSET : PHOTO, DISPLAY, W / T, SELF TIMER I (MOVIE ) pour un enregistrement: START/STOP, DISPLAY, W / T (avant l'enregistrement), SELF TIMER I (PLAY ) pour un film: PLAY, PAUSE, STOP, FF, REW I (PROGRAM), A, S, M, SCENE, MYSET: PHOTO, DISPLAY, W / T, SELF TIMER 93
-
 1
1 -
2
-
3
-
4
-
5
-
6
-
7
-
8
-
9
-
10
-
11
-
12
-
13
-
14
-
15
-
16
-
17
-
18
-
19
-
20
-
21
-
22
-
23
-
24
-
25
-
26
-
27
-
28
-
29
-
30
-
31
-
32
-
33
-
34
-
35
-
36
-
37
-
38
-
39
-
40
-
41
-
42
-
43
-
44
-
45
-
46
-
47
-
48
-
49
-
50
-
51
-
52
-
53
-
54
-
55
-
56
-
57
-
58
-
59
-
60
-
61
-
62
-
63
-
64
-
65
-
66
-
67
-
68
-
69
-
70
-
71
-
72
-
73
-
74
-
75
-
76
-
77
-
78
-
79
-
80
-
81
-
82
-
83
-
84
-
85
-
86
-
87
-
 88
88 -
 89
89 -
 90
90 -
 91
91 -
 92
92 -
 93
93 -
 94
94 -
 95
95 -
 96
96 -
 97
97 -
 98
98 -
99
-
100
-
101
-
102
-
103
-
104
-
105
-
106
-
107
-
108
-
109
-
110
-
111
-
112
-
113
-
114
-
115
-
116
-
117
-
118
-
119
-
120
-
121
-
122
-
123
-
124
-
125
-
126
-
127
-
128
-
129
-
130
-
131
-
132
-
133
-
134
-
135
-
136
-
137
-
138
-
139
-
140
-
141
-
142
-
143
-
144
-
145
-
146
-
147
-
148
-
149
-
150
-
151
-
152
-
153
-
154
-
155
-
156
-
157
-
158
-
159
-
160
-
161
-
162
-
163
-
164
-
165
-
166
-
167
 |
 |
