Samsung SCD6040 User Manual (user Manual) (English, French) - Page 141

Resetting PictBridge Settings, Printing Images Using DPOF Digital Print Order Format Settings

Page 141 highlights

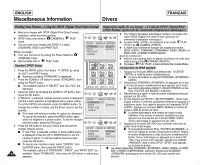
ENGLISH Miscellaneous Information Divers FRANÇAIS Printing Images Using DPOF (Digital Print Order Format) Settings ✤ DPOF PRINT requires at least one DPOF marked image on the memory card. 1. Set the DPOF settings as described in page 142. 2. Connect your camera and the printer as described in page 137. I The PictBridge settings menu is displayed. 3. Press the DOWN button to select "DPOF PRINT", then press the RIGHT button. I The available options are listed: YES and NO. 4. Select "YES" by pressing the DOWN or UP button, then press the OK button to start printing. I DPOF printing starts to print images and the progress bar is displayed. 5. To cancel the printing, press the MENU button. Resetting PictBridge Settings 1. Press the DOWN button to select "RESET", then press the RIGHT button. I The available options of "YES" and "NO" are displayed. 2. Select an option by pressing the UP or DOWN button, then press the OK button. I If "YES" is selected, changes made by the user are reset to the default settings. Notes ✤ If no image is marked for DPOF, "DPOF PRINT" in PictBridge settings menu cannot be selected. ✤ PictBridge supporting printers are commercially available. ✤ Use the USB cable provided with the Camera. ✤ Use the AC power adapter for your camera during PictBridge Direct Printing. Turning your camera off during the printing might damage data on the memory card. ✤ Printing still images is supported. Motion clips are not available for printing. Utilisation de votre appareil photo - Prise de photos avancée ✤ Impression d'images à l'aide du réglage de DPOF (Digital Print Order Format

  • 1
  • 2
  • 3
  • 4
  • 5
  • 6
  • 7
  • 8
  • 9
  • 10
  • 11
  • 12
  • 13
  • 14
  • 15
  • 16
  • 17
  • 18
  • 19
  • 20
  • 21
  • 22
  • 23
  • 24
  • 25
  • 26
  • 27
  • 28
  • 29
  • 30
  • 31
  • 32
  • 33
  • 34
  • 35
  • 36
  • 37
  • 38
  • 39
  • 40
  • 41
  • 42
  • 43
  • 44
  • 45
  • 46
  • 47
  • 48
  • 49
  • 50
  • 51
  • 52
  • 53
  • 54
  • 55
  • 56
  • 57
  • 58
  • 59
  • 60
  • 61
  • 62
  • 63
  • 64
  • 65
  • 66
  • 67
  • 68
  • 69
  • 70
  • 71
  • 72
  • 73
  • 74
  • 75
  • 76
  • 77
  • 78
  • 79
  • 80
  • 81
  • 82
  • 83
  • 84
  • 85
  • 86
  • 87
  • 88
  • 89
  • 90
  • 91
  • 92
  • 93
  • 94
  • 95
  • 96
  • 97
  • 98
  • 99
  • 100
  • 101
  • 102
  • 103
  • 104
  • 105
  • 106
  • 107
  • 108
  • 109
  • 110
  • 111
  • 112
  • 113
  • 114
  • 115
  • 116
  • 117
  • 118
  • 119
  • 120
  • 121
  • 122
  • 123
  • 124
  • 125
  • 126
  • 127
  • 128
  • 129
  • 130
  • 131
  • 132
  • 133
  • 134
  • 135
  • 136
  • 137
  • 138
  • 139
  • 140
  • 141
  • 142
  • 143
  • 144
  • 145
  • 146
  • 147
  • 148
  • 149
  • 150
  • 151
  • 152
  • 153
  • 154
  • 155
  • 156
  • 157
  • 158
  • 159
  • 160
  • 161
  • 162
  • 163
  • 164
  • 165
  • 166
  • 167

Utilisation de votre appareil photo – Prise de photos avancée
Impression d
images
à
l
aide du r
é
glage de DPOF (Digital
Print Order Format <protocole de commande
d
impression num
é
rique>)DPOF PRINT <IMPRESSION
DPOF> n
é
cessite la pr
é
sence d
au moins une image
marqu
é
e d'un rep
è
re DPOF <DPOF> sur la carte
m
é
moire
1.
Param
é
trez les r
é
glages DPOF <DPOF> en suivant les
instructions de la page 142.
2.
Branchez votre appareil photo
à
votre imprimante
comme indiqu
é
à
la page 137.
Le menu de param
é
trage PictBridge s'affiche.
3.
Appuyez sur le bas du bouton multidirectionnel pour
s
é
lectionner DPOF PRINT <IMPRESSION DPOF> puis
appuyez sur la droite du bouton.
La liste des options disponibles s
affiche: YES <OUI>
et NO <NON>.
4.
S
é
lectionnez YES <OUI> en appuyant sur le bas ou le
haut du bouton multidirectionnel, puis appuyez sur OK
<OK> pour lancer l'impression.
L
impression DPOF <DPOF> commence
à
imprimer
les images et la barre d
avancement s
affiche.
5.
Pour annuler l
impression, appuyez sur le bouton MENU.
Réinitialisation des réglages Pictbridge
1.
Appuyez sur le bas du bouton multidirectionnel pour
s
é
lectionner RESET <REINITIALISER> puis appuyez sur
la droite du bouton.
Les options disponibles YES <OUI> et NO <NON>
s
affichent.
2.
S
é
lectionnez une option en appuyant le bas ou sur le haut du bouton
multidirectionnel puis appuyez sur OK <OK>.
Si vous choisissez YES <OUI>, les changements que vous avez
effectu
é
s sont annul
é
s au profit des r
é
glages par d
é
faut.
Remarques
Si aucune image ne porte de rep
è
re DPOF <DPOF>, il est impossible de
s
é
lectionner DPOF PRINT <IMPRESSION DPOF> dans le menu de
param
é
trage de PictBridge.
Les imprimantes compatibles PictBridge sont disponibles sur le march
é
.
Utilisez le c
â
ble USB fourni avec l
appareil photo.
Utilisez l
adaptateur CA de votre appareil pendant l
impression directe <Direct
Printing> PictBridge. Si vous
é
teignez votre appareil pendant l
impression, cela
risque d
endommager les donn
é
es de votre carte m
é
moire.
L
impression des photos est prise en charge. Les films ne peuvent pas
ê
tre imprim
é
s.
Divers
ENGLISH
FRANÇAIS
141
141
DPOF PRINT requires at least one DPOF marked
image on the memory card.
1.
Set the DPOF settings as described in page 142.
2.
Connect your camera and the printer as described in
page 137.
The PictBridge settings menu is displayed.
3.
Press the DOWN button to select
DPOF PRINT
,
then press the RIGHT button.
The available options are listed: YES and NO.
4.
Select
YES
by pressing the DOWN or UP button,
then press the OK button to start printing.
DPOF printing starts to print images and the
progress bar is displayed.
5.
To cancel the printing, press the MENU button.
1.
Press the DOWN button to select
RESET
, then
press the RIGHT button.
The available options of
YES
and
NO
are
displayed.
2.
Select an option by pressing the UP or DOWN button,
then press the OK button.
If
YES
is selected, changes made by the user are
reset to the default settings.
If no image is marked for DPOF,
DPOF PRINT
in PictBridge
settings menu cannot be selected.
PictBridge supporting printers are commercially available.
Use the USB cable provided with the Camera.
Use the AC power adapter for your camera during PictBridge
Direct Printing. Turning your camera off during the printing might
damage data on the memory card.
Printing still images is supported. Motion clips are not available for
printing.
Resetting PictBridge Settings
Notes
Printing Images Using DPOF (Digital Print Order Format) Settings
Miscellaneous Information