Samsung SGH-I437Z User Manual - Page 78
Groups, Adding a Contact to a Group, Creating a New Group, Group ringtone
 |
View all Samsung SGH-I437Z manuals
Add to My Manuals
Save this manual to your list of manuals |
Page 78 highlights
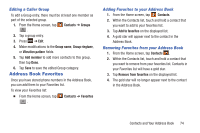
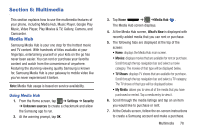
Groups Adding a Contact to a Group 1. From the Home screen, tap Contacts. 2. Press and hold a contact that you would like to add to a group. 3. Tap Add to group. 4. Tap a group entry. 5. Tap Save. The contact is added to the group. Removing a Contact From a Group 1. From the Home screen, tap Contacts ➔ Groups . Groups 2. Tap a group entry. 3. Press ➔ Remove member. 4. Tap all of the contacts you want to remove from this group. A green checkmark will appear next to their name. 5. Tap Done. The contacts are now removed from the group. Creating a New Group 1. From the Home screen, tap Contacts ➔ Groups ➔ Groups ➔ Create. 2. Tap the Group name field and use the on-screen keypad to enter a new group name. For more information, refer to "Entering Text" on page 59. 3. Tap Group ringtone to choose an audio file for assignment to this new group. Choose from Default, Ringtones, or Go to My files. 4. Tap Vibration pattern to choose an audio file for assignment to this new group. 5. Tap Add member to add contacts to the new group. 6. Tap each contact you want to add to create a checkmark. You can also tap Select all. 7. Tap Done. 8. Tap Save to save the new Group category. 73
-
 1
1 -
2
-
3
-
4
-
5
-
6
-
7
-
8
-
9
-
10
-
11
-
12
-
13
-
14
-
15
-
16
-
17
-
18
-
19
-
20
-
21
-
22
-
23
-
24
-
25
-
26
-
27
-
28
-
29
-
30
-
31
-
32
-
33
-
34
-
35
-
36
-
37
-
38
-
39
-
40
-
41
-
42
-
43
-
44
-
45
-
46
-
47
-
48
-
49
-
50
-
51
-
52
-
53
-
54
-
55
-
56
-
57
-
58
-
59
-
60
-
61
-
62
-
63
-
64
-
65
-
66
-
67
-
68
-
69
-
70
-
71
-
72
-
 73
73 -
 74
74 -
 75
75 -
 76
76 -
 77
77 -
 78
78 -
 79
79 -
 80
80 -
 81
81 -
 82
82 -
 83
83 -
84
-
85
-
86
-
87
-
88
-
89
-
90
-
91
-
92
-
93
-
94
-
95
-
96
-
97
-
98
-
99
-
100
-
101
-
102
-
103
-
104
-
105
-
106
-
107
-
108
-
109
-
110
-
111
-
112
-
113
-
114
-
115
-
116
-
117
-
118
-
119
-
120
-
121
-
122
-
123
-
124
-
125
-
126
-
127
-
128
-
129
-
130
-
131
-
132
-
133
-
134
-
135
-
136
-
137
-
138
-
139
-
140
-
141
-
142
-
143
-
144
-
145
-
146
-
147
-
148
-
149
-
150
-
151
-
152
-
153
-
154
-
155
-
156
-
157
-
158
-
159
-
160
-
161
-
162
-
163
-
164
-
165
-
166
-
167
-
168
-
169
-
170
-
171
-
172
-
173
-
174
-
175
-
176
-
177
-
178
-
179
-
180
-
181
-
182
-
183
-
184
-
185
-
186
-
187
-
188
-
189
-
190
-
191
-
192
-
193
-
194
-
195
-
196
-
197
-
198
-
199
-
200
-
201
-
202
-
203
-
204
-
205
-
206
-
207
-
208
-
209
-
210
-
211
-
212
-
213
-
214
-
215
-
216
-
217
-
218
-
219
-
220
-
221
-
222
-
223
-
224
-
225
-
226
-
227
 |
 |
