Samsung YP-GS1CB User Manual Ver.1.0 (English) - Page 95
Recording Videos, Camcorder Options and Settings, Applications, Camera, Record, Pause, Exposure value
 |
View all Samsung YP-GS1CB manuals
Add to My Manuals
Save this manual to your list of manuals |
Page 95 highlights
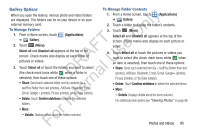
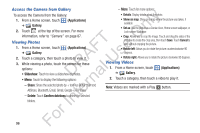
Recording Videos 1. From a Home screen, touch ly ➔ Camera. (Applications) 2. Touch the Mode icon to switch from the n the Camcorder. Camera to 3. Using the display as a viewfinder, compose your shot O by aiming the lens at the subject. To configure settings, T see "Camcorder Options and Settings" on page 91. F e 4. To start recording, touch (Record). During s recording, the button changes to (Pause). Touch A U Pause to temporarily stop recording. To resume R recording, touch (Record) again. l 5. To stop recording, touch the (Stop) button. D a Camcorder Options and Settings rn Before you start recording videos, use the camcorder options and settings to configure the camcorder for best results. te Camcorder options are represented by icons on the left side of the screen. While in Camcorder mode, touch the following icons to configure the camcorder: Exposure value: Set the brightness of the video. Settings: Touch for the following options: • Timer: Set a timer for how long to wait before recording a video. Options are: Off, 2 sec, 5 sec, and 10 sec. • Resolution: Set the video size to either: 640x480 or 320x240. • White balance: Set the light source. Options are: Auto, Daylight, Cloudy, Incandescent, or Fluorescent. • Effects: Apply an effect to videos. Options are: Normal, Negative, Black and white, or Sepia. • Video quality: Choose a quality setting for videos. Options are: Superfine, Fine, or Normal. For In Photos and Videos 91
-
 1
1 -
2
-
3
-
4
-
5
-
6
-
7
-
8
-
9
-
10
-
11
-
12
-
13
-
14
-
15
-
16
-
17
-
18
-
19
-
20
-
21
-
22
-
23
-
24
-
25
-
26
-
27
-
28
-
29
-
30
-
31
-
32
-
33
-
34
-
35
-
36
-
37
-
38
-
39
-
40
-
41
-
42
-
43
-
44
-
45
-
46
-
47
-
48
-
49
-
50
-
51
-
52
-
53
-
54
-
55
-
56
-
57
-
58
-
59
-
60
-
61
-
62
-
63
-
64
-
65
-
66
-
67
-
68
-
69
-
70
-
71
-
72
-
73
-
74
-
75
-
76
-
77
-
78
-
79
-
80
-
81
-
82
-
83
-
84
-
85
-
86
-
87
-
88
-
89
-
 90
90 -
 91
91 -
 92
92 -
 93
93 -
 94
94 -
 95
95 -
 96
96 -
 97
97 -
 98
98 -
 99
99 -
 100
100 -
101
-
102
-
103
-
104
-
105
-
106
-
107
-
108
-
109
-
110
-
111
-
112
-
113
-
114
-
115
-
116
-
117
-
118
-
119
-
120
-
121
-
122
-
123
-
124
-
125
-
126
-
127
-
128
-
129
-
130
-
131
-
132
-
133
-
134
-
135
-
136
-
137
-
138
-
139
-
140
-
141
-
142
-
143
-
144
-
145
-
146
-
147
-
148
-
149
-
150
-
151
-
152
-
153
-
154
-
155
-
156
-
157
-
158
-
159
-
160
-
161
-
162
-
163
-
164
-
165
-
166
-
167
-
168
-
169
-
170
-
171
-
172
-
173
-
174
-
175
-
176
-
177
-
178
-
179
-
180
-
181
-
182
-
183
-
184
-
185
-
186
-
187
-
188
-
189
-
190
-
191
-
192
-
193
-
194
-
195
-
196
-
197
-
198
-
199
-
200
-
201
-
202
-
203
-
204
-
205
-
206
-
207
-
208
-
209
 |
 |
