Sony SNCEP520 User Manual (SNC-ER/EP User Guide) - Page 10
Installing ActiveX Control, Configuring Windows Firewall, Install, Control Panel, Start
 |
View all Sony SNCEP520 manuals
Add to My Manuals
Save this manual to your list of manuals |
Page 10 highlights
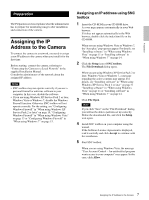
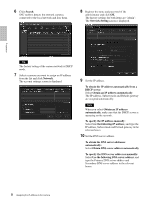
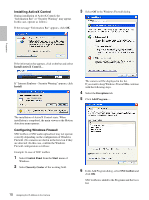
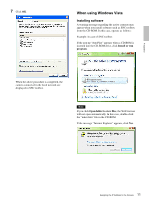
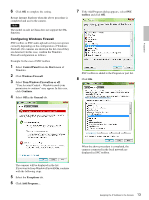
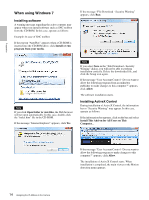
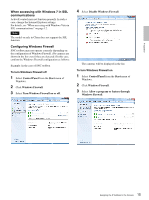
Installing ActiveX Control During installation of ActiveX Control, the "Information Bar" or "Security Warning" may appear. In this case, operate as follows: If the message "Information Bar" appears, click OK. 3 Select Off in the Windows Firewall dialog. Preparation If the information bar appears, click on the bar and select Install ActiveX Control.... If " Internet Explorer - Security Warning" appears, click Install. Program name The camera will be displayed in the list. If you want to keep Windows Firewall On, continue with the following steps. 4 Select the Exceptions tab. 5 Click Add Program.... The installation of ActiveX Control starts. When installation is completed, the main viewer or the Motion detection menu appears. Configuring Windows Firewall SNC toolbox or SNC audio upload tool may not operate correctly depending on the configuration of Windows Firewall. (No cameras are shown in the list even if they are detected.) In this case, confirm the Windows Firewall configuration as follows: Example: In case of SNC toolbox 1 Select Control Panel from the Start menu of Windows. 2 Select Security Center of the working field. 6 In the Add Program dialog, select SNC toolbox and click OK. SNC toolbox is added to the Programs and Services list. 10 Assigning the IP Address to the Camera
-
 1
1 -
2
-
3
-
4
-
 5
5 -
 6
6 -
 7
7 -
 8
8 -
 9
9 -
 10
10 -
 11
11 -
 12
12 -
 13
13 -
 14
14 -
 15
15 -
16
-
17
-
18
-
19
-
20
-
21
-
22
-
23
-
24
-
25
-
26
-
27
-
28
-
29
-
30
-
31
-
32
-
33
-
34
-
35
-
36
-
37
-
38
-
39
-
40
-
41
-
42
-
43
-
44
-
45
-
46
-
47
-
48
-
49
-
50
-
51
-
52
-
53
-
54
-
55
-
56
-
57
-
58
-
59
-
60
-
61
-
62
-
63
-
64
-
65
-
66
-
67
-
68
-
69
-
70
-
71
-
72
-
73
-
74
-
75
-
76
-
77
-
78
-
79
-
80
-
81
-
82
-
83
-
84
-
85
-
86
-
87
-
88
-
89
-
90
-
91
-
92
-
93
-
94
-
95
-
96
-
97
-
98
-
99
-
100
-
101
-
102
-
103
-
104
-
105
-
106
-
107
-
108
-
109
-
110
-
111
-
112
-
113
-
114
-
115
-
116
-
117
-
118
-
119
-
120
-
121
-
122
 |
 |