Sony SNCEP520 User Manual (SNC-ER/EP User Guide) - Page 40
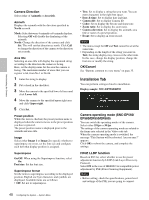
Installation Tab, Camera Direction, OK/Cancel, Camera operating mode SNC-EP550, EP580/ER550/ER580
 |
View all Sony SNCEP520 manuals
Add to My Manuals
Save this manual to your list of manuals |
Page 40 highlights
Administrating the Camera Camera Direction Select either of Azimuth or Area title. Azimuth Displays the azimuth with the direction specified in North as north. Mode: Select between 4-azimuth or 8-azimuth displays. Selecting Off will disable the displaying of the azimuth. North: Change the direction of the camera and click Set. This will set that direction as north. Click Call to change the direction of the camera to the direction set as north. Area title Selecting an area title will display the registered string according to the direction the camera is facing. Here, set the display name for the area the camera is facing. The maximum number of areas that you can register is 64, from No.1 to No.64. 1 Enter the string to display. 2 Put a check in the checkbox. 3 Move the camera to the specified lower left area and click Lower left. 4 Move the camera to the specified upper right area and click Upper right. 5 Click Set. Preset position While this item is checked, the preset position name is displayed when the camera moves to the preset position you have registered. The preset position name is displayed prior to the azimuth and area title. Image Select either Image 1 or Image 2 to specify whether to superimpose on or not, set the font size and configure each item that display position is assigned. Superimpose On/Off: When using the Superimpose function, select On. Font size: Set the font size. Superimpose format Set the items to superimpose according to the displayed position. English one byte characters and symbols are displayed. Available items are as follows: • Off: Set not to superimpose. • Text: Set to display a string that you want. You can enter characters in the right free space. • Date & time: Set to display date and time. • Camera ID: Set to display Camera ID. • Codec: Set to display the bit rate and frame rate. • Zoom ratio: Set to display the zoom ratio. • Camera direction: Set to display the azimuth, area title or name of a preset position. • Event: Set to display an event record. Notes • The items except for Off and Text cannot be set at the same time. • Depending on the length of the string you enter in Text, the string display may crossover the other item. In this case, change the display position, change the font size or modify the string. OK/Cancel See "Buttons common to every menu" on page 35. Installation Tab You can perform settings related to installation. Display sample: SNC-EP550/ER550 Camera operating mode (SNC-EP550/ EP580/ER550/ER580) You can switch the operating modes of the camera. Select either 25 fps or 30 fps. The settings of the camera operating mode are related to the frame rate selected in the Video code tab. When the camera operating mode is switched, the message "This System will be rebooted. Are you sure?" appears. Click OK to reboot the camera, and complete the settings. HPoE LLDP function Based on 802.3at, select whether to use the power adjustment function by LLDP (Link-Layer-DiscoveryProtocol). Select ON in the case of IEEE802.3at compatible power adjustment by PSE (Power Sourcing Equipment). Notes • Before setting, check the specifications, power level and settings of the PSE you are going to connect. 40 Configuring the System - System Menu
-
 1
1 -
2
-
3
-
4
-
5
-
6
-
7
-
8
-
9
-
10
-
11
-
12
-
13
-
14
-
15
-
16
-
17
-
18
-
19
-
20
-
21
-
22
-
23
-
24
-
25
-
26
-
27
-
28
-
29
-
30
-
31
-
32
-
33
-
34
-
 35
35 -
 36
36 -
 37
37 -
 38
38 -
 39
39 -
 40
40 -
 41
41 -
 42
42 -
 43
43 -
 44
44 -
 45
45 -
46
-
47
-
48
-
49
-
50
-
51
-
52
-
53
-
54
-
55
-
56
-
57
-
58
-
59
-
60
-
61
-
62
-
63
-
64
-
65
-
66
-
67
-
68
-
69
-
70
-
71
-
72
-
73
-
74
-
75
-
76
-
77
-
78
-
79
-
80
-
81
-
82
-
83
-
84
-
85
-
86
-
87
-
88
-
89
-
90
-
91
-
92
-
93
-
94
-
95
-
96
-
97
-
98
-
99
-
100
-
101
-
102
-
103
-
104
-
105
-
106
-
107
-
108
-
109
-
110
-
111
-
112
-
113
-
114
-
115
-
116
-
117
-
118
-
119
-
120
-
121
-
122
 |
 |
