Sony SNCEP520 User Manual (SNC-ER/EP User Guide) - Page 60
To remove an installed CA certificate, Add Stand-alone Snap-in
 |
View all Sony SNCEP520 manuals
Add to My Manuals
Save this manual to your list of manuals |
Page 60 highlights
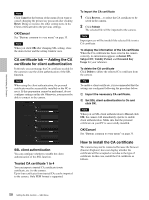
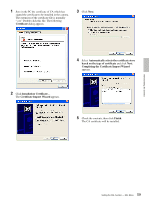
To remove an installed CA certificate 1 In Internet Explorer, click in the order Tools, Internet options, Content tab and Certificates. The Certificates dialog appears. 4 Select Certificates from the list, then click Add. Certificate Snap-in is displayed. 5 Select Computer account as the certificate administrated in this Snap-in, then click Next. 6 Select Local Computer as the computer administrated in this Snap-in, then click Finish. 7 Close Add Standalone Snap-in (for Windows XP Professional only) and Add/Remove Snap-in... dialogs. The items for administrating Certificates appears in the Console Route window. Confirm the relevant certificate, then remove it. Administrating the Camera 2 Select the certificate you want to remove. The CA certificate is usually stored in Trusted Root Certification Authorities. 3 Click Remove. Do you want to delete the certificate appears to confirm. 4 Click Yes. The certificate will be removed. There may be a case that a certificate cannot be removed by the steps above due to the type of certificate. Check the installation condition and remove it following the steps below. Note You need to log in as Administrator to perform these steps. 1 Open Run... of the Windows menu, then enter mmc and click OK. 2 Select File in the Console 1 window and Add/ Remove Snap-in... (when Windows XP Professional is used) Add/Remove Snap-in... dialog appears. 3 Click Add to display Add Stand-alone Snap-in dialog. You need to follow this step if using Windows XP Professional. 60 Setting the SSL function - SSL Menu
-
 1
1 -
2
-
3
-
4
-
5
-
6
-
7
-
8
-
9
-
10
-
11
-
12
-
13
-
14
-
15
-
16
-
17
-
18
-
19
-
20
-
21
-
22
-
23
-
24
-
25
-
26
-
27
-
28
-
29
-
30
-
31
-
32
-
33
-
34
-
35
-
36
-
37
-
38
-
39
-
40
-
41
-
42
-
43
-
44
-
45
-
46
-
47
-
48
-
49
-
50
-
51
-
52
-
53
-
54
-
 55
55 -
 56
56 -
 57
57 -
 58
58 -
 59
59 -
 60
60 -
 61
61 -
 62
62 -
 63
63 -
 64
64 -
 65
65 -
66
-
67
-
68
-
69
-
70
-
71
-
72
-
73
-
74
-
75
-
76
-
77
-
78
-
79
-
80
-
81
-
82
-
83
-
84
-
85
-
86
-
87
-
88
-
89
-
90
-
91
-
92
-
93
-
94
-
95
-
96
-
97
-
98
-
99
-
100
-
101
-
102
-
103
-
104
-
105
-
106
-
107
-
108
-
109
-
110
-
111
-
112
-
113
-
114
-
115
-
116
-
117
-
118
-
119
-
120
-
121
-
122
 |
 |
