Sony SNCEP520 User Manual (SNC-ER/EP User Guide) - Page 57
Certificates, Private key password, Status, Issuer DN
 |
View all Sony SNCEP520 manuals
Add to My Manuals
Save this manual to your list of manuals |
Page 57 highlights
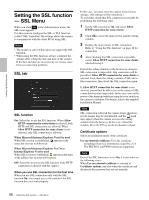
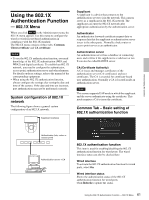
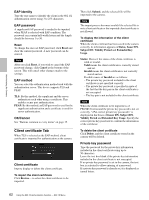
Administrating the Camera Use a self-signed certificate (For test use): This mode uses the certificate and private key pair generated by Generating a self-signed certificate on page 57. Private key information corresponding to the certificate is stored in the camera. You do not need to install an external certificate. However, you cannot execute the existence proof that is one of the SSL functions for the following reasons. - The private key generated in the camera is selfsigned by the camera. - A prepared value is set for a distinguished name (Common name, etc). - The certificate is not issued by a trusted CA. For reasons of security, we recommend using this mode only when there is no problem even if perfect security is not saved. Notes • When Use a self-signed certificate (For test use) is selected, the Security Alert dialog appears on the SSL connection with a browser. For details, refer to "Using the SSL function" (page 16). • SSL connection may be impossible due to the type of certificate installed in the camera. In this case, refer to "How to install the CA certificate" on page 58 and install. Certificates Import, display or delete the certificate. To import the certificate Click Browse... to select the certificate to be imported. Click Submit to import the certificate, and the selected file to the camera. Note The import process becomes invalid if the selected file is not a certificate or the imported certificate is not allowed. Generating a self-signed certificate A self-signed certificate can be generated in the camera to be used when Use a self-signed certificate (For test use) is selected from Certificate options. Click Generate to generate a self-signed certificate in the camera. Clicking Generate again after Generate has been clicked once will update the self-signed certificate stored in the camera. Note Make sure to set the date and time on the camera correctly before performing this operation. If the date and time are not correctly set, it may cause browser connection problems. To display certificate information When the certificate has been set in the camera correctly, its information appears on Status, Issuer DN, Subject DN, Validity Period and Extended Key Usage. Status Shows if the status of the certificate is valid or invalid. The following statuses are recognised. Valid: The certificate is correctly stored and set. Invalid: The certificate is not correctly stored and set. Possible causes are as follows: - Use an external certificate is selected and the private key password included in the certificate is not specified correctly. - Use an external certificate is selected and the private key password is specified in spite of the fact that the key pair in the certificate is not encrypted. - Use an external certificate is selected and the key pair is not included in the certificate. - Use a self-signed certificate (For test use) is selected without the self-signed certificate being generated. Note When the certificate to be imported is of PKCS#12 format and the private key password is not set correctly, is displayed in the boxes of Issuer DN, Subject DN, Validity Period and Extended Key Usage. Specify the correct private key password to confirm the information of the certificate. To delete the imported certificate or self-signed certificate Click Delete to delete the certificate or self-signed certificate imported to the camera. Private key password Type the password for the private key information included in the certificate using up to 50 characters. This text box is active only when Certificate options is set to Use an external certificate. Leave the text box blank if the private key information included in the certificate is not encrypted. If no private key password is set in the camera, an active text field is displayed and this allows a password to be entered. If a private key password is already set, it is displayed as an inactive text field. Reset To change the private key password, click this button. The current password is cleared and the password text box becomes active to allow a new password entry. 57 Setting the SSL function - SSL Menu
-
 1
1 -
2
-
3
-
4
-
5
-
6
-
7
-
8
-
9
-
10
-
11
-
12
-
13
-
14
-
15
-
16
-
17
-
18
-
19
-
20
-
21
-
22
-
23
-
24
-
25
-
26
-
27
-
28
-
29
-
30
-
31
-
32
-
33
-
34
-
35
-
36
-
37
-
38
-
39
-
40
-
41
-
42
-
43
-
44
-
45
-
46
-
47
-
48
-
49
-
50
-
51
-
 52
52 -
 53
53 -
 54
54 -
 55
55 -
 56
56 -
 57
57 -
 58
58 -
 59
59 -
 60
60 -
 61
61 -
 62
62 -
63
-
64
-
65
-
66
-
67
-
68
-
69
-
70
-
71
-
72
-
73
-
74
-
75
-
76
-
77
-
78
-
79
-
80
-
81
-
82
-
83
-
84
-
85
-
86
-
87
-
88
-
89
-
90
-
91
-
92
-
93
-
94
-
95
-
96
-
97
-
98
-
99
-
100
-
101
-
102
-
103
-
104
-
105
-
106
-
107
-
108
-
109
-
110
-
111
-
112
-
113
-
114
-
115
-
116
-
117
-
118
-
119
-
120
-
121
-
122
 |
 |