Sony SNCEP520 User Manual (SNC-ER/EP User Guide) - Page 44
Picture Tab, Audio codec, Audio upload, OK/Cancel, Preview screen, Exposure
 |
View all Sony SNCEP520 manuals
Add to My Manuals
Save this manual to your list of manuals |
Page 44 highlights
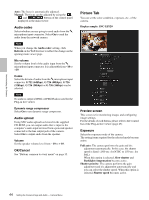
Administrating the Camera Auto: The focus is automatically adjusted. Manual: The focus can be adjusted by using the , and buttons of the control panel displayed in the main viewer. Audio codec Select whether you are going to send audio from the m microphone input connector. Select On to send the audio from the network camera. Note When you change the Audio codec setting, click Refresh on the Web browser to reflect the change on the opening main viewer page. Mic volume Set the volume level of the audio input from the m microphone input connector. It is adjustable from -10 to +10. Codec Select the bit rate of audio from the m microphone input connector. G.711 (64kbps), G.726 (40kbps), G.726 (32kbps), G.726 (24kbps) or G.726 (16kbps) can be selected. Note No audio is output if JPEG or JPEG/Flash is used for the Plug-in free viewer. Dynamic range compressor Select On to use dynamic range compressor. Audio upload Using SNC audio upload tool stored in the supplied CD-ROM, you can output audio that is input to the computer's audio input terminal from a powered speaker connected to the line output jack of the camera. Select On to output audio from the speaker. Volume Set the speaker volume level from - 10 to + 10. OK/Cancel See "Buttons common to every menu" on page 35. Picture Tab You can set the color condition, exposure, etc., of the camera. Display sample: SNC-EP520 Preview screen This screen is for monitoring images and configuring image settings. For the details of each button, please refer to the Control bar of the Plug-in free viewer (page 25). Exposure Select the exposure mode of the camera. The setting items required for the selected mode become active. Full auto: The camera performs the gain and iris adjustment automatically. In this case, the shutter speed is fixed. (1/60 sec. for NTSC or 1/50 sec. for PAL). When this option is selected, Slow shutter and Backlight compensation become active. Shutter priority: The camera performs the gain adjustment and iris adjustment automatically and you can select the shutter speed. When this option is selected, Shutter speed becomes active. 44 Setting the Camera Image and Audio - Camera Menu
-
 1
1 -
2
-
3
-
4
-
5
-
6
-
7
-
8
-
9
-
10
-
11
-
12
-
13
-
14
-
15
-
16
-
17
-
18
-
19
-
20
-
21
-
22
-
23
-
24
-
25
-
26
-
27
-
28
-
29
-
30
-
31
-
32
-
33
-
34
-
35
-
36
-
37
-
38
-
 39
39 -
 40
40 -
 41
41 -
 42
42 -
 43
43 -
 44
44 -
 45
45 -
 46
46 -
 47
47 -
 48
48 -
 49
49 -
50
-
51
-
52
-
53
-
54
-
55
-
56
-
57
-
58
-
59
-
60
-
61
-
62
-
63
-
64
-
65
-
66
-
67
-
68
-
69
-
70
-
71
-
72
-
73
-
74
-
75
-
76
-
77
-
78
-
79
-
80
-
81
-
82
-
83
-
84
-
85
-
86
-
87
-
88
-
89
-
90
-
91
-
92
-
93
-
94
-
95
-
96
-
97
-
98
-
99
-
100
-
101
-
102
-
103
-
104
-
105
-
106
-
107
-
108
-
109
-
110
-
111
-
112
-
113
-
114
-
115
-
116
-
117
-
118
-
119
-
120
-
121
-
122
 |
 |
