Sony SNCEP520 User Manual (SNC-ER/EP User Guide) - Page 66
Setting the User - User Menu, User Menu
 |
View all Sony SNCEP520 manuals
Add to My Manuals
Save this manual to your list of manuals |
Page 66 highlights
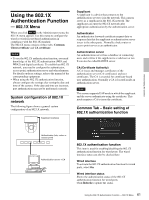
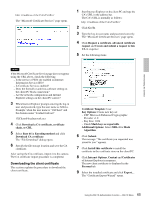
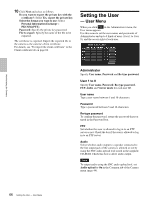
Administrating the Camera 10 Click Next and select as follows. Do you want to export the private key with the certificate?: Select Yes, export the private key. Select the format you want to use: Select Personal Information Exchange - PKCS#12(PFX). Password: Specify the private key password. File to export: Specify the name of the file to be exported. The certificate is exported. Import the exported file to the camera as the camera's client certificate. For details, see "To import the client certificate" in the Client certificate tab on page 62. Setting the User - User Menu When you click User in the Administrator menu, the User menu appears. Use this menu to set the user names and passwords of Administrator and up to 9 kinds of users (User 1 to User 9), and the access right of each user. Administrator Specify User name, Password and Re-type password. User 1 to 9 Specify User name, Password, Re-type password, FTP, Audio and Viewer mode for each user ID. User name Type a user name between 5 and 16 characters. Password Type a password between 5 and 16 characters. Re-type password To confirm the password, retype the password that you typed in the Password box. FTP Set whether this user is allowed to log in to an FTP server or not. Check the box if the user is allowed to log in to an FTP server. Audio Select whether audio output to a speaker connected to the line output jack of the camera is allowed or not by using the SNC audio upload tool stored in the supplied CD-ROM. Check this box to allow audio output. Note To output audio using the SNC audio upload tool, set Audio upload to On in the Common tab of the Camera menu (page 44). 66 Setting the User - User Menu
-
 1
1 -
2
-
3
-
4
-
5
-
6
-
7
-
8
-
9
-
10
-
11
-
12
-
13
-
14
-
15
-
16
-
17
-
18
-
19
-
20
-
21
-
22
-
23
-
24
-
25
-
26
-
27
-
28
-
29
-
30
-
31
-
32
-
33
-
34
-
35
-
36
-
37
-
38
-
39
-
40
-
41
-
42
-
43
-
44
-
45
-
46
-
47
-
48
-
49
-
50
-
51
-
52
-
53
-
54
-
55
-
56
-
57
-
58
-
59
-
60
-
 61
61 -
 62
62 -
 63
63 -
 64
64 -
 65
65 -
 66
66 -
 67
67 -
 68
68 -
 69
69 -
 70
70 -
 71
71 -
72
-
73
-
74
-
75
-
76
-
77
-
78
-
79
-
80
-
81
-
82
-
83
-
84
-
85
-
86
-
87
-
88
-
89
-
90
-
91
-
92
-
93
-
94
-
95
-
96
-
97
-
98
-
99
-
100
-
101
-
102
-
103
-
104
-
105
-
106
-
107
-
108
-
109
-
110
-
111
-
112
-
113
-
114
-
115
-
116
-
117
-
118
-
119
-
120
-
121
-
122
 |
 |
