Sony SNCEP520 User Manual (SNC-ER/EP User Guide) - Page 27
Panning and tilting by clicking the monitor image (Area zoom mode only), Panning - digital camera
 |
View all Sony SNCEP520 manuals
Add to My Manuals
Save this manual to your list of manuals |
Page 27 highlights
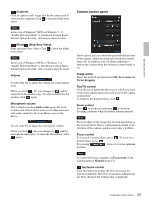
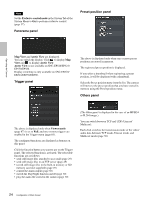
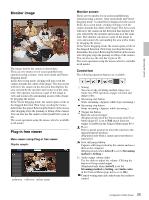
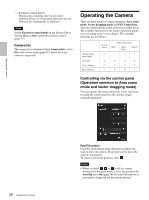
Operating the Camera • When you select On in "Horizontal tilt limit" (page 38), the camera will not move beyond horizontal level. Zoom control Click to zoom out, and click to zoom in. Zooming continues while the button remains pressed. Indicates the available area of analog zoom. Indicates the available area of digital zoom. Note The four edges of the image may be dark depending on the zoom position. This is a phenomenon related to the structure of the camera, and does not cause a problem. Focus control To focus on a nearby object, click . To focus on a distant object, click . By clicking , the focus is set to the optimum position. Note To control the focus manually, set Focus mode of the Camera menu to Manual (page 43). Panning and tilting by clicking the monitor image (Area zoom mode only) Click on the monitor image, and the camera moves so that the clicked portion is positioned at the center of the display. Panning, tilting and zooming by specifying the area (Area zoom mode only) Click and hold the left button of the mouse on the monitor image, and drag the mouse diagonally to draw a red frame around the portion you want to enlarge. The camera moves so that framed portion is positioned at the center of the display and is zoomed in. Notes • When Zoom mode in the Camera menu is set to Full, zooming of the specified area stops at the T end of the optical zoom. If you want to zoom in further using the digital zoom, specify the area again. • When the specified area is zoomed in, the center may be shifted or some portion of the image may appear out of the monitor image section. In this case, click the point you want to move to the center or click the arrow button on the camera control panel. Panning and tilting by dragging the screen (Vector dragging mode only) When you click on the starting point on the image and drag to the end point, the camera pans/tilts in the direction of the arrow from the starting point to the end point. The speed of operation is determined by the length of arrow. Releasing the button on the mouse stops the panning/tilting of the camera. 27 Operating the Camera
-
 1
1 -
2
-
3
-
4
-
5
-
6
-
7
-
8
-
9
-
10
-
11
-
12
-
13
-
14
-
15
-
16
-
17
-
18
-
19
-
20
-
21
-
 22
22 -
 23
23 -
 24
24 -
 25
25 -
 26
26 -
 27
27 -
 28
28 -
 29
29 -
 30
30 -
 31
31 -
 32
32 -
33
-
34
-
35
-
36
-
37
-
38
-
39
-
40
-
41
-
42
-
43
-
44
-
45
-
46
-
47
-
48
-
49
-
50
-
51
-
52
-
53
-
54
-
55
-
56
-
57
-
58
-
59
-
60
-
61
-
62
-
63
-
64
-
65
-
66
-
67
-
68
-
69
-
70
-
71
-
72
-
73
-
74
-
75
-
76
-
77
-
78
-
79
-
80
-
81
-
82
-
83
-
84
-
85
-
86
-
87
-
88
-
89
-
90
-
91
-
92
-
93
-
94
-
95
-
96
-
97
-
98
-
99
-
100
-
101
-
102
-
103
-
104
-
105
-
106
-
107
-
108
-
109
-
110
-
111
-
112
-
113
-
114
-
115
-
116
-
117
-
118
-
119
-
120
-
121
-
122
 |
 |
