Sony SNCEP520 User Manual (SNC-ER/EP User Guide) - Page 48
Day/Night Tab, Video codec Tab, Preview screen, Short infrared ray adjustment, OK/Cancel
 |
View all Sony SNCEP520 manuals
Add to My Manuals
Save this manual to your list of manuals |
Page 48 highlights
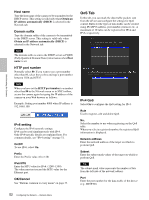
Administrating the Camera Day/Night Tab Use this tab to set the day/night function of the camera. Preview screen This screen is for monitoring images and configuring day/night settings. For details on each button, refer to the Control bar of the Plug-in free viewer (page 25). Day/Night mode Select the day/night mode from among four modes. Auto: Normally works in day mode; switches automatically to night mode in a dark place. Note The day/night mode is not switched to night mode automatically when Exposure is set to Manual in the Picture tab. Manual: Switch the day/night mode manually. When you select Manual, On and Off become active. When you select On, the camera works in night mode. When you select Off, it works in day mode. Timer: Normally the camera works in day mode. It switches to night mode at the time you set in the Schedule menu. Click Schedule to display the setting menu for the effective period. ("Setting the Schedule - Schedule Menu" on page 87) Sensor input: Controls the day/night mode by synchronizing it with the sensor input. Select the sensor input with which you want to synchronize the mode: Sensor input 1 or Sensor input 2. While a sensor input is detected, the camera works in night mode. Short infrared ray adjustment ON: Adjust background light when using the IR lamp or where there is much near short infrared ray. Increase the accuracy of auto-focus in night mode. OFF: Do not adjust background light. OK/Cancel See "Buttons common to every menu" on page 35. Video codec Tab Use this tab to set the items for the video codec. Display sample: SNC-EP550/ER550 Letterbox (SNC-EP550/EP580/ER550/ ER580) If you use Letterbox, select On. Note This function is not available if Cropping is set to On. 48 Setting the Camera Image and Audio - Camera Menu
-
 1
1 -
2
-
3
-
4
-
5
-
6
-
7
-
8
-
9
-
10
-
11
-
12
-
13
-
14
-
15
-
16
-
17
-
18
-
19
-
20
-
21
-
22
-
23
-
24
-
25
-
26
-
27
-
28
-
29
-
30
-
31
-
32
-
33
-
34
-
35
-
36
-
37
-
38
-
39
-
40
-
41
-
42
-
 43
43 -
 44
44 -
 45
45 -
 46
46 -
 47
47 -
 48
48 -
 49
49 -
 50
50 -
 51
51 -
 52
52 -
 53
53 -
54
-
55
-
56
-
57
-
58
-
59
-
60
-
61
-
62
-
63
-
64
-
65
-
66
-
67
-
68
-
69
-
70
-
71
-
72
-
73
-
74
-
75
-
76
-
77
-
78
-
79
-
80
-
81
-
82
-
83
-
84
-
85
-
86
-
87
-
88
-
89
-
90
-
91
-
92
-
93
-
94
-
95
-
96
-
97
-
98
-
99
-
100
-
101
-
102
-
103
-
104
-
105
-
106
-
107
-
108
-
109
-
110
-
111
-
112
-
113
-
114
-
115
-
116
-
117
-
118
-
119
-
120
-
121
-
122
 |
 |
