Sony SNCEP520 User Manual (SNC-ER/EP User Guide) - Page 110
Using the SNC audio upload tool, Setting tab
 |
View all Sony SNCEP520 manuals
Add to My Manuals
Save this manual to your list of manuals |
Page 110 highlights
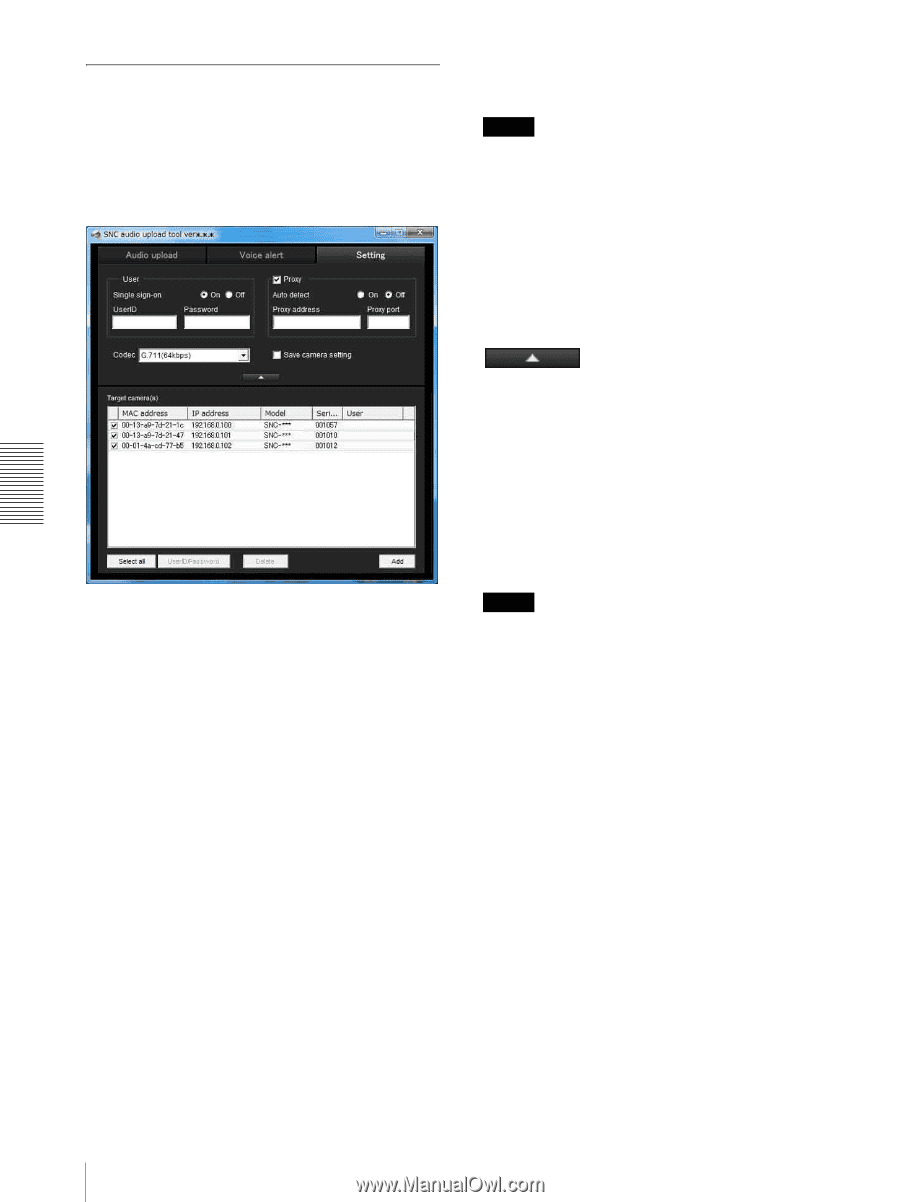
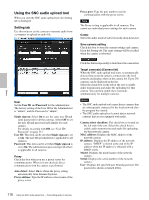
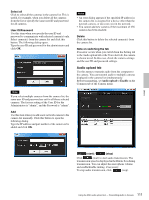
Others Using the SNC audio upload tool When you start the SNC audio upload tool, the Setting tab is displayed. Setting tab Use this menu to set the camera to transmit audio from a computer or upload an audio file. Proxy port: Type the port number used for communication with the proxy server. Note The Proxy setting is applicable to all cameras. You cannot use individual proxy settings for each camera. Codec Select the audio mode (Codec) from the drop-down list. Save camera setting Check this box to store the current settings and camera list in the Setting tab. The same settings will be recalled when the camera is rebooted. User Set the User ID and Password for the administrator. The factory setting of the User ID for the Administrator is "admin", and the Password is "admin". Single sign-on: Select On to use the same user ID and same password for all the cameras. Select Off to set the user ID and password individually for each camera. For details on setting with Off, see "User ID/ Password" on page 111. User ID: This item can be set when Single sign-on is set to On. The user ID specified here is applicable to all cameras. Password: This item can be set when Single sign-on is set to On. The administrator password specified here is applicable to all cameras. Proxy Check this box when you use a proxy server for communications. When it is not checked, direct communication with the camera is performed. Auto detect: Select On to obtain the proxy setting automatically from Internet Explorer. Proxy address: Type the IP address or host name of the proxy server. Click this button repeatedly to hide/show the camera list. Target camera(s) (Camera list) When the SNC audio upload tool starts, it automatically detects Sony network cameras connected to the local network and displays them in the camera list. Up to 256 cameras can be displayed in the list. Select the check box on the left of the row to enable audio transmission and audio file uploading for that camera. You can then enable these functions simultaneously for multiple cameras. Notes • The SNC audio upload tool cannot detect cameras that are subsequently connected to the local network after the program has started. • The SNC audio upload tool cannot detect network cameras that are not equipped with audio. Camera select checkbox: The check box is located on the left end of the row. Select this check box to enable audio transmission and audio file uploading for that network camera. MAC address: Displays the MAC address of the network camera. IP address: Displays the IP address of the network camera. "DHCP" is shown at the end of the IP address when the IP address is obtained with a DHCP server. Model: Displays the model name of the network camera. Serial: Displays the serial number of the network camera. User: Displays the specified user ID and password. The password is shown as turned letters. 110 Using the SNC audio upload tool - Transmitting Audio to Camera
-
 1
1 -
2
-
3
-
4
-
5
-
6
-
7
-
8
-
9
-
10
-
11
-
12
-
13
-
14
-
15
-
16
-
17
-
18
-
19
-
20
-
21
-
22
-
23
-
24
-
25
-
26
-
27
-
28
-
29
-
30
-
31
-
32
-
33
-
34
-
35
-
36
-
37
-
38
-
39
-
40
-
41
-
42
-
43
-
44
-
45
-
46
-
47
-
48
-
49
-
50
-
51
-
52
-
53
-
54
-
55
-
56
-
57
-
58
-
59
-
60
-
61
-
62
-
63
-
64
-
65
-
66
-
67
-
68
-
69
-
70
-
71
-
72
-
73
-
74
-
75
-
76
-
77
-
78
-
79
-
80
-
81
-
82
-
83
-
84
-
85
-
86
-
87
-
88
-
89
-
90
-
91
-
92
-
93
-
94
-
95
-
96
-
97
-
98
-
99
-
100
-
101
-
102
-
103
-
104
-
 105
105 -
 106
106 -
 107
107 -
 108
108 -
 109
109 -
 110
110 -
 111
111 -
 112
112 -
 113
113 -
 114
114 -
 115
115 -
116
-
117
-
118
-
119
-
120
-
121
-
122
 |
 |