Sony SNCEP520 User Manual (SNC-ER/EP User Guide) - Page 58
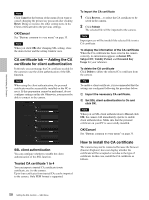
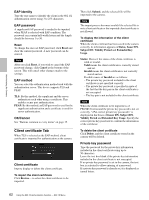
CA certificate tab - Adding the CA certificate for client authentication
 |
View all Sony SNCEP520 manuals
Add to My Manuals
Save this manual to your list of manuals |
Page 58 highlights
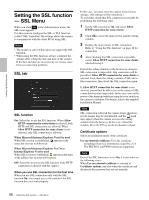
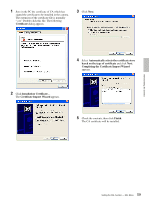
Administrating the Camera Note Click Cancel at the bottom of the menu if you want to cancel changing the private key password after clicking Reset. Doing so restores the other setting items in the Client certificate tab to the previous settings. OK/Cancel See "Buttons common to every menu" on page 35. Note When you click OK after changing SSL setting, close the main viewer and the setting window once. CA certificate tab - Adding the CA certificate for client authentication In this tab, you can manage the CA certificate needed for the camera to use the client authentication of the SSL function. Note When using the client authentication, the personal certificate must be successfully installed on the PC to use it. If this preparation cannot be performed, do not configure settings on this tab. Otherwise, you may not be able to connect to the camera. SSL client authentication You can configure whether to enable the client authentication of the SSL function. Trusted CA certificate 1 to 4 You can import a trusted CA certificate (route certificate, etc.) to the camera. Up to four certificates from trusted CAs can be imported to the camera. Only PEM format is supported. To import the CA certificate 1 Click Browse... to select the CA certificate to be saved in the camera. 2 Click Submit The selected file will be imported to the camera. Note Import process will be invalid if the selected file is not a CA certificate. To display the information of the CA certificate When the CA certificate has been saved in the camera correctly, its information appears on Issuer DN, Subject DN, Validity Period, and Extended Key Usage for your reference. To delete the CA certificate Click Delete to delete the selected CA certificate from the camera. Tip To enable a client certificate, it is recommended that the settings are configured following the procedure below: 1 Import the necessary CA certificate. 2 Set SSL client authentication to On and click OK. Note When you set SSL client authentication to On and click OK, the camera will immediately operate to enable client authentication. Make sure that the personal certificate on your PC is successfully installed. OK/Cancel See "Buttons common to every menu" on page 35. How to install the CA certificate The camera may not be connected because the browser (Internet Explorer) does not display whether the certificate will be accepted or not due to the type of certificate. In this case, install the CA certificate as follows. 58 Setting the SSL function - SSL Menu
-
 1
1 -
2
-
3
-
4
-
5
-
6
-
7
-
8
-
9
-
10
-
11
-
12
-
13
-
14
-
15
-
16
-
17
-
18
-
19
-
20
-
21
-
22
-
23
-
24
-
25
-
26
-
27
-
28
-
29
-
30
-
31
-
32
-
33
-
34
-
35
-
36
-
37
-
38
-
39
-
40
-
41
-
42
-
43
-
44
-
45
-
46
-
47
-
48
-
49
-
50
-
51
-
52
-
 53
53 -
 54
54 -
 55
55 -
 56
56 -
 57
57 -
 58
58 -
 59
59 -
 60
60 -
 61
61 -
 62
62 -
 63
63 -
64
-
65
-
66
-
67
-
68
-
69
-
70
-
71
-
72
-
73
-
74
-
75
-
76
-
77
-
78
-
79
-
80
-
81
-
82
-
83
-
84
-
85
-
86
-
87
-
88
-
89
-
90
-
91
-
92
-
93
-
94
-
95
-
96
-
97
-
98
-
99
-
100
-
101
-
102
-
103
-
104
-
105
-
106
-
107
-
108
-
109
-
110
-
111
-
112
-
113
-
114
-
115
-
116
-
117
-
118
-
119
-
120
-
121
-
122
 |
 |
