Sony SNCEP520 User Manual (SNC-ER/EP User Guide) - Page 100
Using Privacy Masking - Masking a Camera Image, Log tab, Using the Privacy Masking
 |
View all Sony SNCEP520 manuals
Add to My Manuals
Save this manual to your list of manuals |
Page 100 highlights
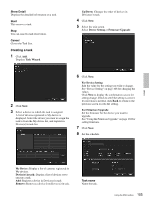
Log tab Privacy Masking screen Viewer Others Overwrite the oldest log file To set the size of the log file, check Enable and specify the minimum required space for a log file. Log output folder Click Browse to display the folder selection dialog. Specify the folder to save the log. Using Privacy Masking - Masking a Camera Image The Privacy Masking function of SNC toolbox allows you to mask parts of the camera image to be transmitted. 1 Select the camera to set a privacy mask from the Device list. 2 Click Masking. Using the Privacy Masking The Privacy Masking screen enables you to set the privacy mask position. Click Masking to display the Privacy Masking screen. Panorama image area Viewer A live image of the camera is displayed. You can specify the position of the privacy mask in this area. If you click on the image, the camera moves so that the clicked point goes to the center of the image. Panorama image area The panorama image created with the supplied Panorama Creator is displayed. The positions of the registered privacy masks are shown with numbers in this area. If you click on the panorama image, the camera moves to the clicked point. Note The default image is shown when no panorama image has been created. PTZ Controller Allows you to pan, tilt and zoom the camera. Pan/tilt control Click the arrow button of the direction in which you want to move the camera. Keep it pressed to move the camera continuously. 100 Using the SNC toolbox
-
 1
1 -
2
-
3
-
4
-
5
-
6
-
7
-
8
-
9
-
10
-
11
-
12
-
13
-
14
-
15
-
16
-
17
-
18
-
19
-
20
-
21
-
22
-
23
-
24
-
25
-
26
-
27
-
28
-
29
-
30
-
31
-
32
-
33
-
34
-
35
-
36
-
37
-
38
-
39
-
40
-
41
-
42
-
43
-
44
-
45
-
46
-
47
-
48
-
49
-
50
-
51
-
52
-
53
-
54
-
55
-
56
-
57
-
58
-
59
-
60
-
61
-
62
-
63
-
64
-
65
-
66
-
67
-
68
-
69
-
70
-
71
-
72
-
73
-
74
-
75
-
76
-
77
-
78
-
79
-
80
-
81
-
82
-
83
-
84
-
85
-
86
-
87
-
88
-
89
-
90
-
91
-
92
-
93
-
94
-
 95
95 -
 96
96 -
 97
97 -
 98
98 -
 99
99 -
 100
100 -
 101
101 -
 102
102 -
 103
103 -
 104
104 -
 105
105 -
106
-
107
-
108
-
109
-
110
-
111
-
112
-
113
-
114
-
115
-
116
-
117
-
118
-
119
-
120
-
121
-
122
 |
 |
