Brother International MFC 8500 Service Manual - Page 127
Sensor Operational Check, DFDRCVRSTNPOHK, MNCS P2
 |
UPC - 012502603832
View all Brother International MFC 8500 manuals
Add to My Manuals
Save this manual to your list of manuals |
Page 127 highlights
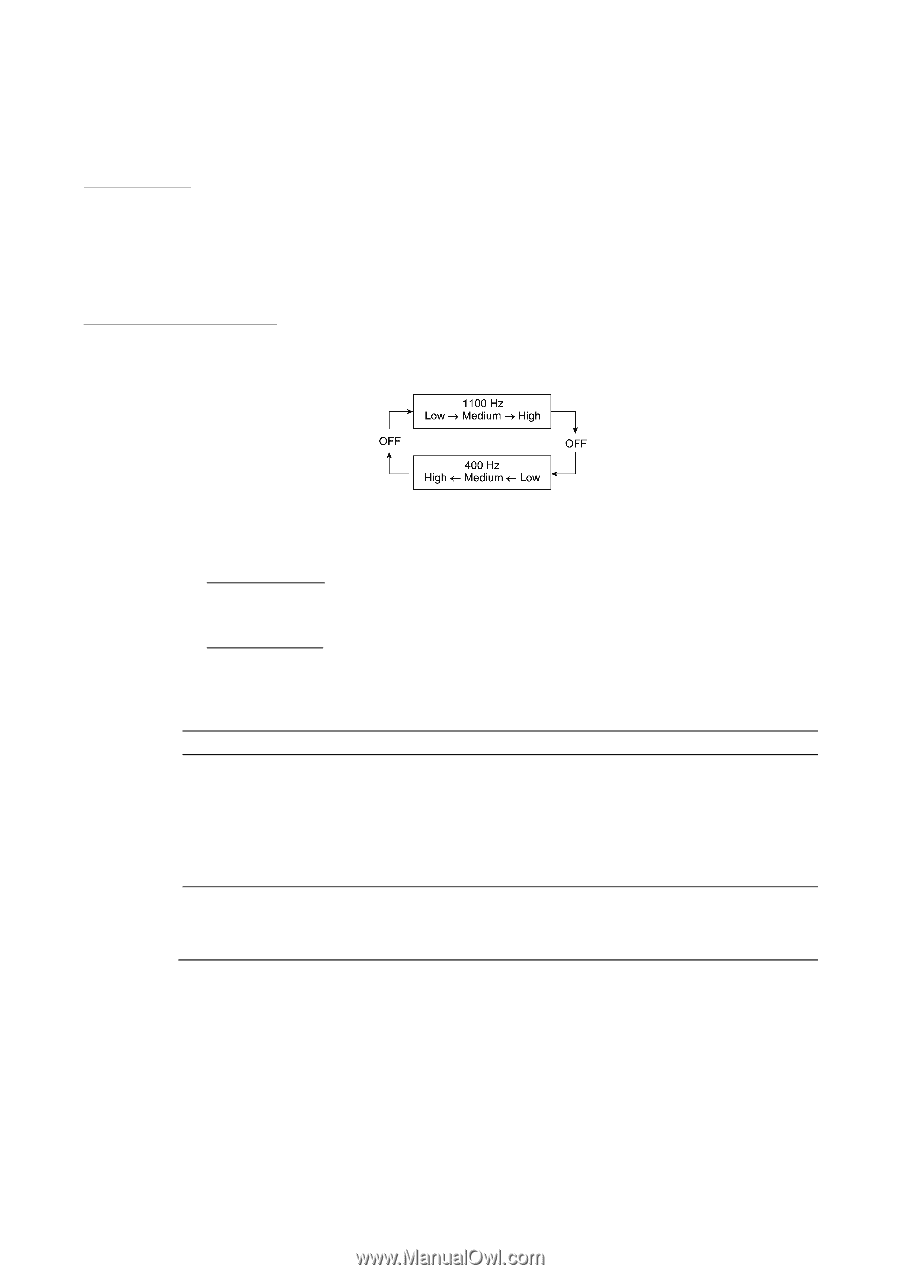
3.9 Sensor Operational Check n Function This function allows you to check whether the 12 sensors (11 sensors on European models)-document front sensor, document rear sensor, cover sensor, registration sensor, toner sensor, paper ejection sensor, hook switch*, 2nd registration sensor**, manual insertion sensor, cassette sensor, 2nd cassette sensor**, and jam sensor--operate correctly. (*European models have no hook switch.) (**These sensors are provided for models supporting a 2nd paper cassette.) n Operating Procedure (1) Press the 3 and 2 keys in this order in the initial stage of the maintenance mode. The equipment beeps 1100 Hz and 400 Hz tones cyclically through the following volumes for testing the speaker. NOTE: To stop beeping, press the Menu key. If the sensing status are as listed below, the LCD will show the following two character strings which can be switched by pressing the Fax Start key: American models "DFDRCVRSTNPOHK " and "MNCS P2" "DFDRCVRSTNPOHKR2" and "MNCSC2P2" on models having a 2nd paper cassette European models "DFDRCVRSTNPO " and "MNCS P2" "DFDRCVRSTNPO R2" and "MNCSC2P2" on models having a 2nd paper cassette Given below is the relationship between the LCD indication, sensor names and sensor status. LCD Sensors Sensing status DF Document front sensor DR Document rear sensor CV Cover sensor RS Registration sensor TN Toner sensor PO Paper ejection sensor HK Hook switch* R2 2nd registration sensor** MN Manual insertion sensor CS Cassette sensor C2 2nd cassette sensor** P2 Jam sensor No document detected. No document detected. Top cover closed. No paper detected. No toner detected. No paper jam. On-hook state. No paper detected. No paper detected. No paper cassette loaded. No paper cassette loaded. No paper jammed. (2) Change the detecting conditions (e.g., insert paper through the document sensors or the registration sensor(s), open the front cover, remove the toner cartridge, jam paper at the paper outlet or inside the heat-fixing unit, lift up the handset*, and then check that the indication on the LCD changes according to the sensor states. (3) To stop this operation and return the equipment to the initial stage of the maintenance mode, press the Stop key. NOTE: If you have opened and closed the top cover during the above procedure, you need to open and close the front cover again upon completion of the procedure. V - 15
-
 1
1 -
2
-
3
-
4
-
5
-
6
-
7
-
8
-
9
-
10
-
11
-
12
-
13
-
14
-
15
-
16
-
17
-
18
-
19
-
20
-
21
-
22
-
23
-
24
-
25
-
26
-
27
-
28
-
29
-
30
-
31
-
32
-
33
-
34
-
35
-
36
-
37
-
38
-
39
-
40
-
41
-
42
-
43
-
44
-
45
-
46
-
47
-
48
-
49
-
50
-
51
-
52
-
53
-
54
-
55
-
56
-
57
-
58
-
59
-
60
-
61
-
62
-
63
-
64
-
65
-
66
-
67
-
68
-
69
-
70
-
71
-
72
-
73
-
74
-
75
-
76
-
77
-
78
-
79
-
80
-
81
-
82
-
83
-
84
-
85
-
86
-
87
-
88
-
89
-
90
-
91
-
92
-
93
-
94
-
95
-
96
-
97
-
98
-
99
-
100
-
101
-
102
-
103
-
104
-
105
-
106
-
107
-
108
-
109
-
110
-
111
-
112
-
113
-
114
-
115
-
116
-
117
-
118
-
119
-
120
-
121
-
 122
122 -
 123
123 -
 124
124 -
 125
125 -
 126
126 -
 127
127 -
 128
128 -
 129
129 -
 130
130 -
 131
131 -
 132
132 -
133
-
134
-
135
-
136
-
137
-
138
-
139
-
140
-
141
-
142
-
143
-
144
-
145
-
146
-
147
-
148
-
149
-
150
-
151
-
152
-
153
-
154
-
155
-
156
-
157
-
158
-
159
-
160
-
161
-
162
-
163
-
164
-
165
-
166
-
167
-
168
-
169
-
170
-
171
-
172
-
173
-
174
-
175
-
176
-
177
-
178
-
179
-
180
-
181
-
182
-
183
-
184
-
185
-
186
-
187
-
188
-
189
-
190
-
191
-
192
-
193
-
194
-
195
-
196
-
197
-
198
-
199
-
200
-
201
-
202
-
203
-
204
-
205
-
206
-
207
-
208
-
209
-
210
-
211
-
212
-
213
-
214
-
215
-
216
-
217
-
218
-
219
-
220
-
221
-
222
-
223
-
224
-
225
-
226
-
227
-
228
-
229
-
230
-
231
-
232
-
233
-
234
-
235
-
236
-
237
-
238
-
239
 |
 |