Brother International MFC 8500 Service Manual - Page 46
Control Panel ASSY, the front arrow
 |
UPC - 012502603832
View all Brother International MFC 8500 manuals
Add to My Manuals
Save this manual to your list of manuals |
Page 46 highlights
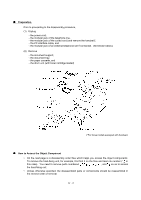
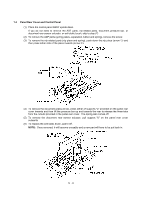
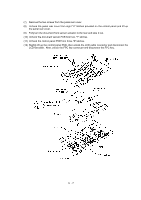
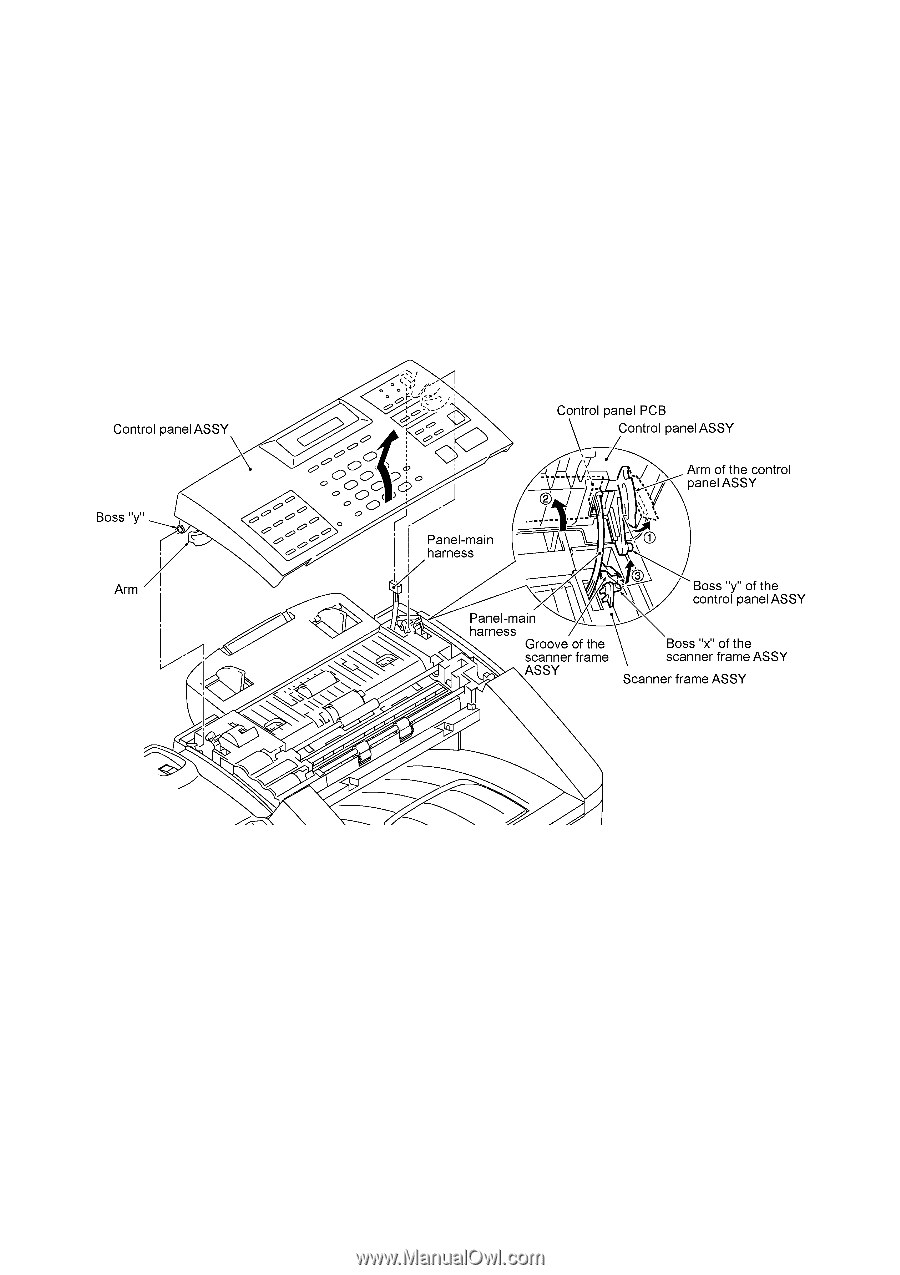
1.3 Control Panel ASSY (1) Slightly open the control panel ASSY. (2) Push the right and left arms of the control panel ASSY outwards (in the direction of arrow ) with your thumbs, then open the control panel ASSY further (arrow to unhook those arms from bosses "x" provided on the scanner frame ASSY) while sliding the control panel ASSY to the front (arrow to release its bosses "y" from the grooves of the scanner frame ASSY). (3) Slightly lift up the control panel ASSY and disconnect the panel-main harness from the control panel PCB. IV - 5
-
 1
1 -
2
-
3
-
4
-
5
-
6
-
7
-
8
-
9
-
10
-
11
-
12
-
13
-
14
-
15
-
16
-
17
-
18
-
19
-
20
-
21
-
22
-
23
-
24
-
25
-
26
-
27
-
28
-
29
-
30
-
31
-
32
-
33
-
34
-
35
-
36
-
37
-
38
-
39
-
40
-
 41
41 -
 42
42 -
 43
43 -
 44
44 -
 45
45 -
 46
46 -
 47
47 -
 48
48 -
 49
49 -
 50
50 -
 51
51 -
52
-
53
-
54
-
55
-
56
-
57
-
58
-
59
-
60
-
61
-
62
-
63
-
64
-
65
-
66
-
67
-
68
-
69
-
70
-
71
-
72
-
73
-
74
-
75
-
76
-
77
-
78
-
79
-
80
-
81
-
82
-
83
-
84
-
85
-
86
-
87
-
88
-
89
-
90
-
91
-
92
-
93
-
94
-
95
-
96
-
97
-
98
-
99
-
100
-
101
-
102
-
103
-
104
-
105
-
106
-
107
-
108
-
109
-
110
-
111
-
112
-
113
-
114
-
115
-
116
-
117
-
118
-
119
-
120
-
121
-
122
-
123
-
124
-
125
-
126
-
127
-
128
-
129
-
130
-
131
-
132
-
133
-
134
-
135
-
136
-
137
-
138
-
139
-
140
-
141
-
142
-
143
-
144
-
145
-
146
-
147
-
148
-
149
-
150
-
151
-
152
-
153
-
154
-
155
-
156
-
157
-
158
-
159
-
160
-
161
-
162
-
163
-
164
-
165
-
166
-
167
-
168
-
169
-
170
-
171
-
172
-
173
-
174
-
175
-
176
-
177
-
178
-
179
-
180
-
181
-
182
-
183
-
184
-
185
-
186
-
187
-
188
-
189
-
190
-
191
-
192
-
193
-
194
-
195
-
196
-
197
-
198
-
199
-
200
-
201
-
202
-
203
-
204
-
205
-
206
-
207
-
208
-
209
-
210
-
211
-
212
-
213
-
214
-
215
-
216
-
217
-
218
-
219
-
220
-
221
-
222
-
223
-
224
-
225
-
226
-
227
-
228
-
229
-
230
-
231
-
232
-
233
-
234
-
235
-
236
-
237
-
238
-
239
 |
 |
IV
- 5
1.3
Control Panel ASSY
(1)
Slightly open the control panel ASSY.
(2)
Push the right and left arms of the control panel ASSY outwards (in the direction of arrow
±
)
with your thumbs, then open the control panel ASSY further (arrow
²
to unhook those arms
from bosses "x" provided on the scanner frame ASSY) while sliding the control panel ASSY to
the front (arrow
³
to release its bosses "y" from the grooves of the scanner frame ASSY).
(3)
Slightly lift up the control panel ASSY and disconnect the panel-main harness from the control
panel PCB.