D-Link DGS-3120-24TC Product Manual - Page 160
<<Back, Show Details, Delete Rules, Add Rule, Access ID 1-256, Action, Priority 0-7
 |
View all D-Link DGS-3120-24TC manuals
Add to My Manuals
Save this manual to your list of manuals |
Page 160 highlights
xStack® DGS-3120 Series Managed Switch Web UI Reference Guide Click the
-
 1
1 -
2
-
3
-
4
-
5
-
6
-
7
-
8
-
9
-
10
-
11
-
12
-
13
-
14
-
15
-
16
-
17
-
18
-
19
-
20
-
21
-
22
-
23
-
24
-
25
-
26
-
27
-
28
-
29
-
30
-
31
-
32
-
33
-
34
-
35
-
36
-
37
-
38
-
39
-
40
-
41
-
42
-
43
-
44
-
45
-
46
-
47
-
48
-
49
-
50
-
51
-
52
-
53
-
54
-
55
-
56
-
57
-
58
-
59
-
60
-
61
-
62
-
63
-
64
-
65
-
66
-
67
-
68
-
69
-
70
-
71
-
72
-
73
-
74
-
75
-
76
-
77
-
78
-
79
-
80
-
81
-
82
-
83
-
84
-
85
-
86
-
87
-
88
-
89
-
90
-
91
-
92
-
93
-
94
-
95
-
96
-
97
-
98
-
99
-
100
-
101
-
102
-
103
-
104
-
105
-
106
-
107
-
108
-
109
-
110
-
111
-
112
-
113
-
114
-
115
-
116
-
117
-
118
-
119
-
120
-
121
-
122
-
123
-
124
-
125
-
126
-
127
-
128
-
129
-
130
-
131
-
132
-
133
-
134
-
135
-
136
-
137
-
138
-
139
-
140
-
141
-
142
-
143
-
144
-
145
-
146
-
147
-
148
-
149
-
150
-
151
-
152
-
153
-
154
-
 155
155 -
 156
156 -
 157
157 -
 158
158 -
 159
159 -
 160
160 -
 161
161 -
 162
162 -
 163
163 -
 164
164 -
 165
165 -
166
-
167
-
168
-
169
-
170
-
171
-
172
-
173
-
174
-
175
-
176
-
177
-
178
-
179
-
180
-
181
-
182
-
183
-
184
-
185
-
186
-
187
-
188
-
189
-
190
-
191
-
192
-
193
-
194
-
195
-
196
-
197
-
198
-
199
-
200
-
201
-
202
-
203
-
204
-
205
-
206
-
207
-
208
-
209
-
210
-
211
-
212
-
213
-
214
-
215
-
216
-
217
-
218
-
219
-
220
-
221
-
222
-
223
-
224
-
225
-
226
-
227
-
228
-
229
-
230
-
231
-
232
-
233
-
234
-
235
-
236
-
237
-
238
-
239
-
240
-
241
-
242
-
243
-
244
-
245
-
246
-
247
-
248
-
249
-
250
-
251
-
252
-
253
-
254
-
255
-
256
-
257
-
258
-
259
-
260
-
261
-
262
-
263
-
264
-
265
-
266
-
267
-
268
-
269
-
270
-
271
-
272
-
273
-
274
-
275
-
276
-
277
-
278
-
279
-
280
-
281
-
282
-
283
-
284
-
285
-
286
-
287
-
288
-
289
-
290
-
291
-
292
-
293
-
294
-
295
-
296
-
297
-
298
-
299
-
300
-
301
-
302
-
303
-
304
-
305
-
306
-
307
-
308
-
309
-
310
-
311
-
312
-
313
-
314
-
315
-
316
-
317
-
318
-
319
-
320
-
321
-
322
-
323
-
324
-
325
-
326
-
327
-
328
-
329
-
330
-
331
-
332
-
333
-
334
-
335
-
336
-
337
-
338
-
339
 |
 |

xStack® DGS-3120 Series Managed Switch Web UI Reference Guide
152
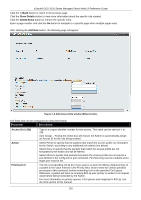
Click the
<<Back
button to return to the previous page.
Click the
Show Details
button to view more information about the specific rule created.
Click the
Delete Rules
button to remove the specific entry.
Enter a page number and click the
Go
button to navigate to a specific page when multiple pages exist.
After clicking the
Add Rule
button, the following page will appear:
Figure 7–6 Add Access Rule window (Ethernet ACL)
The fields that can be configured are described below:
Parameter
Description
Access ID (1-256)
Type in a unique identifier number for this access. This value can be set from
1
to
256
.
Auto Assign – Ticking this check box will instruct the Switch to automatically assign
an Access ID for the rule being created.
Action
Select
Permit
to specify that the packets that match the access profile are forwarded
by the Switch, according to any additional rule added (see below).
Select
Deny
to specify that the packets that match the access profile are not
forwarded by the Switch and will be filtered.
Select
Mirror
to specify that packets that match the access profile are mirrored to a
port defined in the config mirror port command. Port Mirroring must be enabled and a
target port must be set.
Priority (0-7)
Tick the corresponding check box if you want to re-write the 802.1p default priority of
a packet to the value entered in the Priority field, which meets the criteria specified
previously in this command, before forwarding it on to the specified CoS queue.
Otherwise, a packet will have its incoming 802.1p user priority re-written to its original
value before being forwarded by the Switch.
For more information on priority queues, CoS queues and mapping for 802.1p, see
the QoS section of this manual.