Epson ActionLaser User Manual - Page 43
Performing the self test, Be sure that your printer is plugged in and the power is
 |
View all Epson ActionLaser manuals
Add to My Manuals
Save this manual to your list of manuals |
Page 43 highlights
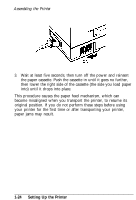
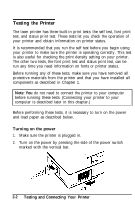
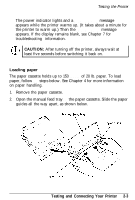
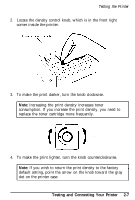
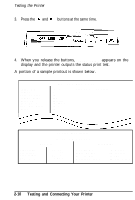
Testing the Printer 8. If you are not using letter size paper (the factory default setting for your printer), see the section on SelecType in Chapter 3 for details on setting the correct paper size. Performing the self test Successful completion of the self test indicates that you have set up your printer correctly and that you are ready to connect the printer to your computer. If you are unable to print this test, see Chapter 7 for troubleshooting information. The self test also lets you check your print density setting. After you print the self test, check the character pattern to see whether you are satisfied with the print density. The section in this chapter on adjusting print density describes how to change the print density setting. Follow the steps below to perform the self test: CAUTION: Never open the cover while the printer is printing. 1. Be sure that your printer is plugged in and the power is on before performing the self test. 2. Be sure that your printer is off line. (OFF LINE appears on your display.) If not, press the ON LINE button to set the printer off line. 3. Press the MANUAL and SPECIAL buttons on your control panel at the same time. Testing and Connecting Your Printer 2-5
-
 1
1 -
2
-
3
-
4
-
5
-
6
-
7
-
8
-
9
-
10
-
11
-
12
-
13
-
14
-
15
-
16
-
17
-
18
-
19
-
20
-
21
-
22
-
23
-
24
-
25
-
26
-
27
-
28
-
29
-
30
-
31
-
32
-
33
-
34
-
35
-
36
-
37
-
 38
38 -
 39
39 -
 40
40 -
 41
41 -
 42
42 -
 43
43 -
 44
44 -
 45
45 -
 46
46 -
 47
47 -
 48
48 -
49
-
50
-
51
-
52
-
53
-
54
-
55
-
56
-
57
-
58
-
59
-
60
-
61
-
62
-
63
-
64
-
65
-
66
-
67
-
68
-
69
-
70
-
71
-
72
-
73
-
74
-
75
-
76
-
77
-
78
-
79
-
80
-
81
-
82
-
83
-
84
-
85
-
86
-
87
-
88
-
89
-
90
-
91
-
92
-
93
-
94
-
95
-
96
-
97
-
98
-
99
-
100
-
101
-
102
-
103
-
104
-
105
-
106
-
107
-
108
-
109
-
110
-
111
-
112
-
113
-
114
-
115
-
116
-
117
-
118
-
119
-
120
-
121
-
122
-
123
-
124
-
125
-
126
-
127
-
128
-
129
-
130
-
131
-
132
-
133
-
134
-
135
-
136
-
137
-
138
-
139
-
140
-
141
-
142
-
143
-
144
-
145
-
146
-
147
-
148
-
149
-
150
-
151
-
152
-
153
-
154
-
155
-
156
-
157
-
158
-
159
-
160
-
161
-
162
-
163
-
164
-
165
-
166
-
167
-
168
-
169
-
170
-
171
-
172
-
173
-
174
-
175
-
176
-
177
-
178
-
179
-
180
-
181
-
182
-
183
-
184
-
185
-
186
-
187
-
188
-
189
-
190
-
191
-
192
-
193
-
194
-
195
-
196
-
197
-
198
-
199
-
200
-
201
-
202
-
203
-
204
-
205
-
206
-
207
-
208
-
209
-
210
-
211
-
212
-
213
-
214
-
215
-
216
-
217
-
218
-
219
 |
 |
