Epson ActionLaser User Manual - Page 49
Connecting the Printer to Your Computer, Choosing an interface, and Connecting Your Printer
 |
View all Epson ActionLaser manuals
Add to My Manuals
Save this manual to your list of manuals |
Page 49 highlights
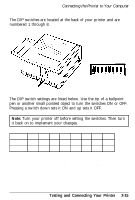
Connecting the Printer to Your Computer For the laser printer to be able to receive and interpret information from your computer, both devices need to be set up so that they can communicate correctly. This requires having the correct interface cable and selecting the right communications settings. You can select from the following built-in interfaces: l Parallel l RS-232C serial l RS-422A serial. Choosing an interface When connecting the laser printer to your computer, you first have to determine whether a parallel or serial connection should be used. Many computers only provide one type of connection for a printer. If both serial and parallel connections are available, it is normally better to use the parallel interface for the printer, leaving the serial port of your computer free for devices such as modems. If you are ii any doubt about which type of connection to make, consult your computer dealer. Your printer is set up at the factory for parallel communication. If your computer also uses parallel communication, you should be able to connect up immediately, provided you have a shielded parallel interface cable. If, however, you find that you need a serial interface, you must change the communications settings with SelecType as described in Chapter 3. You also need to find out which type of serial interface is required by your computer (RS-232C or RS-422A) and set the printer's DIP switches accordingly. (The DIP switches are factory set for the RS-232C serial interface.) Testing and Connecting Your Printer 2-11
-
 1
1 -
2
-
3
-
4
-
5
-
6
-
7
-
8
-
9
-
10
-
11
-
12
-
13
-
14
-
15
-
16
-
17
-
18
-
19
-
20
-
21
-
22
-
23
-
24
-
25
-
26
-
27
-
28
-
29
-
30
-
31
-
32
-
33
-
34
-
35
-
36
-
37
-
38
-
39
-
40
-
41
-
42
-
43
-
 44
44 -
 45
45 -
 46
46 -
 47
47 -
 48
48 -
 49
49 -
 50
50 -
 51
51 -
 52
52 -
 53
53 -
 54
54 -
55
-
56
-
57
-
58
-
59
-
60
-
61
-
62
-
63
-
64
-
65
-
66
-
67
-
68
-
69
-
70
-
71
-
72
-
73
-
74
-
75
-
76
-
77
-
78
-
79
-
80
-
81
-
82
-
83
-
84
-
85
-
86
-
87
-
88
-
89
-
90
-
91
-
92
-
93
-
94
-
95
-
96
-
97
-
98
-
99
-
100
-
101
-
102
-
103
-
104
-
105
-
106
-
107
-
108
-
109
-
110
-
111
-
112
-
113
-
114
-
115
-
116
-
117
-
118
-
119
-
120
-
121
-
122
-
123
-
124
-
125
-
126
-
127
-
128
-
129
-
130
-
131
-
132
-
133
-
134
-
135
-
136
-
137
-
138
-
139
-
140
-
141
-
142
-
143
-
144
-
145
-
146
-
147
-
148
-
149
-
150
-
151
-
152
-
153
-
154
-
155
-
156
-
157
-
158
-
159
-
160
-
161
-
162
-
163
-
164
-
165
-
166
-
167
-
168
-
169
-
170
-
171
-
172
-
173
-
174
-
175
-
176
-
177
-
178
-
179
-
180
-
181
-
182
-
183
-
184
-
185
-
186
-
187
-
188
-
189
-
190
-
191
-
192
-
193
-
194
-
195
-
196
-
197
-
198
-
199
-
200
-
201
-
202
-
203
-
204
-
205
-
206
-
207
-
208
-
209
-
210
-
211
-
212
-
213
-
214
-
215
-
216
-
217
-
218
-
219
 |
 |
