HP 6125G HP 6125G & 6125G/XG Blade Switches Security Configuration Gui - Page 181
Configuring the switch, Internet Information Services IIS Manager
 |
View all HP 6125G manuals
Add to My Manuals
Save this manual to your list of manuals |
Page 181 highlights
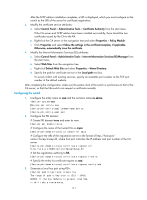
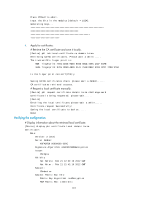
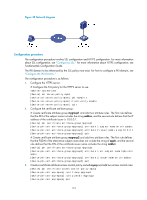
After the SCEP add-on installation completes, a URL is displayed, which you must configure on the switch as the URL of the server for certificate registration. 3. Modify the certificate service attributes: a. Select Control Panel > Administrative Tools > Certificate Authority from the start menu. If the CA server and SCEP add-on have been installed successfully, there should be two certificates issued by the CA to the RA. b. Right-click the CA server in the navigation tree and select Properties > Policy Module. c. Click Properties and select Follow the settings in the certificate template, if applicable. Otherwise, automatically issue the certificate. 4. Modify the Internet Information Services (IIS) attributes: a. Select Control Panel > Administrative Tools > Internet Information Services (IIS) Manager from the start menu. b. Select Web Sites from the navigation tree. c. Right-click Default Web Site and select Properties > Home Directory. d. Specify the path for certificate service in the Local path text box. To avoid conflict with existing services, specify an available port number as the TCP port number of the default website. After completing the configuration, make sure the system clock of the switch is synchronous to that of the CA server, so that that the switch can request a certificate normally. Configuring the switch 1. Configure the entity name as aaa and the common name as device. system-view [Device] pki entity aaa [Device-pki-entity-aaa] common-name device [Device-pki-entity-aaa] quit 2. Configure the PKI domain: # Create PKI domain torsa and enter its view. [Device] pki domain torsa # Configure the name of the trusted CA as myca. [Device-pki-domain-torsa] ca identifier myca # Configure the URL of the registration server in the format of http://host:port/ certsrv/mscep/mscep.dll, where host:port indicates the IP address and port number of the CA server. [Device-pki-domain-torsa] certificate request url http://4.4.4.1:8080/certsrv/mscep/mscep.dll # Set the registration authority to RA. [Device-pki-domain-torsa] certificate request from ra # Specify the entity for certificate request as aaa. [Device-pki-domain-torsa] certificate request entity aaa 3. Generate a local key pair using RSA: [Device] public-key local create rsa The range of public key size is (512 ~ 2048). NOTES: If the key modulus is greater than 512, It will take a few minutes. 171
-
 1
1 -
2
-
3
-
4
-
5
-
6
-
7
-
8
-
9
-
10
-
11
-
12
-
13
-
14
-
15
-
16
-
17
-
18
-
19
-
20
-
21
-
22
-
23
-
24
-
25
-
26
-
27
-
28
-
29
-
30
-
31
-
32
-
33
-
34
-
35
-
36
-
37
-
38
-
39
-
40
-
41
-
42
-
43
-
44
-
45
-
46
-
47
-
48
-
49
-
50
-
51
-
52
-
53
-
54
-
55
-
56
-
57
-
58
-
59
-
60
-
61
-
62
-
63
-
64
-
65
-
66
-
67
-
68
-
69
-
70
-
71
-
72
-
73
-
74
-
75
-
76
-
77
-
78
-
79
-
80
-
81
-
82
-
83
-
84
-
85
-
86
-
87
-
88
-
89
-
90
-
91
-
92
-
93
-
94
-
95
-
96
-
97
-
98
-
99
-
100
-
101
-
102
-
103
-
104
-
105
-
106
-
107
-
108
-
109
-
110
-
111
-
112
-
113
-
114
-
115
-
116
-
117
-
118
-
119
-
120
-
121
-
122
-
123
-
124
-
125
-
126
-
127
-
128
-
129
-
130
-
131
-
132
-
133
-
134
-
135
-
136
-
137
-
138
-
139
-
140
-
141
-
142
-
143
-
144
-
145
-
146
-
147
-
148
-
149
-
150
-
151
-
152
-
153
-
154
-
155
-
156
-
157
-
158
-
159
-
160
-
161
-
162
-
163
-
164
-
165
-
166
-
167
-
168
-
169
-
170
-
171
-
172
-
173
-
174
-
175
-
 176
176 -
 177
177 -
 178
178 -
 179
179 -
 180
180 -
 181
181 -
 182
182 -
 183
183 -
 184
184 -
 185
185 -
 186
186 -
187
-
188
-
189
-
190
-
191
-
192
-
193
-
194
-
195
-
196
-
197
-
198
-
199
-
200
-
201
-
202
-
203
-
204
-
205
-
206
-
207
-
208
-
209
-
210
-
211
-
212
-
213
-
214
-
215
-
216
-
217
-
218
-
219
-
220
-
221
-
222
-
223
-
224
-
225
-
226
-
227
-
228
-
229
-
230
-
231
-
232
-
233
-
234
-
235
-
236
-
237
-
238
-
239
-
240
-
241
-
242
-
243
-
244
-
245
-
246
-
247
-
248
-
249
-
250
-
251
-
252
-
253
-
254
-
255
-
256
-
257
-
258
-
259
-
260
-
261
-
262
-
263
-
264
-
265
-
266
-
267
-
268
-
269
-
270
-
271
-
272
-
273
-
274
-
275
-
276
-
277
-
278
-
279
-
280
-
281
-
282
-
283
-
284
-
285
 |
 |
