HP 6125G HP 6125G & 6125G/XG Blade Switches Security Configuration Gui - Page 90
Enabling 802.1X, Configuration guidelines, Configuration procedure
 |
View all HP 6125G manuals
Add to My Manuals
Save this manual to your list of manuals |
Page 90 highlights
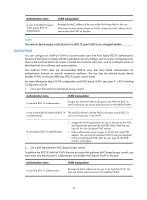
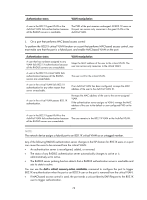
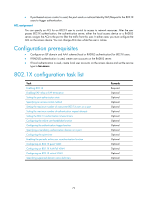
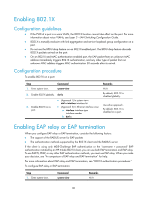
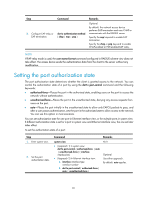
Enabling 802.1X Configuration guidelines • If the PVID of a port is a voice VLAN, the 802.1X function cannot take effect on the port. For more information about voice VLANs, see Layer 2-LAN Switching Configuration Guide. • 802.1X is mutually exclusive with link aggregation and service loopback group configuration on a port. • Do not use the BPDU drop feature on an 802.1X-enabled port. The BPDU drop feature discards 802.1X packets arrived on the port. • On an 802.1X and MAC authentication enabled port, the EAP packet from an unknown MAC address immediately triggers 802.1X authentication, and any other type of packet from an unknown MAC address triggers MAC authentication 30 seconds after its arrival. Configuration procedure To enable 802.1X on a port: Step 1. Enter system view. Command system-view 2. Enable 802.1X globally. dot1x 3. Enable 802.1X on a port. • (Approach 1) In system view: dot1x interface interface-list • (Approach 2) In Ethernet interface view: a. interface interface-type interface-number b. dot1x Remarks N/A By default, 802.1X is disabled globally. Use either approach. By default, 802.1X is disabled on a port. Enabling EAP relay or EAP termination When you configure EAP relay or EAP termination, consider the following factors: • The support of the RADIUS server for EAP packets • The authentication methods supported by the 802.1X client and the RADIUS server If the client is using only MD5-Challenge EAP authentication or the "username + password" EAP authentication initiated by an HP iNode 802.1X client, you can use both EAP termination and EAP relay. To use EAP-TL, PEAP, or any other EAP authentication methods, you must use EAP relay. When you make your decision, see "A comparison of EAP relay and EAP termination" for help. For more information about EAP relay and EAP termination, see "802.1X authentication procedures." To configure EAP relay or EAP termination: Step 1. Enter system view. Command system-view Remarks N/A 80
-
 1
1 -
2
-
3
-
4
-
5
-
6
-
7
-
8
-
9
-
10
-
11
-
12
-
13
-
14
-
15
-
16
-
17
-
18
-
19
-
20
-
21
-
22
-
23
-
24
-
25
-
26
-
27
-
28
-
29
-
30
-
31
-
32
-
33
-
34
-
35
-
36
-
37
-
38
-
39
-
40
-
41
-
42
-
43
-
44
-
45
-
46
-
47
-
48
-
49
-
50
-
51
-
52
-
53
-
54
-
55
-
56
-
57
-
58
-
59
-
60
-
61
-
62
-
63
-
64
-
65
-
66
-
67
-
68
-
69
-
70
-
71
-
72
-
73
-
74
-
75
-
76
-
77
-
78
-
79
-
80
-
81
-
82
-
83
-
84
-
 85
85 -
 86
86 -
 87
87 -
 88
88 -
 89
89 -
 90
90 -
 91
91 -
 92
92 -
 93
93 -
 94
94 -
 95
95 -
96
-
97
-
98
-
99
-
100
-
101
-
102
-
103
-
104
-
105
-
106
-
107
-
108
-
109
-
110
-
111
-
112
-
113
-
114
-
115
-
116
-
117
-
118
-
119
-
120
-
121
-
122
-
123
-
124
-
125
-
126
-
127
-
128
-
129
-
130
-
131
-
132
-
133
-
134
-
135
-
136
-
137
-
138
-
139
-
140
-
141
-
142
-
143
-
144
-
145
-
146
-
147
-
148
-
149
-
150
-
151
-
152
-
153
-
154
-
155
-
156
-
157
-
158
-
159
-
160
-
161
-
162
-
163
-
164
-
165
-
166
-
167
-
168
-
169
-
170
-
171
-
172
-
173
-
174
-
175
-
176
-
177
-
178
-
179
-
180
-
181
-
182
-
183
-
184
-
185
-
186
-
187
-
188
-
189
-
190
-
191
-
192
-
193
-
194
-
195
-
196
-
197
-
198
-
199
-
200
-
201
-
202
-
203
-
204
-
205
-
206
-
207
-
208
-
209
-
210
-
211
-
212
-
213
-
214
-
215
-
216
-
217
-
218
-
219
-
220
-
221
-
222
-
223
-
224
-
225
-
226
-
227
-
228
-
229
-
230
-
231
-
232
-
233
-
234
-
235
-
236
-
237
-
238
-
239
-
240
-
241
-
242
-
243
-
244
-
245
-
246
-
247
-
248
-
249
-
250
-
251
-
252
-
253
-
254
-
255
-
256
-
257
-
258
-
259
-
260
-
261
-
262
-
263
-
264
-
265
-
266
-
267
-
268
-
269
-
270
-
271
-
272
-
273
-
274
-
275
-
276
-
277
-
278
-
279
-
280
-
281
-
282
-
283
-
284
-
285
 |
 |
