HP Deskjet 460 User's Guide - Page 60
To reset 802.11 wireless profiles to factory defaults
 |
View all HP Deskjet 460 manuals
Add to My Manuals
Save this manual to your list of manuals |
Page 60 highlights
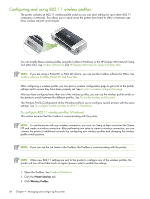
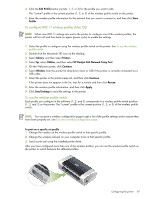
For example, if you configured profile 1 for printing in an infrastructure environment (for example, the office) and configured profile 2 for printing in an ad hoc environment (for example, away from the office or on the road), you only have to move the switch between 1 and 2 to switch between those profiles. Make sure the switch is in the appropriate position (1, 2, or 3) to match the profile you are using before sending a print job. For example, if you are on the road and had previously configured switch position 2 for ad hoc wireless printing on the road, move the switch to position 2 before sending a print job. NOTE: After switching from one wireless profile to another, the first print job takes 10 seconds or so before it starts to print. To reset 802.11 wireless profiles to factory defaults To reset the active profile (the current position of the wireless profile switch) • Hold down (Power button) and press (Cancel button) 8 times. To reset all three 802.11 wireless profiles • Hold down (Power button), press (Cancel button) twice, and then press 8 times. (Resume button) To configure multiple printers for 802.11 (Windows) You can use the Wireless Profile Configuration Utility to conveniently set up multiple printers for wireless connection. This utility exports the printer's wireless profile settings to a USB Flash drive. You can then configure other printers with these settings by inserting the flash drive into another printer's USB host port. NOTE: The Wireless Profile Configuration Utility is supported on the following operating systems: Windows 2000, and Windows XP. To use the Wireless Profile Configuration Utility 1. Insert the 802.11 wireless printer card into the every printers' CF card slot. 2. Connect the USB Flash drive to one printer's USB host port. For the location of this port, see Back and side view. When the USB Flash drive is inserted, the 802.11 wireless printer card lights will turn off. The lights will turn on again after the 802.11 settings have been configured on the USB Flash drive. 3. Close any running applications. 4. Insert the Starter CD into the CD drive. The CD menu runs automatically. If the CD menu does not start automatically, double-click the Setup icon on the Starter CD. 5. On the CD menu, click Enterprise Solutions, and then click Wireless Profile Configuration Utility. 6. Follow the onscreen instructions to export the printer's wireless profile settings to a USB Flash drive and then configure the other printers by moving the USB Flash drive to the USB host port of each printer. 60 Chapter 4 - Managing and configuring the printer
-
 1
1 -
2
-
3
-
4
-
5
-
6
-
7
-
8
-
9
-
10
-
11
-
12
-
13
-
14
-
15
-
16
-
17
-
18
-
19
-
20
-
21
-
22
-
23
-
24
-
25
-
26
-
27
-
28
-
29
-
30
-
31
-
32
-
33
-
34
-
35
-
36
-
37
-
38
-
39
-
40
-
41
-
42
-
43
-
44
-
45
-
46
-
47
-
48
-
49
-
50
-
51
-
52
-
53
-
54
-
 55
55 -
 56
56 -
 57
57 -
 58
58 -
 59
59 -
 60
60 -
 61
61 -
 62
62 -
 63
63 -
 64
64 -
 65
65 -
66
-
67
-
68
-
69
-
70
-
71
-
72
-
73
-
74
-
75
-
76
-
77
-
78
-
79
-
80
-
81
-
82
-
83
-
84
-
85
-
86
-
87
-
88
-
89
-
90
-
91
-
92
-
93
-
94
-
95
-
96
-
97
-
98
-
99
-
100
-
101
-
102
-
103
-
104
-
105
-
106
-
107
-
108
-
109
-
110
-
111
-
112
-
113
-
114
-
115
-
116
-
117
-
118
-
119
-
120
-
121
-
122
-
123
-
124
-
125
-
126
-
127
-
128
-
129
-
130
-
131
-
132
 |
 |