HP Media Center m7200 Microsoft Windows XP Media Center Edition 2005 Software - Page 41
Troubleshooting HP Tunes, Resetting HP Tunes
 |
View all HP Media Center m7200 manuals
Add to My Manuals
Save this manual to your list of manuals |
Page 41 highlights
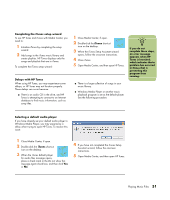
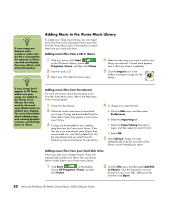
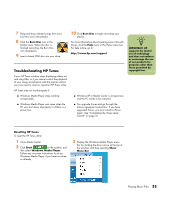
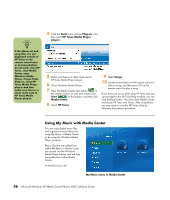
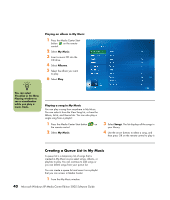
7 Drag and drop selected songs from your source to your new playlist. 8 Click the Burn Disc icon in the toolbar area. When the disc is finished recording, the Burn Disc icon disappears. 9 Insert a blank CD-R disc into your drive. 10 Click Burn Disc to begin recording your playlist. For more information about creating music CDs with iTunes, click the Help menu in the iTunes menu bar. For help online, go to: http://www.hp.com/support Troubleshooting HP Tunes If your HP Tunes window stops displaying album art and song titles, or if you cannot control the playback of your songs and playlists with the remote control, you may need to reset an important HP Tunes utility. HP Tunes may not work properly if: ■ Windows Media Player stops working unexpectedly. ■ Windows Media Player was open when the PC was shut down improperly or if there is a power loss. ■ Windows XP or Media Center is unresponsive and the PC needs to be restarted. ■ You upgrade iTunes and go through the license agreement instructions. If you have upgraded iTunes, you must initialize iTunes again. See "Completing the iTunes setup wizard" on page 31. n IMPORTANT: HP supports the lawful use of technology and does not endorse or encourage the use of our products for purposes other than those permitted by copyright law. Resetting HP Tunes To reset the HP Tunes utility: 1 Close Media Center. 2 Click Start on the taskbar, and then select Windows Media Player. Follow any onscreen instructions to set up Windows Media Player if you have not done so already. 3 Display the Windows Media Player menu bar by clicking the down arrow at the top of the window, and then selecting Show Menu Bar. Playing Music Files 35
-
 1
1 -
2
-
3
-
4
-
5
-
6
-
7
-
8
-
9
-
10
-
11
-
12
-
13
-
14
-
15
-
16
-
17
-
18
-
19
-
20
-
21
-
22
-
23
-
24
-
25
-
26
-
27
-
28
-
29
-
30
-
31
-
32
-
33
-
34
-
35
-
 36
36 -
 37
37 -
 38
38 -
 39
39 -
 40
40 -
 41
41 -
 42
42 -
 43
43 -
 44
44 -
 45
45 -
 46
46 -
47
-
48
-
49
-
50
-
51
-
52
-
53
-
54
-
55
-
56
-
57
-
58
-
59
-
60
-
61
-
62
-
63
-
64
-
65
-
66
-
67
-
68
-
69
-
70
-
71
-
72
-
73
-
74
-
75
-
76
-
77
-
78
-
79
-
80
-
81
-
82
-
83
-
84
-
85
-
86
-
87
-
88
-
89
-
90
-
91
-
92
-
93
-
94
-
95
-
96
-
97
-
98
-
99
-
100
-
101
-
102
-
103
-
104
-
105
-
106
-
107
-
108
-
109
-
110
-
111
-
112
-
113
-
114
-
115
-
116
-
117
-
118
-
119
-
120
-
121
-
122
 |
 |