HP Media Center m7200 Microsoft Windows XP Media Center Edition 2005 Software - Page 57
Burning a Label on a LightScribe Media Disc
 |
View all HP Media Center m7200 manuals
Add to My Manuals
Save this manual to your list of manuals |
Page 57 highlights
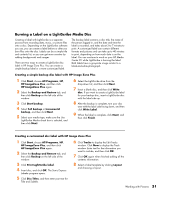
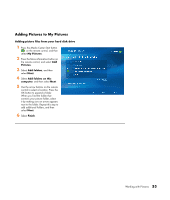
Burning a Label on a LightScribe Media Disc Creating a label with LightScribe is a separate process from recording data, music, or picture files onto a disc. Depending on the LightScribe software you use, you can create a label before or after you burn files onto the disc. Labels can be a simple title and contents list, or you can get more creative by adding backgrounds and images. There are two ways to create a LightScribe disc label in HP Image Zone Plus. You can create a simple backup label or a more customized label. The backup label contains a disc title, the name of the person logged in, and the date and time the label is recorded, and takes about 3 to 7 minutes to print. A customized label can contain different formats and pictures and can take up to 40 minutes to print, depending on how much data is on the label. You can continue to work on your HP Media Center PC while LightScribe is burning the label. Both labels have a grayscale image similar to a black-and-white photograph. Creating a simple backup disc label with HP Image Zone Plus 1 Click Start, choose All Programs, HP, HP ImageZone Plus, and then click HP ImageZone Plus again. 2 Select the Backup and Restore tab, and then click Backup on the left side of the window. 3 Click Start backup. 4 Select Full backup or Incremental backup, and then click Next. 5 Select your media type, make sure the Use LightScribe Media check box is selected, and then click Next. 6 Select the LightScribe drive from the drop-down list, and then click Next. 7 Insert a blank disc, and then click Write disc. If you want to create a LightScribe label for your backup disc, insert a LightScribe disc with the label side up. 8 After the backup is complete, turn your disc over with the label side facing down, and then click Write Label. 9 When the label is complete, click Next, and then click Finish. Creating a customized disc label with HP Image Zone Plus 1 Click Start, choose All Programs, HP, HP ImageZone Plus, and then click HP ImageZone Plus again. 2 Select the Backup and Restore tab, and then click Backup on the left side of the window. 3 Click Print LightScribe label. 4 Insert disc, and click OK. The Sonic Express Labeler program opens. 5 Click Disc Titles, and then enter your text for Title and Subtitle. 6 Click Tracks to display the Edit Tracks window. Click New to display the Track window. Enter text for the information you want to include, and then click OK. 7 Click OK again when finished adding all the contents information. 8 Select a label template by clicking Layout and choosing a layout. Working with Pictures 51
-
 1
1 -
2
-
3
-
4
-
5
-
6
-
7
-
8
-
9
-
10
-
11
-
12
-
13
-
14
-
15
-
16
-
17
-
18
-
19
-
20
-
21
-
22
-
23
-
24
-
25
-
26
-
27
-
28
-
29
-
30
-
31
-
32
-
33
-
34
-
35
-
36
-
37
-
38
-
39
-
40
-
41
-
42
-
43
-
44
-
45
-
46
-
47
-
48
-
49
-
50
-
51
-
 52
52 -
 53
53 -
 54
54 -
 55
55 -
 56
56 -
 57
57 -
 58
58 -
 59
59 -
 60
60 -
 61
61 -
 62
62 -
63
-
64
-
65
-
66
-
67
-
68
-
69
-
70
-
71
-
72
-
73
-
74
-
75
-
76
-
77
-
78
-
79
-
80
-
81
-
82
-
83
-
84
-
85
-
86
-
87
-
88
-
89
-
90
-
91
-
92
-
93
-
94
-
95
-
96
-
97
-
98
-
99
-
100
-
101
-
102
-
103
-
104
-
105
-
106
-
107
-
108
-
109
-
110
-
111
-
112
-
113
-
114
-
115
-
116
-
117
-
118
-
119
-
120
-
121
-
122
 |
 |