HP Neoware c50 TeemTalk® 5.0 for Unix User's Guide - Page 46
The Soft Buttons, Emulation Settings, Online, Local, Not Ready, Ready, Controller, Level
 |
View all HP Neoware c50 manuals
Add to My Manuals
Save this manual to your list of manuals |
Page 46 highlights
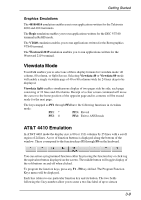
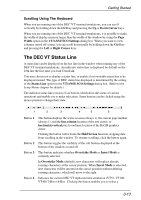
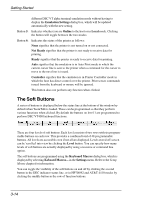
Getting Started different DEC VT alpha terminal emulation mode without having to display the Emulation Settings dialog box, which will be updated automatically with the new setting. Button 5: Indicates whether you are Online to the host or in Local mode. Clicking the button will toggle between the two modes. Button 6: Indicates the status of the printer as follows: None signifies that the printer is not turned on or not connected. Not Ready signifies that the printer is not ready to receive data for printing. Ready signifies that the printer is ready to receive data for printing. Auto signifies that the emulation is in Auto Print mode in which the current cursor line is sent to the printer when a command for the cursor to move to the next line is issued. Controller signifies that the emulation is in Printer Controller mode in which the host has direct control over the printer. Print screen commands issued from the keyboard or mouse will be ignored. This button does not perform any function when clicked. The Soft Buttons A series of buttons is displayed below the status line at the bottom of the window by default when TeemTalk is loaded. These can be programmed so that they perform various functions when clicked. By default the buttons on level 1 are programmed to perform DEC VT400 keyboard functions. There are four levels of soft buttons. Each level consists of two rows with six programmable buttons on each row. This provides a combined total of 48 programmable buttons. All levels are accessible even if not all are displayed. Levels stored off-screen can be 'scrolled' into view by clicking the Level button. You can specify how many levels of soft buttons are actually displayed by using a resource or command line option. The soft buttons are programmed using the Keyboard Macros dialog box, which is displayed by selecting Keboard Macros... in the Settings menu. Refer to the Setup Menus chapter for information. You can toggle the visibility of the soft buttons on and off by clicking the second button in the DEC indicator status line, or in HP700/92 and AT&T 4410 modes by clicking the middle button in the row of function buttons. 3-14
-
 1
1 -
2
-
3
-
4
-
5
-
6
-
7
-
8
-
9
-
10
-
11
-
12
-
13
-
14
-
15
-
16
-
17
-
18
-
19
-
20
-
21
-
22
-
23
-
24
-
25
-
26
-
27
-
28
-
29
-
30
-
31
-
32
-
33
-
34
-
35
-
36
-
37
-
38
-
39
-
40
-
 41
41 -
 42
42 -
 43
43 -
 44
44 -
 45
45 -
 46
46 -
 47
47 -
 48
48 -
 49
49 -
 50
50 -
 51
51 -
52
-
53
-
54
-
55
-
56
-
57
-
58
-
59
-
60
-
61
-
62
-
63
-
64
-
65
-
66
-
67
-
68
-
69
-
70
-
71
-
72
-
73
-
74
-
75
-
76
-
77
-
78
-
79
-
80
-
81
-
82
-
83
-
84
-
85
-
86
-
87
-
88
-
89
-
90
-
91
-
92
-
93
-
94
-
95
-
96
-
97
-
98
-
99
-
100
-
101
-
102
-
103
-
104
-
105
-
106
-
107
-
108
-
109
-
110
-
111
-
112
-
113
-
114
-
115
-
116
-
117
-
118
-
119
-
120
-
121
-
122
-
123
-
124
-
125
-
126
-
127
-
128
-
129
-
130
-
131
-
132
-
133
-
134
-
135
-
136
-
137
-
138
-
139
-
140
-
141
-
142
-
143
-
144
-
145
-
146
-
147
-
148
-
149
-
150
-
151
-
152
-
153
-
154
-
155
-
156
-
157
-
158
-
159
-
160
-
161
-
162
-
163
-
164
-
165
-
166
-
167
-
168
-
169
-
170
-
171
-
172
-
173
-
174
-
175
-
176
-
177
-
178
-
179
-
180
-
181
-
182
-
183
-
184
-
185
-
186
-
187
-
188
-
189
-
190
-
191
-
192
-
193
-
194
-
195
-
196
-
197
-
198
-
199
-
200
-
201
-
202
-
203
-
204
-
205
-
206
-
207
-
208
-
209
-
210
-
211
-
212
-
213
-
214
-
215
-
216
-
217
-
218
-
219
-
220
-
221
-
222
-
223
-
224
-
225
-
226
-
227
-
228
-
229
-
230
-
231
-
232
-
233
-
234
-
235
-
236
-
237
-
238
-
239
-
240
-
241
-
242
-
243
-
244
-
245
-
246
-
247
-
248
-
249
-
250
-
251
-
252
-
253
-
254
-
255
-
256
-
257
-
258
-
259
-
260
-
261
-
262
-
263
-
264
-
265
-
266
-
267
-
268
-
269
-
270
-
271
-
272
-
273
-
274
-
275
-
276
-
277
-
278
-
279
-
280
-
281
-
282
-
283
-
284
-
285
-
286
-
287
-
288
-
289
-
290
-
291
-
292
-
293
-
294
-
295
-
296
-
297
-
298
-
299
-
300
-
301
-
302
-
303
-
304
-
305
-
306
-
307
-
308
-
309
-
310
-
311
-
312
-
313
-
314
-
315
-
316
-
317
-
318
-
319
-
320
-
321
-
322
-
323
-
324
-
325
-
326
-
327
-
328
-
329
-
330
-
331
-
332
-
333
-
334
-
335
-
336
-
337
-
338
-
339
-
340
-
341
-
342
-
343
-
344
-
345
-
346
-
347
-
348
-
349
-
350
-
351
-
352
-
353
-
354
-
355
-
356
-
357
-
358
-
359
-
360
-
361
-
362
-
363
-
364
-
365
-
366
-
367
-
368
-
369
-
370
-
371
-
372
-
373
-
374
-
375
-
376
-
377
-
378
-
379
-
380
 |
 |
