HP Neoware c50 TeemTalk® 5.0 for Unix User's Guide - Page 84
Graphic Print Mode, Left Mouse Button
 |
View all HP Neoware c50 manuals
Add to My Manuals
Save this manual to your list of manuals |
Page 84 highlights
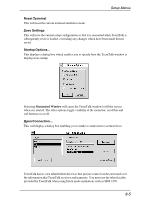
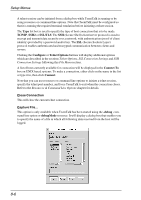
Setup Menus to the printer when the cursor moves to the next line. Auto print mode lets you print each line as it is received from the host. Selecting Controller will enable the host to to send text directly to the printer, without displaying it on the screen. Refer to the Print Facilities chapter for more information on printing. Print Screen... This displays the Print Screen dialog box. Clicking the Print Text button will cause a fast print of text displayed in the TeemTalk window using ASCII text codes. The Print Graphic Screen and Print Graphic Selection buttons enable you to print an almost exact representation of the text and graphics displayed in the TeemTalk window or selected area. Note that a graphic print will take a lot longer than a text print. To select an area of the TeemTalk window for a graphic print (prior to using this dialog box), position the mouse pointer at the top left corner of the required area, hold down the keys Control + Shift + Left Mouse Button, then drag the mouse pointer down to the bottom right corner of the required area and release the keys. Click the Print Graphic Selection button to produce a hardcopy of the selected area. The Graphic Print Mode option enables you to modify the way a graphic print is produced. The default setting, Normal will enable the window or area to be printed as displayed. Swap Black/White will change everything that is displayed in black to white, and vice versa. Mono will convert colours to their monochrome equivalent, and Mono Swap Black/White will convert all colours to their monochrome equivalent and change everything that is displayed in black to white, and vice versa. Start Auto Print Selecting this option will enable auto print mode in which each line of data will be transmitted to the currently enabled hardcopy device when the cursor moves to a new line as a result of a carriage return, line feed, vertical tab, or form feed. To disable auto print mode, select the following option. 8-10
-
 1
1 -
2
-
3
-
4
-
5
-
6
-
7
-
8
-
9
-
10
-
11
-
12
-
13
-
14
-
15
-
16
-
17
-
18
-
19
-
20
-
21
-
22
-
23
-
24
-
25
-
26
-
27
-
28
-
29
-
30
-
31
-
32
-
33
-
34
-
35
-
36
-
37
-
38
-
39
-
40
-
41
-
42
-
43
-
44
-
45
-
46
-
47
-
48
-
49
-
50
-
51
-
52
-
53
-
54
-
55
-
56
-
57
-
58
-
59
-
60
-
61
-
62
-
63
-
64
-
65
-
66
-
67
-
68
-
69
-
70
-
71
-
72
-
73
-
74
-
75
-
76
-
77
-
78
-
 79
79 -
 80
80 -
 81
81 -
 82
82 -
 83
83 -
 84
84 -
 85
85 -
 86
86 -
 87
87 -
 88
88 -
 89
89 -
90
-
91
-
92
-
93
-
94
-
95
-
96
-
97
-
98
-
99
-
100
-
101
-
102
-
103
-
104
-
105
-
106
-
107
-
108
-
109
-
110
-
111
-
112
-
113
-
114
-
115
-
116
-
117
-
118
-
119
-
120
-
121
-
122
-
123
-
124
-
125
-
126
-
127
-
128
-
129
-
130
-
131
-
132
-
133
-
134
-
135
-
136
-
137
-
138
-
139
-
140
-
141
-
142
-
143
-
144
-
145
-
146
-
147
-
148
-
149
-
150
-
151
-
152
-
153
-
154
-
155
-
156
-
157
-
158
-
159
-
160
-
161
-
162
-
163
-
164
-
165
-
166
-
167
-
168
-
169
-
170
-
171
-
172
-
173
-
174
-
175
-
176
-
177
-
178
-
179
-
180
-
181
-
182
-
183
-
184
-
185
-
186
-
187
-
188
-
189
-
190
-
191
-
192
-
193
-
194
-
195
-
196
-
197
-
198
-
199
-
200
-
201
-
202
-
203
-
204
-
205
-
206
-
207
-
208
-
209
-
210
-
211
-
212
-
213
-
214
-
215
-
216
-
217
-
218
-
219
-
220
-
221
-
222
-
223
-
224
-
225
-
226
-
227
-
228
-
229
-
230
-
231
-
232
-
233
-
234
-
235
-
236
-
237
-
238
-
239
-
240
-
241
-
242
-
243
-
244
-
245
-
246
-
247
-
248
-
249
-
250
-
251
-
252
-
253
-
254
-
255
-
256
-
257
-
258
-
259
-
260
-
261
-
262
-
263
-
264
-
265
-
266
-
267
-
268
-
269
-
270
-
271
-
272
-
273
-
274
-
275
-
276
-
277
-
278
-
279
-
280
-
281
-
282
-
283
-
284
-
285
-
286
-
287
-
288
-
289
-
290
-
291
-
292
-
293
-
294
-
295
-
296
-
297
-
298
-
299
-
300
-
301
-
302
-
303
-
304
-
305
-
306
-
307
-
308
-
309
-
310
-
311
-
312
-
313
-
314
-
315
-
316
-
317
-
318
-
319
-
320
-
321
-
322
-
323
-
324
-
325
-
326
-
327
-
328
-
329
-
330
-
331
-
332
-
333
-
334
-
335
-
336
-
337
-
338
-
339
-
340
-
341
-
342
-
343
-
344
-
345
-
346
-
347
-
348
-
349
-
350
-
351
-
352
-
353
-
354
-
355
-
356
-
357
-
358
-
359
-
360
-
361
-
362
-
363
-
364
-
365
-
366
-
367
-
368
-
369
-
370
-
371
-
372
-
373
-
374
-
375
-
376
-
377
-
378
-
379
-
380
 |
 |
