HP Officejet 4500 User Guide - Page 116
HP Digital Imaging Monitor is not operating properly Windows.
 |
View all HP Officejet 4500 manuals
Add to My Manuals
Save this manual to your list of manuals |
Page 116 highlights
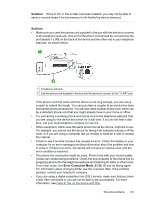
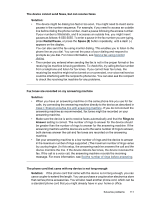
Chapter 7 TIP: If the device came with a 2-wire phone cord adaptor, you can use it with a 4-wire phone cord to extend the length. For information on using the 2-wire phone cord adaptor, see the documentation that came with it. To extend your phone cord 1. Using the phone cord supplied in the box with the device, connect one end to the coupler, then connect the other end to the port labeled 1-LINE on the back of the device. 2. Connect another phone cord to the open port on the coupler and to the telephone wall jack. Color faxes do not print Cause: The Incoming Fax Printing option is turned off. Solution: To print color faxes, make sure that the Incoming Fax Printing option in the device control panel is turned on. The computer cannot receive faxes (Fax to PC and Fax to Mac) Cause: The HP Digital Imaging monitor is turned off (Windows). Solution: Check the taskbar and ensure that the HP Digital Imaging monitor is turned on at all times. Cause: The computer selected to receive faxes is turned off. Solution: Make sure the computer selected to receive faxes is switched on at all times. Cause: Different computers are configured for setup and receiving faxes and one of them may be switched off. Solution: If the computer receiving faxes is different from the one used for setup, both computers should be switched on at all times. Cause: Fax to PC or Fax to Mac is not activated or the computer is not configured to receive faxes. Solution: Activate Fax to PC or Fax to Mac and make sure the computer is configured to receive faxes. Cause: HP Digital Imaging Monitor is not operating properly (Windows). Solution: Restart the HP Digital Imaging Monitor or restart the computer. 112 Solve a problem
-
 1
1 -
2
-
3
-
4
-
5
-
6
-
7
-
8
-
9
-
10
-
11
-
12
-
13
-
14
-
15
-
16
-
17
-
18
-
19
-
20
-
21
-
22
-
23
-
24
-
25
-
26
-
27
-
28
-
29
-
30
-
31
-
32
-
33
-
34
-
35
-
36
-
37
-
38
-
39
-
40
-
41
-
42
-
43
-
44
-
45
-
46
-
47
-
48
-
49
-
50
-
51
-
52
-
53
-
54
-
55
-
56
-
57
-
58
-
59
-
60
-
61
-
62
-
63
-
64
-
65
-
66
-
67
-
68
-
69
-
70
-
71
-
72
-
73
-
74
-
75
-
76
-
77
-
78
-
79
-
80
-
81
-
82
-
83
-
84
-
85
-
86
-
87
-
88
-
89
-
90
-
91
-
92
-
93
-
94
-
95
-
96
-
97
-
98
-
99
-
100
-
101
-
102
-
103
-
104
-
105
-
106
-
107
-
108
-
109
-
110
-
 111
111 -
 112
112 -
 113
113 -
 114
114 -
 115
115 -
 116
116 -
 117
117 -
 118
118 -
 119
119 -
 120
120 -
 121
121 -
122
-
123
-
124
-
125
-
126
-
127
-
128
-
129
-
130
-
131
-
132
-
133
-
134
-
135
-
136
-
137
-
138
-
139
-
140
-
141
-
142
-
143
-
144
-
145
-
146
-
147
-
148
-
149
-
150
-
151
-
152
-
153
-
154
-
155
-
156
-
157
-
158
-
159
-
160
-
161
-
162
-
163
-
164
-
165
-
166
-
167
-
168
-
169
-
170
-
171
-
172
-
173
-
174
-
175
-
176
-
177
-
178
-
179
-
180
-
181
-
182
-
183
-
184
-
185
-
186
-
187
-
188
-
189
-
190
-
191
-
192
-
193
-
194
-
195
-
196
-
197
-
198
-
199
-
200
-
201
-
202
-
203
-
204
-
205
-
206
-
207
-
208
-
209
-
210
-
211
-
212
-
213
-
214
-
215
-
216
-
217
-
218
-
219
-
220
-
221
-
222
-
223
-
224
-
225
-
226
-
227
-
228
 |
 |