HP Surestore 64 fw 05.01.00 and sw 07.01.00 - Director Product Manager - User - Page 142
Con SNMP dialog box, Enable Authorization Traps
 |
View all HP Surestore 64 manuals
Add to My Manuals
Save this manual to your list of manuals |
Page 142 highlights
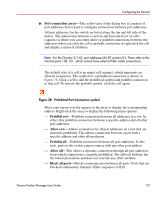
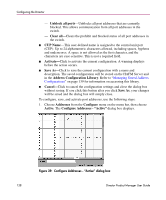
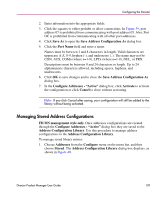
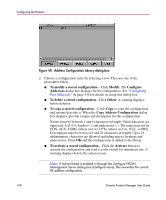
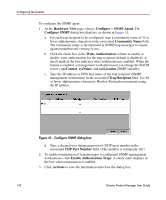
Configuring the Director To configure the SNMP agent: 1. At the Hardware View page, choose Configure > SNMP Agent. The Configure SNMP dialog box displays, as shown in Figure 41. a. For each trap recipient to be configured, type a community name of 32 or fewer alphanumeric characters in the associated Community Name field. The community name is incorporated in SNMP trap messages to ensure against unauthorized viewing or use. b. Click the check box in the Write Authorization column to enable or disable write authorization for the trap recipient (default is disabled). A check mark in the box indicates write authorization is enabled. When the feature is enabled, a management workstation user can change the HAFM server's sysContact, sysName, and sysLocation SNMP variables. c. Type the IP address or DNS host name of the trap recipient (SNMP management workstation) in the associated Trap Recipient field. Use 64 or fewer alphanumeric characters. Hewlett-Packard recommends using the IP address. Figure 41: Configure SNMP dialog box d. Type a decimal user datagram protocol (UDP) port number in the associated UDP Port Number field. (This number is commonly 162.) 2. To enable transmission of trap messages to configured SNMP management workstations, click Enable Authorization Traps. A check mark displays in the box when transmission is enabled. 3. Click Activate to save the information and close the dialog box. 142 Director Product Manager User Guide
-
 1
1 -
2
-
3
-
4
-
5
-
6
-
7
-
8
-
9
-
10
-
11
-
12
-
13
-
14
-
15
-
16
-
17
-
18
-
19
-
20
-
21
-
22
-
23
-
24
-
25
-
26
-
27
-
28
-
29
-
30
-
31
-
32
-
33
-
34
-
35
-
36
-
37
-
38
-
39
-
40
-
41
-
42
-
43
-
44
-
45
-
46
-
47
-
48
-
49
-
50
-
51
-
52
-
53
-
54
-
55
-
56
-
57
-
58
-
59
-
60
-
61
-
62
-
63
-
64
-
65
-
66
-
67
-
68
-
69
-
70
-
71
-
72
-
73
-
74
-
75
-
76
-
77
-
78
-
79
-
80
-
81
-
82
-
83
-
84
-
85
-
86
-
87
-
88
-
89
-
90
-
91
-
92
-
93
-
94
-
95
-
96
-
97
-
98
-
99
-
100
-
101
-
102
-
103
-
104
-
105
-
106
-
107
-
108
-
109
-
110
-
111
-
112
-
113
-
114
-
115
-
116
-
117
-
118
-
119
-
120
-
121
-
122
-
123
-
124
-
125
-
126
-
127
-
128
-
129
-
130
-
131
-
132
-
133
-
134
-
135
-
136
-
 137
137 -
 138
138 -
 139
139 -
 140
140 -
 141
141 -
 142
142 -
 143
143 -
 144
144 -
 145
145 -
 146
146 -
 147
147 -
148
-
149
-
150
-
151
-
152
-
153
-
154
-
155
-
156
-
157
-
158
-
159
-
160
-
161
-
162
-
163
-
164
-
165
-
166
-
167
-
168
-
169
-
170
-
171
-
172
-
173
-
174
-
175
-
176
-
177
-
178
-
179
-
180
-
181
-
182
-
183
-
184
-
185
-
186
-
187
-
188
-
189
-
190
-
191
-
192
-
193
-
194
-
195
-
196
-
197
-
198
-
199
-
200
-
201
-
202
-
203
-
204
-
205
-
206
-
207
-
208
-
209
-
210
-
211
-
212
-
213
-
214
-
215
-
216
-
217
-
218
-
219
-
220
-
221
-
222
-
223
-
224
-
225
-
226
-
227
-
228
-
229
-
230
-
231
-
232
-
233
-
234
-
235
-
236
-
237
-
238
-
239
-
240
-
241
-
242
-
243
-
244
 |
 |
