HP Surestore 64 fw 05.01.00 and sw 07.01.00 - Director Product Manager - User - Page 146
Configuring Director Date and Time, Con Date and Time dialog box
 |
View all HP Surestore 64 manuals
Add to My Manuals
Save this manual to your list of manuals |
Page 146 highlights
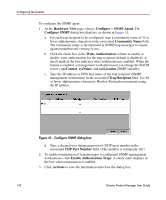
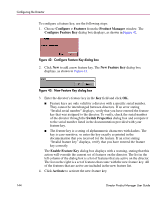
Configuring the Director Configuring Director Date and Time The Director 2/140 Product Manager log entries are stamped with the date and time received from the director. Use these steps to set the effective date and time for the director. Note: The director and HAFM synchronize at least once daily. 1. At the Hardware View page, click the Configure menu. 2. Choose Date/Time from the drop-down menu. The Configure Date and Time dialog box displays, as shown in Figure 44. 3. Set director date and time manually, or set for periodic updates. For specific instructions, see the following sections: ■ "Setting Date and Time Manually" on page 146 ■ "Synchronizing Date and Time" on page 147 Figure 44: Configure Date and Time dialog box Setting Date and Time Manually Use these steps to set the director date and time manually. 1. At the Configure Date and Time dialog box, click the Periodic Date/Time Synchronization check box to deselect the option (no check mark in the box). The grayed-out Date and Time fields activate. 2. Click the Date fields that require change, and type numbers in the following ranges: Month (MM): 1 through 12 Day (DD): 1 through 31 Year (YYYY): greater than 1980 146 Director Product Manager User Guide
-
 1
1 -
2
-
3
-
4
-
5
-
6
-
7
-
8
-
9
-
10
-
11
-
12
-
13
-
14
-
15
-
16
-
17
-
18
-
19
-
20
-
21
-
22
-
23
-
24
-
25
-
26
-
27
-
28
-
29
-
30
-
31
-
32
-
33
-
34
-
35
-
36
-
37
-
38
-
39
-
40
-
41
-
42
-
43
-
44
-
45
-
46
-
47
-
48
-
49
-
50
-
51
-
52
-
53
-
54
-
55
-
56
-
57
-
58
-
59
-
60
-
61
-
62
-
63
-
64
-
65
-
66
-
67
-
68
-
69
-
70
-
71
-
72
-
73
-
74
-
75
-
76
-
77
-
78
-
79
-
80
-
81
-
82
-
83
-
84
-
85
-
86
-
87
-
88
-
89
-
90
-
91
-
92
-
93
-
94
-
95
-
96
-
97
-
98
-
99
-
100
-
101
-
102
-
103
-
104
-
105
-
106
-
107
-
108
-
109
-
110
-
111
-
112
-
113
-
114
-
115
-
116
-
117
-
118
-
119
-
120
-
121
-
122
-
123
-
124
-
125
-
126
-
127
-
128
-
129
-
130
-
131
-
132
-
133
-
134
-
135
-
136
-
137
-
138
-
139
-
140
-
 141
141 -
 142
142 -
 143
143 -
 144
144 -
 145
145 -
 146
146 -
 147
147 -
 148
148 -
 149
149 -
 150
150 -
 151
151 -
152
-
153
-
154
-
155
-
156
-
157
-
158
-
159
-
160
-
161
-
162
-
163
-
164
-
165
-
166
-
167
-
168
-
169
-
170
-
171
-
172
-
173
-
174
-
175
-
176
-
177
-
178
-
179
-
180
-
181
-
182
-
183
-
184
-
185
-
186
-
187
-
188
-
189
-
190
-
191
-
192
-
193
-
194
-
195
-
196
-
197
-
198
-
199
-
200
-
201
-
202
-
203
-
204
-
205
-
206
-
207
-
208
-
209
-
210
-
211
-
212
-
213
-
214
-
215
-
216
-
217
-
218
-
219
-
220
-
221
-
222
-
223
-
224
-
225
-
226
-
227
-
228
-
229
-
230
-
231
-
232
-
233
-
234
-
235
-
236
-
237
-
238
-
239
-
240
-
241
-
242
-
243
-
244
 |
 |
