HP Surestore 64 fw 05.01.00 and sw 07.01.00 - Director Product Manager - User - Page 147
Synchronizing Date and Time, Activate, Con Date, and Time, Periodic, Date/Time Synchronization
 |
View all HP Surestore 64 manuals
Add to My Manuals
Save this manual to your list of manuals |
Page 147 highlights
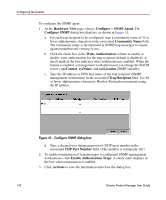
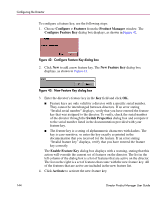
Configuring the Director 3. Click the Time fields that require change, and type numbers in the following ranges: Hour (HH): 0 through 23 Minute (MM): 0 through 59 Second (SS): 0 through 59 4. Click Activate to set the director date and time, and close the Configure Date and Time dialog box. Synchronizing Date and Time Use these steps to set the director to periodically synchronize date and time with HAFM. 1. At the Configure Date and Time dialog box, choose the Periodic Date/Time Synchronization check box. The Date and Time fields are grayed-out and not selectable. 2. Click Activate to enable synchronization and close the Configure Date and Time dialog box. The director date and time synchronize with the HAFM date and time at the next update period (at least once daily). 3. Click Sync Now to synchronize the director and HAFM immediately. The Date and Time Synced dialog box displays. 4. Click OK. 5. Click Activate to enable synchronization and close the Configure Date and Time dialog box. 6. If you are finished configuring the director, back up the configuration data. For more information, refer to "Backing Up and Restoring Configuration Data" on page 157. Director Product Manager User Guide 147
-
 1
1 -
2
-
3
-
4
-
5
-
6
-
7
-
8
-
9
-
10
-
11
-
12
-
13
-
14
-
15
-
16
-
17
-
18
-
19
-
20
-
21
-
22
-
23
-
24
-
25
-
26
-
27
-
28
-
29
-
30
-
31
-
32
-
33
-
34
-
35
-
36
-
37
-
38
-
39
-
40
-
41
-
42
-
43
-
44
-
45
-
46
-
47
-
48
-
49
-
50
-
51
-
52
-
53
-
54
-
55
-
56
-
57
-
58
-
59
-
60
-
61
-
62
-
63
-
64
-
65
-
66
-
67
-
68
-
69
-
70
-
71
-
72
-
73
-
74
-
75
-
76
-
77
-
78
-
79
-
80
-
81
-
82
-
83
-
84
-
85
-
86
-
87
-
88
-
89
-
90
-
91
-
92
-
93
-
94
-
95
-
96
-
97
-
98
-
99
-
100
-
101
-
102
-
103
-
104
-
105
-
106
-
107
-
108
-
109
-
110
-
111
-
112
-
113
-
114
-
115
-
116
-
117
-
118
-
119
-
120
-
121
-
122
-
123
-
124
-
125
-
126
-
127
-
128
-
129
-
130
-
131
-
132
-
133
-
134
-
135
-
136
-
137
-
138
-
139
-
140
-
141
-
 142
142 -
 143
143 -
 144
144 -
 145
145 -
 146
146 -
 147
147 -
 148
148 -
 149
149 -
 150
150 -
 151
151 -
 152
152 -
153
-
154
-
155
-
156
-
157
-
158
-
159
-
160
-
161
-
162
-
163
-
164
-
165
-
166
-
167
-
168
-
169
-
170
-
171
-
172
-
173
-
174
-
175
-
176
-
177
-
178
-
179
-
180
-
181
-
182
-
183
-
184
-
185
-
186
-
187
-
188
-
189
-
190
-
191
-
192
-
193
-
194
-
195
-
196
-
197
-
198
-
199
-
200
-
201
-
202
-
203
-
204
-
205
-
206
-
207
-
208
-
209
-
210
-
211
-
212
-
213
-
214
-
215
-
216
-
217
-
218
-
219
-
220
-
221
-
222
-
223
-
224
-
225
-
226
-
227
-
228
-
229
-
230
-
231
-
232
-
233
-
234
-
235
-
236
-
237
-
238
-
239
-
240
-
241
-
242
-
243
-
244
 |
 |
