Hitachi DZ-MV100A Owners Guide - Page 110
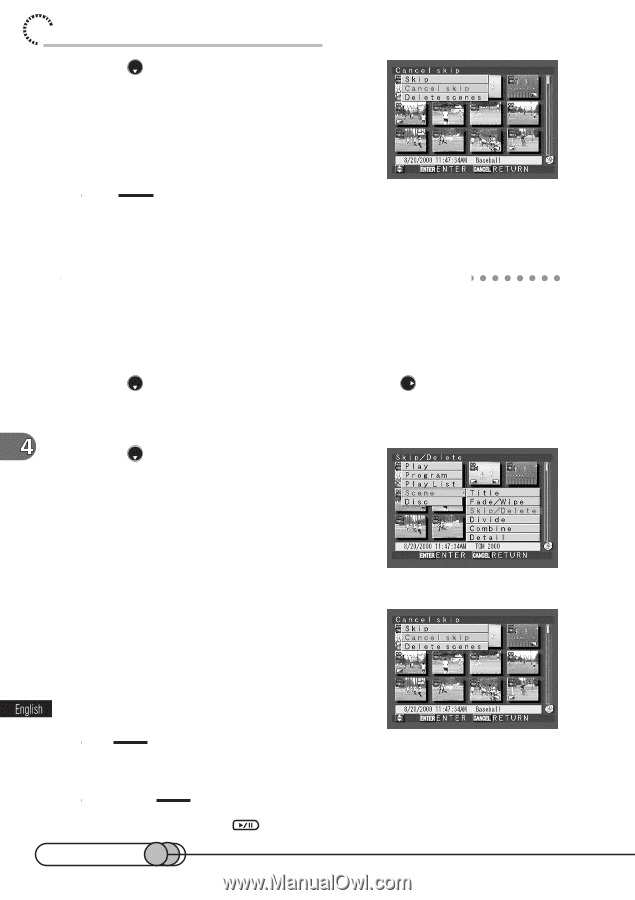
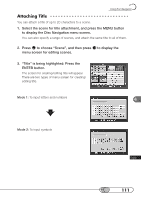
Setting or Releasing Skip using Menu Screen, to choose Scene, and then press
 |
View all Hitachi DZ-MV100A manuals
Add to My Manuals
Save this manual to your list of manuals |
Page 110 highlights
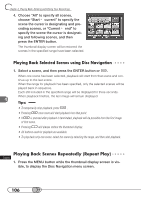
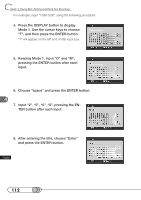
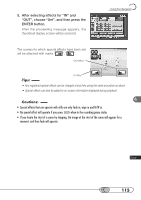
chapter 4_Playing Back, Deleting and Editing Your Recordings 2. Press to choose "Cancel skip", and then press the ENTER button. After the proceeding message is displayed, skipping of the selected scene will be released, and the thumbnail display screen will be restored (the skip mark will disappear). Tip: • Skip can also be set or released from the Disc Navigation menu screen. S○e○tt○in○ g○ ○o○r ○R○e○le○a○s○in○g○ S○ k○ i○p○u○s○in○g○ ○M○e○n○u○S○c○re○e○n 1. Select a scene and press the MENU button to display the Disc Navigation menu screen. 2. Press to choose "Scene", and then press to display the menu screen for editing scenes. 3. Press to choose "Skip/Delete", and then press the ENTER button. The Skip/Delete menu screen will appear. 4. Choose "Skip" or "Cancel skip", and then press the ENTER button. After the proceeding message is displayed, skip will be set or released for the selected scene, and the thumbnail display screen will be restored. Tip • When the DELETE button is pressed, the procedure for releasing skip will be from step 3. Caution: • Skip will not operate if you press 110 in the recording pause status.
-
 1
1 -
2
-
3
-
4
-
5
-
6
-
7
-
8
-
9
-
10
-
11
-
12
-
13
-
14
-
15
-
16
-
17
-
18
-
19
-
20
-
21
-
22
-
23
-
24
-
25
-
26
-
27
-
28
-
29
-
30
-
31
-
32
-
33
-
34
-
35
-
36
-
37
-
38
-
39
-
40
-
41
-
42
-
43
-
44
-
45
-
46
-
47
-
48
-
49
-
50
-
51
-
52
-
53
-
54
-
55
-
56
-
57
-
58
-
59
-
60
-
61
-
62
-
63
-
64
-
65
-
66
-
67
-
68
-
69
-
70
-
71
-
72
-
73
-
74
-
75
-
76
-
77
-
78
-
79
-
80
-
81
-
82
-
83
-
84
-
85
-
86
-
87
-
88
-
89
-
90
-
91
-
92
-
93
-
94
-
95
-
96
-
97
-
98
-
99
-
100
-
101
-
102
-
103
-
104
-
 105
105 -
 106
106 -
 107
107 -
 108
108 -
 109
109 -
 110
110 -
 111
111 -
 112
112 -
 113
113 -
 114
114 -
 115
115 -
116
-
117
-
118
-
119
-
120
-
121
-
122
-
123
-
124
-
125
-
126
-
127
-
128
-
129
-
130
-
131
-
132
-
133
-
134
-
135
-
136
-
137
-
138
-
139
-
140
-
141
-
142
-
143
-
144
-
145
-
146
-
147
-
148
-
149
-
150
-
151
-
152
-
153
-
154
-
155
-
156
-
157
-
158
-
159
-
160
-
161
-
162
-
163
-
164
-
165
-
166
-
167
-
168
-
169
-
170
 |
 |