Hitachi DZ-MV100A Owners Guide - Page 27
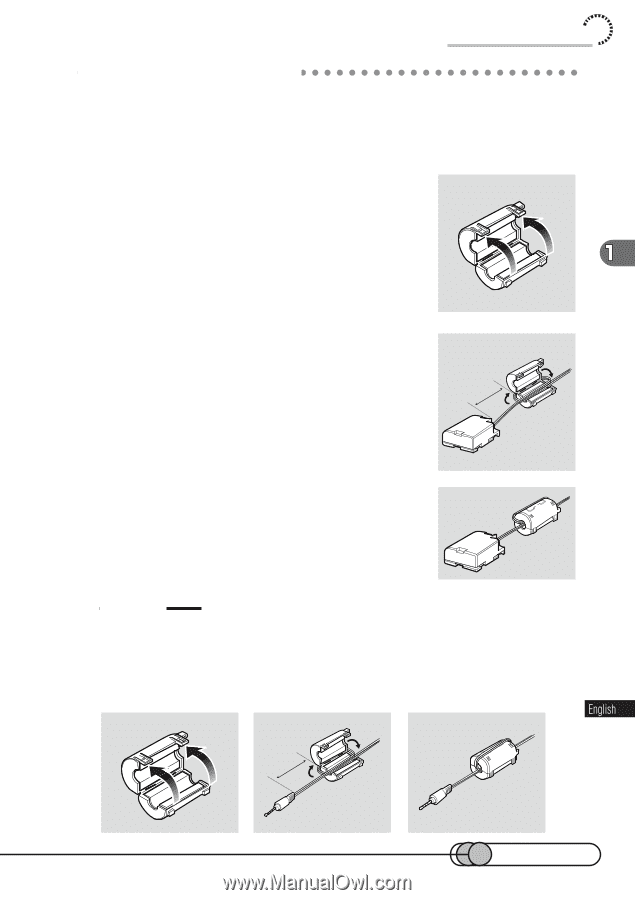
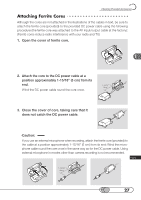
Attaching Ferrite Cores, Close the cover of core, taking care that
 |
View all Hitachi DZ-MV100A manuals
Add to My Manuals
Save this manual to your list of manuals |
Page 27 highlights
Checking Provided Accessories A○ t○ta○ c○ h○ i○n○g○F○e○rr○it○e○ C○ o○ r○e○s Although the cores are not attached in the illustrations of the cables in text, be sure to attach the ferrite core (provided) to the provided DC power cable using the following procedure (the ferrite core was attached to the AV input/output cable at the factory): (Ferrite cores reduce radio interference with your radio and TV.) 1. Open the cover of ferrite core. 2. Attach the core to the DC power cable at a position approximately 1-15/16" (5 cm) from its end. Wind the DC power cable round the core once. 1-15/16" (5cm) 3. Close the cover of core, taking care that it does not catch the DC power cable. Caution: If you use an external microphone when recording, attach the ferrite core (provided) to the cable at a position approximately 1-15/16" (5 cm) from its end: Wind the microphone cable round the core once in the same way as for the DC power cable. Using external microphone in modes other than camera recording is not recommended. 1-15/16" (5cm) 27
-
 1
1 -
2
-
3
-
4
-
5
-
6
-
7
-
8
-
9
-
10
-
11
-
12
-
13
-
14
-
15
-
16
-
17
-
18
-
19
-
20
-
21
-
 22
22 -
 23
23 -
 24
24 -
 25
25 -
 26
26 -
 27
27 -
 28
28 -
 29
29 -
 30
30 -
 31
31 -
 32
32 -
33
-
34
-
35
-
36
-
37
-
38
-
39
-
40
-
41
-
42
-
43
-
44
-
45
-
46
-
47
-
48
-
49
-
50
-
51
-
52
-
53
-
54
-
55
-
56
-
57
-
58
-
59
-
60
-
61
-
62
-
63
-
64
-
65
-
66
-
67
-
68
-
69
-
70
-
71
-
72
-
73
-
74
-
75
-
76
-
77
-
78
-
79
-
80
-
81
-
82
-
83
-
84
-
85
-
86
-
87
-
88
-
89
-
90
-
91
-
92
-
93
-
94
-
95
-
96
-
97
-
98
-
99
-
100
-
101
-
102
-
103
-
104
-
105
-
106
-
107
-
108
-
109
-
110
-
111
-
112
-
113
-
114
-
115
-
116
-
117
-
118
-
119
-
120
-
121
-
122
-
123
-
124
-
125
-
126
-
127
-
128
-
129
-
130
-
131
-
132
-
133
-
134
-
135
-
136
-
137
-
138
-
139
-
140
-
141
-
142
-
143
-
144
-
145
-
146
-
147
-
148
-
149
-
150
-
151
-
152
-
153
-
154
-
155
-
156
-
157
-
158
-
159
-
160
-
161
-
162
-
163
-
164
-
165
-
166
-
167
-
168
-
169
-
170
 |
 |