Hitachi DZ-MV100A Owners Guide - Page 53
Charging the built-in battery, To set the time to match the time signal
 |
View all Hitachi DZ-MV100A manuals
Add to My Manuals
Save this manual to your list of manuals |
Page 53 highlights
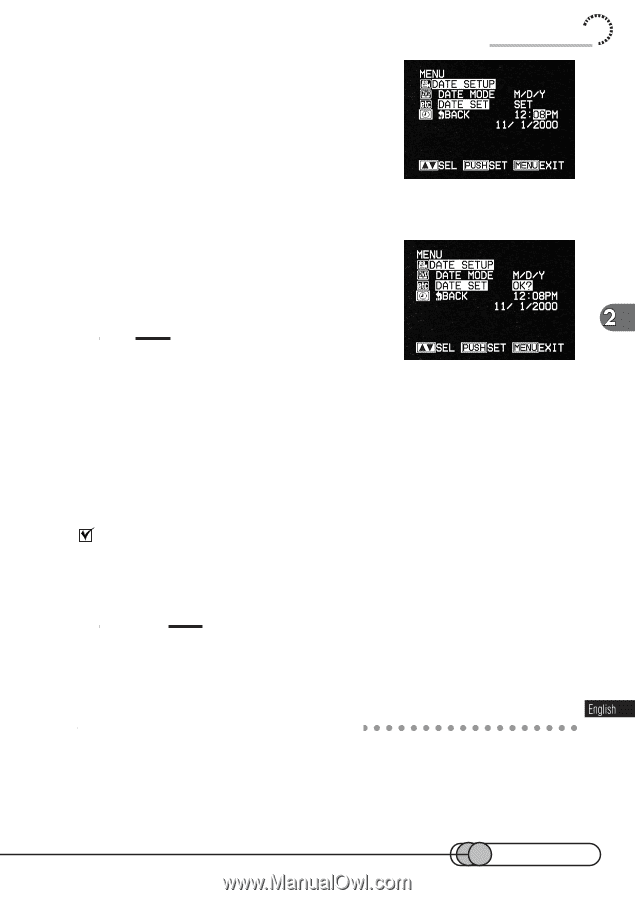
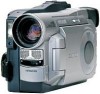
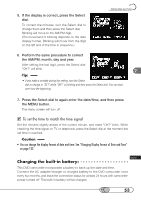
5. If the display is correct, press the Select dial. To correct the minutes, turn the Select dial to change them and then press the Select dial. Blinking will move to the AM/PM digit. (The movement of blinking depends on the date display format. Blinking will move from the digit on the left end of the time in sequence.) Setting Date and Time 6. Perform the same procedure to correct the AM/PM, month, day and year. After setting the last digit, press the Select dial: "OK?" will blink. Tip: • If you make a mistake during the setting, turn the Select dial to change to "SET" while "OK?" is blinking and then press the Select dial: You can start over from the beginning. 7. Press the Select dial to again enter the date/time, and then press the MENU button. The menu screen will turn off. To set the time to match the time signal Set the minutes slightly ahead of the current minute, and make "OK?" blink. While checking the time signal on TV or telephone, press the Select dial at the moment the set time is reached. Caution • You can change the display format of date and time: See "Changing Display Format of Date and Time" on page 132. C○ h○ a○ r○g○in○ g○ ○th○ e○ ○b○u○il○t-○in○ ○b○a○tt○e○ry This DVD camcorder incorporates a battery to back up the date and time. Connect the AC adapter/charger or charged battery to the DVD camcorder once every two months, and leave the connection status for at least 24 hours with camcorder power turned off: The built-in battery will be charged. 53
-
 1
1 -
2
-
3
-
4
-
5
-
6
-
7
-
8
-
9
-
10
-
11
-
12
-
13
-
14
-
15
-
16
-
17
-
18
-
19
-
20
-
21
-
22
-
23
-
24
-
25
-
26
-
27
-
28
-
29
-
30
-
31
-
32
-
33
-
34
-
35
-
36
-
37
-
38
-
39
-
40
-
41
-
42
-
43
-
44
-
45
-
46
-
47
-
 48
48 -
 49
49 -
 50
50 -
 51
51 -
 52
52 -
 53
53 -
 54
54 -
 55
55 -
 56
56 -
 57
57 -
 58
58 -
59
-
60
-
61
-
62
-
63
-
64
-
65
-
66
-
67
-
68
-
69
-
70
-
71
-
72
-
73
-
74
-
75
-
76
-
77
-
78
-
79
-
80
-
81
-
82
-
83
-
84
-
85
-
86
-
87
-
88
-
89
-
90
-
91
-
92
-
93
-
94
-
95
-
96
-
97
-
98
-
99
-
100
-
101
-
102
-
103
-
104
-
105
-
106
-
107
-
108
-
109
-
110
-
111
-
112
-
113
-
114
-
115
-
116
-
117
-
118
-
119
-
120
-
121
-
122
-
123
-
124
-
125
-
126
-
127
-
128
-
129
-
130
-
131
-
132
-
133
-
134
-
135
-
136
-
137
-
138
-
139
-
140
-
141
-
142
-
143
-
144
-
145
-
146
-
147
-
148
-
149
-
150
-
151
-
152
-
153
-
154
-
155
-
156
-
157
-
158
-
159
-
160
-
161
-
162
-
163
-
164
-
165
-
166
-
167
-
168
-
169
-
170
 |
 |