Hitachi DZ-MV100A Owners Guide - Page 119
Creating New Play List, menu screen referring to the play list.
 |
View all Hitachi DZ-MV100A manuals
Add to My Manuals
Save this manual to your list of manuals |
Page 119 highlights
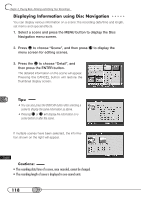
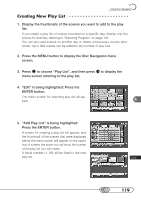
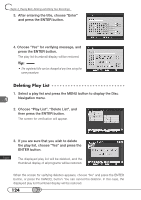
Using Disc Navigation C○ r○e○a○ti○n○g○ N○ e○ w○ ○ P○ l○a○y○ L○is○ t 1. Display the thumbnails of the scenes you want to add to the play list. If you create a play list of scenes recorded on a specific day, display only the scenes for that day, referring to "Selecting Program" on page 102. You can also add scenes on another day or delete unnecessary scenes afterwards. Up to 999 scenes can be added to any number of play lists. 2. Press the MENU button to display the Disc Navigation menu screen. 3. Press to choose "Play List", and then press to display the menu screen referring to the play list. 4. "Edit" is being highlighted: Press the ENTER button. The menu screen for selecting play list will appear. 5. "Add Play List" is being highlighted: Press the ENTER button. A screen for creating a play list will appear, and the thumbnail of the scenes that were displayed before the menu screen will appear on the upper row of screen; the lower row will show the scenes of the play list you will create. A serial number (1~99) will be fixed to the new play list. 119
-
 1
1 -
2
-
3
-
4
-
5
-
6
-
7
-
8
-
9
-
10
-
11
-
12
-
13
-
14
-
15
-
16
-
17
-
18
-
19
-
20
-
21
-
22
-
23
-
24
-
25
-
26
-
27
-
28
-
29
-
30
-
31
-
32
-
33
-
34
-
35
-
36
-
37
-
38
-
39
-
40
-
41
-
42
-
43
-
44
-
45
-
46
-
47
-
48
-
49
-
50
-
51
-
52
-
53
-
54
-
55
-
56
-
57
-
58
-
59
-
60
-
61
-
62
-
63
-
64
-
65
-
66
-
67
-
68
-
69
-
70
-
71
-
72
-
73
-
74
-
75
-
76
-
77
-
78
-
79
-
80
-
81
-
82
-
83
-
84
-
85
-
86
-
87
-
88
-
89
-
90
-
91
-
92
-
93
-
94
-
95
-
96
-
97
-
98
-
99
-
100
-
101
-
102
-
103
-
104
-
105
-
106
-
107
-
108
-
109
-
110
-
111
-
112
-
113
-
 114
114 -
 115
115 -
 116
116 -
 117
117 -
 118
118 -
 119
119 -
 120
120 -
 121
121 -
 122
122 -
 123
123 -
 124
124 -
125
-
126
-
127
-
128
-
129
-
130
-
131
-
132
-
133
-
134
-
135
-
136
-
137
-
138
-
139
-
140
-
141
-
142
-
143
-
144
-
145
-
146
-
147
-
148
-
149
-
150
-
151
-
152
-
153
-
154
-
155
-
156
-
157
-
158
-
159
-
160
-
161
-
162
-
163
-
164
-
165
-
166
-
167
-
168
-
169
-
170
 |
 |
