Hitachi DZ-MV100A Owners Guide - Page 117
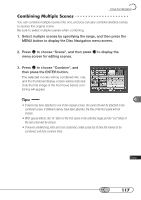
Combining Multiple Scenes
 |
View all Hitachi DZ-MV100A manuals
Add to My Manuals
Save this manual to your list of manuals |
Page 117 highlights
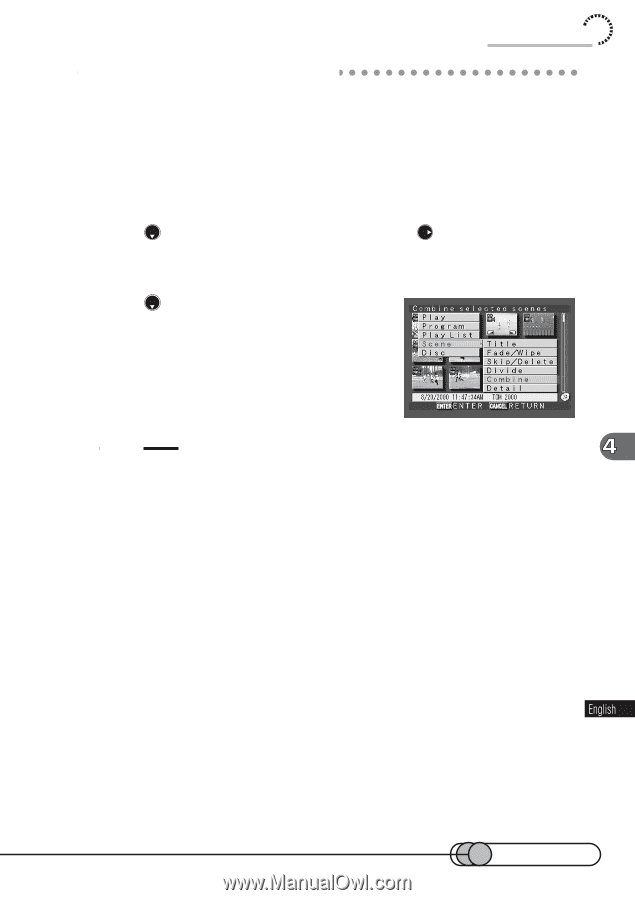
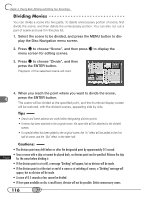
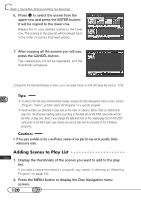
Using Disc Navigation C○ o○ m○ ○b○in○in○ g○ ○M○ u○ l○ti○p○le○ ○S○ce○ n○ e○s You can combine multiple scenes into one, and you can also combine divided scenes to restore the original scene. Be sure to select multiple scenes when combining. 1. Select multiple scenes by specifying the range, and then press the MENU button to display the Disc Navigation menu screen. 2. Press to choose "Scene", and then press to display the menu screen for editing scenes. 3. Press to choose "Combine", and then press the ENTER button. The selected movies will be combined into one, and the thumbnail display screen will be restored: Only the first image of the first movie before combining will appear. Tips: • If memo has been attached to one of the original scenes, the same title will be attached to the combined scene. If different memos have been attached, the title of the first scene will be chosen. • With special effects, the "in" effect of the first scene in the selected range and the "out" effect of the last scene will be chosen. • If movies sandwiching stills are to be combined, create a play list of only the movies to be combined, and then combine them. 117
-
 1
1 -
2
-
3
-
4
-
5
-
6
-
7
-
8
-
9
-
10
-
11
-
12
-
13
-
14
-
15
-
16
-
17
-
18
-
19
-
20
-
21
-
22
-
23
-
24
-
25
-
26
-
27
-
28
-
29
-
30
-
31
-
32
-
33
-
34
-
35
-
36
-
37
-
38
-
39
-
40
-
41
-
42
-
43
-
44
-
45
-
46
-
47
-
48
-
49
-
50
-
51
-
52
-
53
-
54
-
55
-
56
-
57
-
58
-
59
-
60
-
61
-
62
-
63
-
64
-
65
-
66
-
67
-
68
-
69
-
70
-
71
-
72
-
73
-
74
-
75
-
76
-
77
-
78
-
79
-
80
-
81
-
82
-
83
-
84
-
85
-
86
-
87
-
88
-
89
-
90
-
91
-
92
-
93
-
94
-
95
-
96
-
97
-
98
-
99
-
100
-
101
-
102
-
103
-
104
-
105
-
106
-
107
-
108
-
109
-
110
-
111
-
 112
112 -
 113
113 -
 114
114 -
 115
115 -
 116
116 -
 117
117 -
 118
118 -
 119
119 -
 120
120 -
 121
121 -
 122
122 -
123
-
124
-
125
-
126
-
127
-
128
-
129
-
130
-
131
-
132
-
133
-
134
-
135
-
136
-
137
-
138
-
139
-
140
-
141
-
142
-
143
-
144
-
145
-
146
-
147
-
148
-
149
-
150
-
151
-
152
-
153
-
154
-
155
-
156
-
157
-
158
-
159
-
160
-
161
-
162
-
163
-
164
-
165
-
166
-
167
-
168
-
169
-
170
 |
 |