Hitachi DZ-MV100A Owners Guide - Page 97
On-Screen Information During Playback, Switching On-screen Information Display On or Off
 |
View all Hitachi DZ-MV100A manuals
Add to My Manuals
Save this manual to your list of manuals |
Page 97 highlights
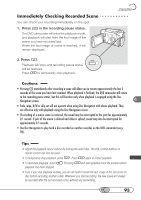
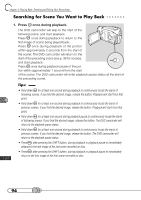
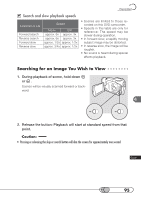
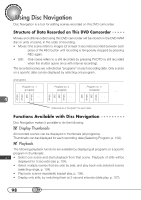
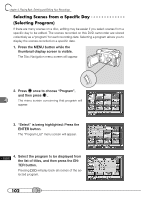
Playing Back O○ ○n○-S○c○r○ee○ n○ ○In○ f○o○r○m○a○t○io○n○ ○D○u○ri○n○g○ P○ l○a○y○b○a○c○k Various types of information on recording will be superimposed on playback picture you are viewing in the viewfinder or on the LCD screen. Playback status: Playback Play pause Fast forward Fast back Forward slow Reverse slow Skipping to following scene Skipping to preceding scene Frame advance Frame back First image of first scene Last image of last scene Recording mode : Movie : Still Repeat play Slide play Battery remaining level Adjusting *Adjusting LCD volume brightness (Only the remaining level warning will appear.) Time when recording started Division of scene Memo of scene being played back Selection of range Date when recording started *Adjust the playback sound volume by turning the Select dial. The VOL control buttons on remote control can also be used. Switching On-screen Information Display On or Off You can switch the mode for displaying on-screen information during playback: • Display OFF: Only division of scene, selection of range, first image of first scene, and last image of last scene will appear. • Partial display: Only division of scene, selection of range and playback status will appear. The playback indicator will light for approximately 3 seconds. • Display ON: All information will appear. 1. Press the DISPLAY button. Pressing the button will switch the options as follows: The setting of on-screen information display will be held in memory even after the DVD camcorder is turned off. Display OFFɹɹɹPartial displayɹɹɹDisplay ON DISPLAY 97
-
 1
1 -
2
-
3
-
4
-
5
-
6
-
7
-
8
-
9
-
10
-
11
-
12
-
13
-
14
-
15
-
16
-
17
-
18
-
19
-
20
-
21
-
22
-
23
-
24
-
25
-
26
-
27
-
28
-
29
-
30
-
31
-
32
-
33
-
34
-
35
-
36
-
37
-
38
-
39
-
40
-
41
-
42
-
43
-
44
-
45
-
46
-
47
-
48
-
49
-
50
-
51
-
52
-
53
-
54
-
55
-
56
-
57
-
58
-
59
-
60
-
61
-
62
-
63
-
64
-
65
-
66
-
67
-
68
-
69
-
70
-
71
-
72
-
73
-
74
-
75
-
76
-
77
-
78
-
79
-
80
-
81
-
82
-
83
-
84
-
85
-
86
-
87
-
88
-
89
-
90
-
91
-
 92
92 -
 93
93 -
 94
94 -
 95
95 -
 96
96 -
 97
97 -
 98
98 -
 99
99 -
 100
100 -
 101
101 -
 102
102 -
103
-
104
-
105
-
106
-
107
-
108
-
109
-
110
-
111
-
112
-
113
-
114
-
115
-
116
-
117
-
118
-
119
-
120
-
121
-
122
-
123
-
124
-
125
-
126
-
127
-
128
-
129
-
130
-
131
-
132
-
133
-
134
-
135
-
136
-
137
-
138
-
139
-
140
-
141
-
142
-
143
-
144
-
145
-
146
-
147
-
148
-
149
-
150
-
151
-
152
-
153
-
154
-
155
-
156
-
157
-
158
-
159
-
160
-
161
-
162
-
163
-
164
-
165
-
166
-
167
-
168
-
169
-
170
 |
 |
