Hitachi DZ-MV270A Owners Guide - Page 25
With disc packed in caddy
 |
View all Hitachi DZ-MV270A manuals
Add to My Manuals
Save this manual to your list of manuals |
Page 25 highlights
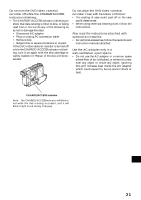
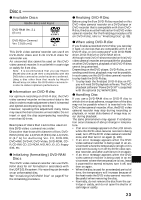
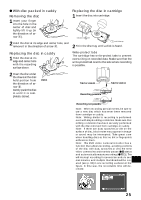
G With disc packed in caddy Removing the disc 1 Insert your finger into the hole in the center of disc and lightly lift it up (in the direction of arrow 1). 2 Hold the disc at its edge and center hole, and remove it in the direction of arrow 2. Replacing the disc in caddy 1 Hold the disc at its edge and center hole with the recording surface down. Replacing the disc in cartridge 1 Insert the disc into cartridge. SIDE A Indication of side mark facing up 2 Fit in the disc tray until a click is heard. Write-protect tabs The cartridge has write-protect tabs to prevent overwriting on recorded data. Make sure that the write-protect tab is set to the side where recording is possible. 2 Insert the disc under the claws at the disc hold portion from the direction of arrow 3. Gently push the disc in until it is completely stored. claws Tab for side B PROTECT A Tab for side A PROTECT A Recording possible PROTECT A Recording not possible Note: When recording special events, be sure to use a new disc which has never been removed from cartridge or caddy. Note: Writing similar to recording is performed even with simple editing or deletion. Make sure that editing or deletion has been securely performed with the disc removed from cartridge or caddy. Note: If there are dust, scratches or dirt on the surface of disc, block noise may appear in image or sound may be interrupted. Take great care when handling discs so that no dirt or fingerprints adheres to them. Note: This DVD video camera/recorder has a function that allows recording, avoiding portions of the disc with dust, scratches or dirt [The DVD video camera/recorder sets to pause ( ) status and automatically restarts recording ( )]. This will interrupt recording for several seconds to several minutes, and multiple thumbnails will be cre- English ated (see p. 66) in one recording as shown in the figure. In this case, the recordable time will de- crease. 25
-
 1
1 -
2
-
3
-
4
-
5
-
6
-
7
-
8
-
9
-
10
-
11
-
12
-
13
-
14
-
15
-
16
-
17
-
18
-
19
-
 20
20 -
 21
21 -
 22
22 -
 23
23 -
 24
24 -
 25
25 -
 26
26 -
 27
27 -
 28
28 -
 29
29 -
 30
30 -
31
-
32
-
33
-
34
-
35
-
36
-
37
-
38
-
39
-
40
-
41
-
42
-
43
-
44
-
45
-
46
-
47
-
48
-
49
-
50
-
51
-
52
-
53
-
54
-
55
-
56
-
57
-
58
-
59
-
60
-
61
-
62
-
63
-
64
-
65
-
66
-
67
-
68
-
69
-
70
-
71
-
72
-
73
-
74
-
75
-
76
-
77
-
78
-
79
-
80
-
81
-
82
-
83
-
84
-
85
-
86
-
87
-
88
-
89
-
90
-
91
-
92
-
93
-
94
-
95
-
96
-
97
-
98
-
99
-
100
-
101
-
102
-
103
-
104
-
105
-
106
-
107
-
108
-
109
-
110
-
111
-
112
-
113
-
114
 |
 |
