Hitachi DZ-MV270A Owners Guide - Page 37
Inserting and Ejecting Disc
 |
View all Hitachi DZ-MV270A manuals
Add to My Manuals
Save this manual to your list of manuals |
Page 37 highlights
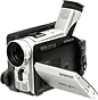
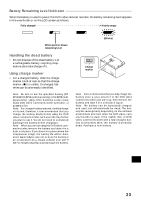
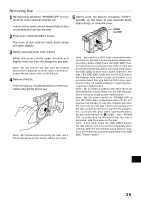
Inserting and Ejecting Disc Inserting Disc With this DVD video camera/recorder the recorded video and audio are stored on DVD-RAM* or DVD-R disc. * When using an uninitialized DVD-RAM disc, it must be formatted (see p. 87). 1 Make sure that the DVD video camera/ recorder is turned off. Set the power switch to "POWER OFF". 2 Press down the DISC EJECT button. The cover of disc insertion block (hand strap) will slightly open. Power switch 3 Gently open the cover by hand until it stops. DISC EJECT button How to set both-side recordable disc •The actual recording surface of side [A] is op- posite to that on which "SIDE A" is marked. If you view the image recorded on side [A] on another device, set the disc in it with indication "SIDE A" facing up. ASide A indication of disc Laser Actual recording surface •The cartridge has a fixed orientation when it is inserted into the DVD video camera/recorder: Insert it correctly referring to the illustration shown below. To record on side [B], turn the cartridge over. 4 Insert the disc, in cartridge or caddy, into the disc guide. Set a both-side recordable disc into the disc guide so that the label of side on which you want to record faces the hand strap. How to set one-side recordable disc • Set the disc with the label side up in the caddy, and then insert the caddy correctly referring to the illustration shown below. The caddy has a mark: Insert it with this mark forward. English 37
-
 1
1 -
2
-
3
-
4
-
5
-
6
-
7
-
8
-
9
-
10
-
11
-
12
-
13
-
14
-
15
-
16
-
17
-
18
-
19
-
20
-
21
-
22
-
23
-
24
-
25
-
26
-
27
-
28
-
29
-
30
-
31
-
 32
32 -
 33
33 -
 34
34 -
 35
35 -
 36
36 -
 37
37 -
 38
38 -
 39
39 -
 40
40 -
 41
41 -
 42
42 -
43
-
44
-
45
-
46
-
47
-
48
-
49
-
50
-
51
-
52
-
53
-
54
-
55
-
56
-
57
-
58
-
59
-
60
-
61
-
62
-
63
-
64
-
65
-
66
-
67
-
68
-
69
-
70
-
71
-
72
-
73
-
74
-
75
-
76
-
77
-
78
-
79
-
80
-
81
-
82
-
83
-
84
-
85
-
86
-
87
-
88
-
89
-
90
-
91
-
92
-
93
-
94
-
95
-
96
-
97
-
98
-
99
-
100
-
101
-
102
-
103
-
104
-
105
-
106
-
107
-
108
-
109
-
110
-
111
-
112
-
113
-
114
 |
 |
