Hitachi DZ-MV270A Owners Guide - Page 80
Scene
 |
View all Hitachi DZ-MV270A manuals
Add to My Manuals
Save this manual to your list of manuals |
Page 80 highlights
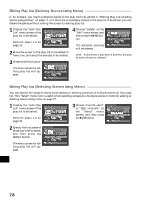
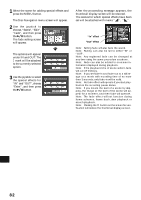
Scene Deleting Scenes 1 3 Use the joystick to select the scene to be deleted, Use the joystick to choose "YES", and then press and then press the MENU button. the button. The Disc Navigation menu screen will appear. 2 Use the joystick to choose "Delete" on the "Scene" menu screen, and then press the button. The message "Deleting..." → "Finished" will appear and the selected scene will be deleted, after which the thumbnail display screen will be restored. To cancel deletion, choose "NO", and then press the button while the screen for verification is being displayed. The screen for verifying deletion will appear. Note: Pressing the button on the screen for verification will restore the thumbnail display screen. Note: If you wish to delete multiple scenes, select them referring to "Selecting Consecutive Scenes Together" or "Selecting Random Scenes" on page 70. Note: If you delete all data on disc, initializing the disc will be r ecommended (see p. 87). Note: If even one play list has been created, message "Same scenes on PlayList will be deleted. Delete scenes?" will appear before deleting scene(s). This message will appear even if the scene(s) to be deleted is not used in the corresponding play list. In this case, choose "YES" and then press the button to delete the scene(s). Note: If the time of deleted scenes (stills) is quite short, the remaining free space of disc may not increase in the time remaining indicator. English 80
-
 1
1 -
2
-
3
-
4
-
5
-
6
-
7
-
8
-
9
-
10
-
11
-
12
-
13
-
14
-
15
-
16
-
17
-
18
-
19
-
20
-
21
-
22
-
23
-
24
-
25
-
26
-
27
-
28
-
29
-
30
-
31
-
32
-
33
-
34
-
35
-
36
-
37
-
38
-
39
-
40
-
41
-
42
-
43
-
44
-
45
-
46
-
47
-
48
-
49
-
50
-
51
-
52
-
53
-
54
-
55
-
56
-
57
-
58
-
59
-
60
-
61
-
62
-
63
-
64
-
65
-
66
-
67
-
68
-
69
-
70
-
71
-
72
-
73
-
74
-
 75
75 -
 76
76 -
 77
77 -
 78
78 -
 79
79 -
 80
80 -
 81
81 -
 82
82 -
 83
83 -
 84
84 -
 85
85 -
86
-
87
-
88
-
89
-
90
-
91
-
92
-
93
-
94
-
95
-
96
-
97
-
98
-
99
-
100
-
101
-
102
-
103
-
104
-
105
-
106
-
107
-
108
-
109
-
110
-
111
-
112
-
113
-
114
 |
 |
